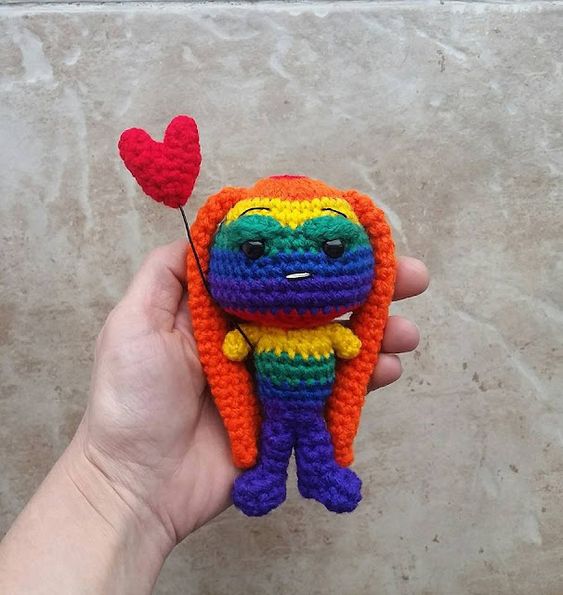
Crochet Beautiful Bunny
Crocheting a beautiful bunny is not only a fun and fulfilling activity but also a great way to add a touch of charm to your crafting projects. The soft yarn, delicate stitches, and cute bunny shape all come together to create a lovable handmade toy or decoration. Whether you're a seasoned crocheter or just starting out, crafting your own bunny can be a delightful experience that allows you to express your creativity and create something unique. With a little patience and creativity, you can bring your bunny to life, giving it character and personality. So grab your yarn, crochet hook, and let's get ready to make a hoppy little friend together!
Abbreviations
Patons Astra yarn in red, orange, yellow, green, blue and purple
8mm safety eyes
Embroidery thread for the mouth and eyebrows
Finished Size
5 inches
Head and Body
Rnd1: Starting at the top of your bunny's head with red yarn sc x 6 in an adjustable ring (6)
Rnd2: Inc x 6 (12)
Rnd3: Switch to orange yarn and inc x 12 (24)
Rnd4: [Sc, inc] x 12 (36)
Rnd5: Switch to yellow yarn and sc x 36 (36)
Rnd6: Sc x 36 (36)
Rnd7: Switch to green yarn and sc x 36 (36)
Rnd8: You will be adding the safety eyes in this round, sc x 15, put a safety eye in the last stitch you just did, sc x 6, place your second safety eye in the last stitch you just did, sc x 15 (36)
Rnd9: Switch to blue yarn and sc x 36 (36)
Rnd10: Sc x 36 (36)
Rnd 11: Switch to purple yarn and sc x 36 (36)
Rnd12: Sc x 36 (36)
Rnd13: Switch to red yarn and sc x 36 (36)
Rnd14: Dec x 18 (18)
Rnd15: Stuff your bunny from this point on as you work, switch to orange yarn and dec x 9 (9)
Rnd16: Sc x 9 (9)
Rnd17: Switch to yellow yarn and inc x 9 (18)
Rnd18: Sc x 18 (18)
Rnd19: Switch to green yarn and sc x 18 (18)
Rnd20: Sc x 18 (18)
Rnd21: Switch to blue yarn and [sc x 4, dec] x 3 (15)
Rnd22: Sc x 15 (15)
Rnd23: Sc, switch to purple yarn and sc x 14 (15)
Rnd24: Sc, dec x 7 (8)
Rnd25: Dec x 4, fo (4)
Arm (Make 2)
Rnd1: Staring at the tip of your arm with yellow yarn sc x 6 in an adjustable ring (6)
Rnd2-4: Sc x 6, fo at the end of Rnd 4 (6)
Leg (Make 2)
Rnd: Starting at the top of your leg with purple yarn ch x 5 and join (5)
Rnd2-5: Sc x 5 (5)
Row6-7: Turn, ch, sc x 2 (2)
Rnd8: Do not turn, sc around the entire foot, fo
Sole Of Foot (Make 2)
Row1: With purple yarn ch x 3 (3)
Row2: Turn, sc x 2 (2)
Row3-4: Turn, ch, sc x 2, fo at the end of Row4 (2)
Eyelid (Make 2)
Row1: With green yarn ch x 5 (5)
Row2: Turn, sc x 4, fo (4)
Ear (Make 2)
Rnd1: Starting at the tip of the ear with orange yarn sc x 6 in an adjustable ring (6)
Rnd2-3: Sc x 6 (6)
Rnd4: [Sc, inc] x 3 (9)
Rnd5-10: Sc x 9 (9)
Rnd11: Dec, sc x 7 (8)
Rnd12-15: Sc x 8 (8)
Rnd16: Dec, sc x 6 (7)
Rnd17-19: Sc x 7 (7)
Rnd20: Dec, sc x 5 (6)
Rnd21: Sc x 6 (6)
Rnd22: Dec, sc x 4 (5)
Rnd23-26: Sc x 5, fo at the end of Rnd26 (5)
Heart Balloon
Rnd1: With red yarn sc x 5 in an adjustable ring (5)
Rnd2: Sc x 5 (5)
Rnd3: Inc, sc x 4 (6)
Rnd4: Sc x 6 (6)
Fo at this point. Now create a second piece following the instructions again from Rnd1-4....but DO NOT fo. Hold both pieces together and continue on to Rnd 5 below.
Rnd5: Sc around both pieces x 13 (13)
Rnd6: [Sc x 4, dec] x 2, sc (11)
Rnd7: [Sc x 3, dec] x 2, sc (9)
Rnd8: Dec x 4, sc (5)
Rnd9: Dec x 2, fo (2)
Assembly
Sew the arms and legs onto your bunny, sew the soles onto the bottom of the feet. Sew the eyelids on, sew on a mouth and eyebrows. Weave in all ends and trim them.