Crochet Snow Cone
Have you heard about the delightful crochet snow cones popping up in the crafting world? These charming creations are not only eye-catching but also a fun and whimsical addition to any crochet collection. With their colorful yarn and intricate details, crochet snow cones bring a touch of winter magic year-round. Whether you're a seasoned crocheter looking for a new project or just starting out in the world of yarn crafts, making a crochet snow cone is a sweet and cheerful way to get creative. So grab your crochet hook, pick out some bright yarn colors, and let's whip up a frosty treat together!
MATERIALS
- Hobbii “Toucan” super bulky weight #6 yarn [100% polyester, 131 yards/ 120 m per 100g skein]; colors: Ecru (02), Light Purple (17), Pastel Yellow (05), Cotton Candy (16)
- Premier “Parfait Chunky” super bulky weight #6 yarn [100% polyester, 131 yards/ 120 m per 100g skein]; colors: Lagoon/Blue, Key Lime/Green, Coral
- US size 8 (5 mm) crochet hook
- (2) 14mm safety eyes
- Polyfill
- Scissors
- (2) Stitch markers
- Tapestry needle
PATTERN NOTES
- This pattern is written in US terms and Imperial measurements.
- Pattern is worked from the bottom up.
- Pattern is worked in continuous rounds without joining unless otherwise stated.
- Use a stitch marker to mark the beginning of round. Move the marker up each round.
Change Color: to change color, insert hook into stitch and pull up a loop, complete stitch by pulling new color through both loops on hook.
ABBREVIATIONS
[ ] – Repeat
BLO – Back loop only
FLO – Front loop only
FO – Fasten Off
inc – 2 sc in same stitch
sc – single crochet
sl st – slip stitch
st(s) – stitch(es)
PATTERN INSTRUCTIONS
With Cream,
Round 1 – sc 6 in a magic ring (6)
Round 2 – sc around (6)
Round 3 – [inc] 6 times (12)
Round 4 – sc around (12)
Round 5 – [sc 1, inc] 6 times (18)
Round 6 – sc around (18)
Round 7 – [sc 2, inc] 6 times (24)
Round 8 – sc around (24)
Round 9 – [sc 3, inc] 6 times (30)
Round 10 – sc around (30)
Use a st marker to mark first BLO of R10
Round 11 – FLO sc around (30)
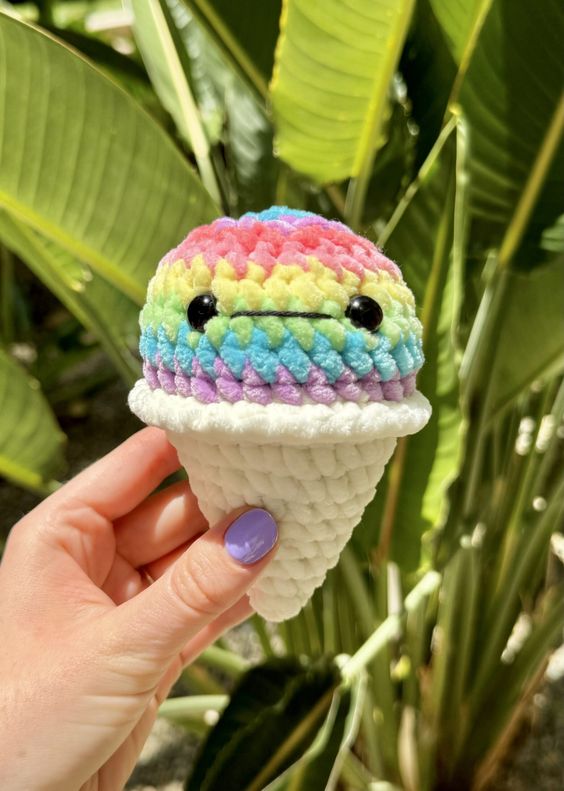
Now comes the fun part! Change the colors to create any flavor of snow cone you’d like. Continue following the instructions to make the snow cone pictured above.
In last st of R11, change color to Purple
R12 is worked into the BLO of R10 where st marker was placed
Round 12 – BLO sc around (30)
In last st of R12, change color to Blue
Round 13 – sc around (30)
In last st of R13, change color to Green
Round 14 – sc around (30)
In last st of R14, change color to Yellow
Round 15 – sc around (30)
In last st of R15, change color to Pink
Round 16 – [sc 3, inv dec] 6 times (24)
In last st of R16, change color to Coral
Begin stuffing
Round 17 – [sc 2, inv dec] 6 times (18)
In last st of R17, change color to Purple
Place safety eyes between rounds 14-15, 5 sts apart
Round 18 – [sc 1, inv dec] 6 times (12)
In last st of R18, change color to Blue
Finish stuffing
Round 19 -[inv dec] 6 times
FO, leaving an 8 in (20 cm) tail for closing. To close hole, using tapestry needle and tail, insert needle into FLO of each stitch of round 19. Pull tail to close and weave in ends.