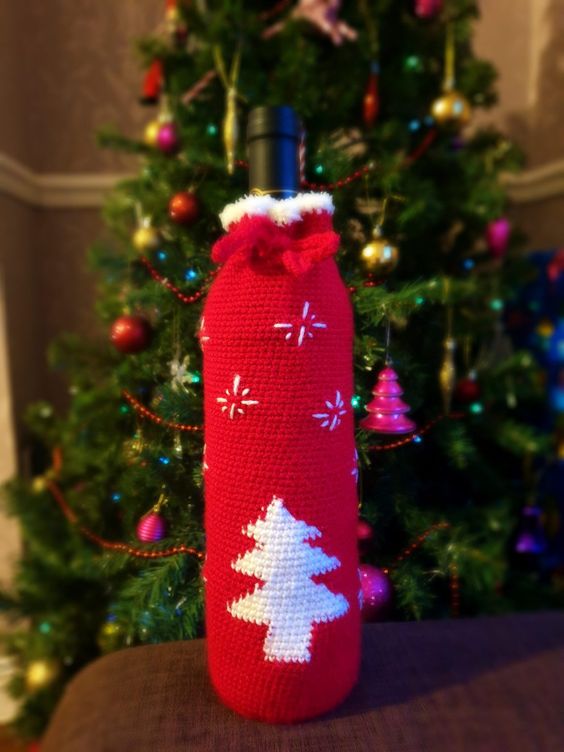
Crochet Bottle Cover for Christmas
Crochet bottle covers for Christmas add a personal and festive touch to your holiday decorations. With their charming designs and warm textures, these handmade covers make for adorable gifts or cute additions to your own home. Whether you opt for traditional red and green colors or get creative with unique patterns, each cover becomes a labor of love that brings joy and coziness to the season. As you crochet away, envisioning how these whimsical covers will brighten up your bottles and spread holiday cheer, remember that the magic truly lies in the thought and effort put into each stitch. So, grab your hooks and yarn, and get ready to add a sprinkle of handmade charm to your Christmas celebrations!
Materials you will need:
- Yarn in red and white colours (I used DK yarn)
- Fluffy white yarn for last 2 rows, I used Shachenmayr Baby Smiles yarn
- 3mm crochet hook (or your preferred size)
- Scissors
- Tapestry needle
- Stitch markers
- Wine bottle for fitting.
Abbreviations:
SC – single crochet
ST – stitch
SL ST – slip stitch
CH – chain
INC – increase
Crochet bottle cover base
Round 1: 8 sc in magic ring [8]
Round 2: (inc) repeat 8 times [16]
Round 3: (sc in next st, inc) repeat 8 times [24]
Round 4: (sc in next 2 st, inc) repeat 8 times [32]
Round 5: (sc in next 3 st, inc) repeat 8 times [40]
Round 6: sc in next 2 st, inc, (sc in next 4 st, inc) repeat 7 times, sc in next 2 st [48]
Round 7: (sc in next 5 st, inc) repeat 8 times [56]
Round 8: (crochet in back loops only) sc in all 56 st [56]
Round 9-18(10 rounds): sc in all 56 st [56]
Now we will start adding white colour.
Round 19-24(6 rows): sc in next 10 st in RED, sc in next 6 st in WHITE, sc in next 40 st in RED [56]
Round 25: sc in next 3 st in RED, sc in next 20 st in WHITE, sc in next 33 st in RED [56]
Round 26: sc in next 4 st in RED, sc in next 18 st in WHITE, sc in next 34 st in RED [56]
Round 27: sc in next 5 st in RED, sc in next 16 st in WHITE, sc in next 35 st in RED [56]
Round 28: sc in next 6 st in RED, sc in next 14 st in WHITE, sc in next 36 st in RED [56]
Round 29: sc in next 7 st in RED, sc in next 12 st in WHITE, sc in next 37 st in RED [56]
Round 30: sc in next 8 st in RED, sc in next 10 st in WHITE, sc in next 38 st in RED [56]
Round 31: sc in next 9 st in RED, sc in next 8 st in WHITE, sc in next 39 st in RED [56]
Round 32: sc in next 10 st in RED, sc in next 6 st in WHITE, sc in next 40 st in RED [56]
Round 33: sc in next 5 st in RED, sc in next 16 st in WHITE, sc in next 35 st in RED [56]
Round 34: sc in next 6 st in RED, sc in next 14 st in WHITE, sc in next 36 st in RED [56]
Round 35: sc in next 7 st in RED, sc in next 12 st in WHITE, sc in next 37 st in RED [56]
Round 36: sc in next 8 st in RED, sc in next 10 st in WHITE, sc in next 38 st in RED [56]
Round 37: sc in next 9 st in RED, sc in next 8 st in WHITE, sc in next 39 st in RED [56]
Round 38: sc in next 10 st in RED, sc in next 6 st in WHITE, sc in next 40 st in RED [56]
Round 39: sc in next 7 st in RED, sc in next 12 st in WHITE, sc in next 37 st in RED [56]
Round 40: sc in next 8 st in RED, sc in next 10 st in WHITE, sc in next 38 st in RED [56]
Round 41: sc in next 9 st in RED, sc in next 8 st in WHITE, sc in next 39 st in RED [56]
Round 42: sc in next 10 st in RED, sc in next 6 st in WHITE, sc in next 40 st in RED [56]
Round 43: sc in next 11 st in RED, sc in next 4 st in WHITE, sc in next 41 st in RED [56]
Round 44: sc in next 12 st in RED, sc in next 2 st in WHITE, sc in next 42 st in RED [56]
From round 45 we are finishing with white colour and continue working only in red.
Round 45-84(40 rounds): sc in all 56 st [56]
In round 85 we are going to make little holes for the thread which we are going to insert at the end of our little project. When round 85 is done you must have 7 little holes.
Round 85: (sc in next 5 st, ch 3, skip 3 sc) repeat 7 times [56]
Round 86-92 (7 rounds): sc in all 56 st [56]
Last 2 rounds I made out of fluffy white yarn, I used Schachenmayr Hand Knitting Yarns Baby Smiles. If you want, you can skip this step, but it adds final Christmassy touch to our crochet bottle cover.
Round 92-93 (2 rounds): sc in all 56 st [56]
Finish off with sl st and hide the end.
Decoration
One of the final steps will be decoration of our crochet bottle cover with snowflakes. I used tapestry needle with white yarn, but you can use something else for decoration, or just leave it as it is. I just scattered snowflakes around the cover.
Thread for the cover
I made it out of red yarn. You can try using something else.
Row 1: ch of 70 sc [70]
Row 2: starting from 2nd ch, 69 sc [69]
Finish off with sl st and hide the end, afterwards insert in the little holes which we made in the round 85.
That’s it, our beautiful bottle cover is complete.