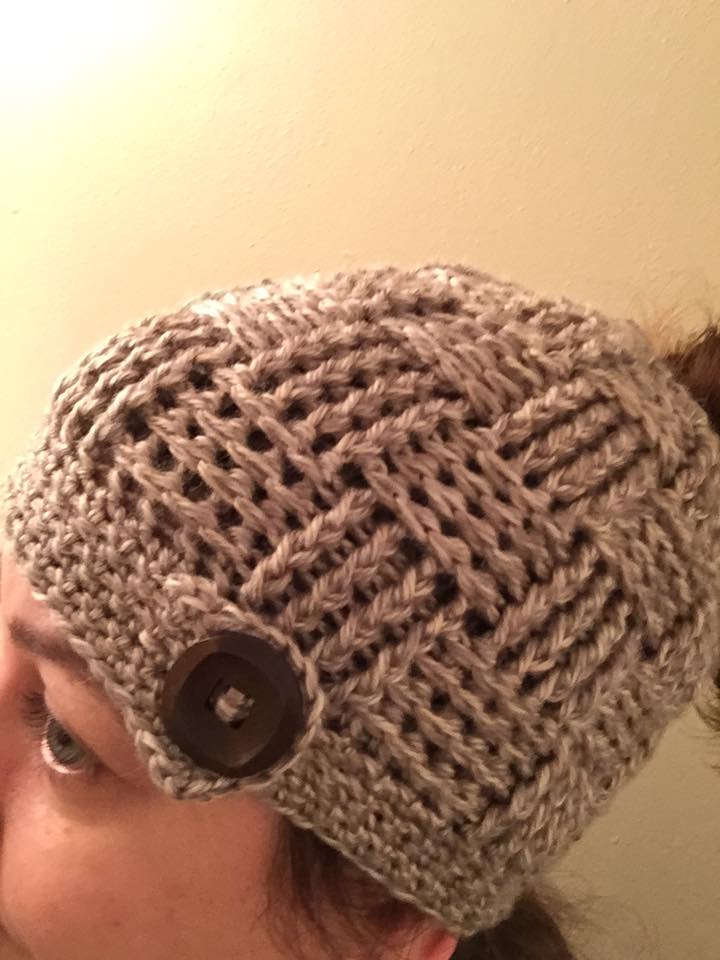
Crochet Fairfield Basket Weave Bun/Ponytail Beanie
The Crochet Fairfield Basket Weave Bun/Ponytail Beanie is a versatile and trendy addition to any winter wardrobe. With its unique design that allows for a bun or ponytail to peek through, this beanie combines style and functionality perfectly. The basket weave pattern adds a touch of texture and elegance, making it a fashionable accessory for any outfit. Whether you're heading out for a walk in the park or meeting friends for coffee, this beanie will keep you warm and looking fabulous. Say goodbye to bad hair days and hello to cozy chic with the Crochet Fairfield Basket Weave Bun/Ponytail Beanie!

Materials:
- 1 ball Lion Brand Heartland yarn in “Grand Canyon” or any similar weight yarn.
- H (5.0 mm) hook
- 1 30 mm button (optional)
- Yarn needle
- Scissors
Gauge:
Gauge isn’t critical, but your first 4 rounds should be a circle approximately 6” across.
Finished size:
One size fits most women, teen to adult
Increase hook size to increase size
Abbreviations:
- Ch
Additional notes:
Pattern is written in American terms.
This hat fits snug per my personal preference. If you prefer a looser fit go up in hook size or add an additional round of double crochet between rows 4 and 5, increasing another 8 stitches. All subsequent row counts would increase
Chain 2 at the beginning of each round does not count as a stitch throughout. When joining the round, slip stitch to the top of the first double crochet, not the chain 2.
Stitch count of each row listed in ( ).
Button and button flap are decorative and not functional. If you prefer a flat band without the button flap, instructions will follow at the end of the pattern,
Ch 24. Sl st to first st in chain, forming a ring.Ch 2
Row 1: DC 32 into ring. Sl to top of 1st DC to join. Ch 2. (32)
Row 2: DC in first 3 sts. 2 DC in next st. *DC in next 3 sts. 2 DC in next st* repeat around. Sl st to top of first DC. Chain 2. (40)
Row 3: DC in first 4 sts. 2 DC in next st. *DC in next 4 sts. 2 DC in next st* repeat around. Sl st to top of first DC. Chain 2. (48)
Row 4: DC in first 5 sts. 2 DC in next st. *DC in next 5 sts. 2 DC in next st* repeat around. Sl st to top of first DC. Chain 2. (56)
Row 5: FPDC first 4 sts. BPDC next 4 sts. *FPDC next 4 sts. BPDC next 4 sts.* repeat around. Sl st to top of first FPDC. Chain 2. (56)
Rows 6-8: Repeat row 5
Row 9: BPDC first 4 sts. FPDC next 4 sts. *BPDC next 4 sts. FPDC next 4 sts.* repeat around.
Sl st to top of first BPDC. Chain 2. (56)
Rows 10-12: Repeat row 9 (56)
Rows 13-16: Repeat row 5 (56)
Rows 17-19: Repeat row 9 (56)
Row 20: repeat row 9 except chain 1 when finished instead of 2. (56)
Band. The following instructions are for the pictured band with button flap. You will begin working back and forth in rows instead of in rounds.
Row 21: SC in first 34 sts. Leave the rest of the sts unworked. Ch 7 and turn. (34 + ch 7)
Row 22: SC in the 2nd st from hook. SC in each of the next 5 chains, the 34 SC from the previous row and the unworked stitches from row 20. Ch 1 and turn (62)
Rows 23-26: SC across. Ch 1 and turn. (62)
Row 27: SC across to last stitch. SC 2 more into the same stitch. SC evenly up the side edge of the button flap. SC 2 more into corner and SC across the top of button flap. Finish off and weave in ends. Sew button through button flap and band behind it, making sure bottom edges are even.
For plain band
Rows 21-26: SC in each stitch around. Join to top of first st with sl st. Ch 1. (56)
Finish off and weave in ends.