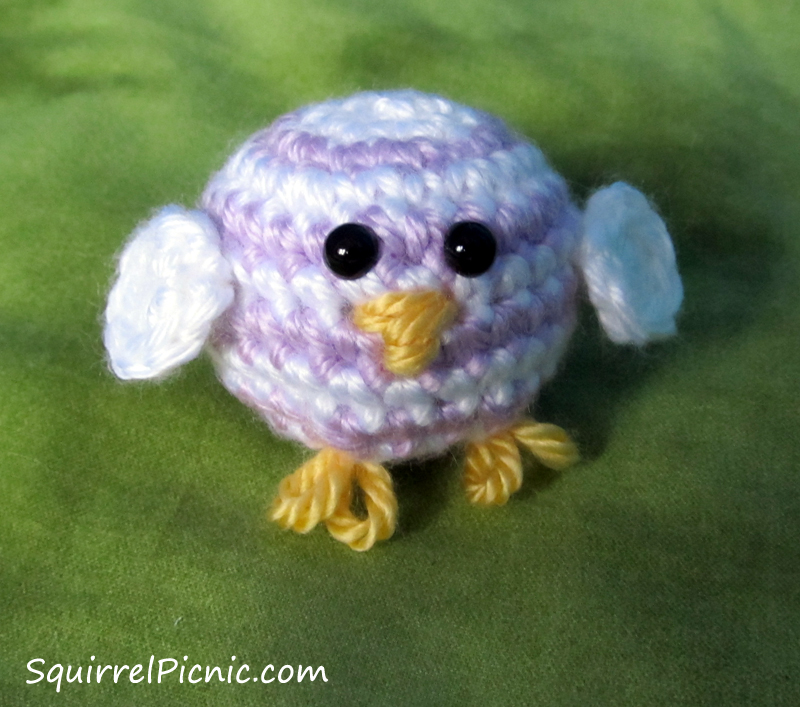
Crochet Baby Rainbow Chic
Crochet Baby Rainbow Chic designs are not only adorable but also bring a burst of color and joy to your little one's wardrobe. The delicate craftsmanship and vibrant hues make these pieces a delightful addition to any baby's outfit. Whether it's a cozy rainbow hat, a charming pair of booties, or a snuggly blanket, each item is lovingly handmade with attention to detail. These crocheted creations are not only stylish but also practical, keeping your baby warm and snug. With the Baby Rainbow Chic collection, your little one is sure to stand out with playful elegance and undeniable sweetness. So, go ahead and dress your baby in these lovely crocheted pieces and watch them shine with colorful charm!

Finished size: 1 1/2″ tall and 5″ around at the widest point
Materials
small amount of worsted-weight yarn in white (Caron Simply Soft in White, 6 oz [170 g] / 315 yds [288 m])
small amount of worsted-weight yarn in purple (Caron Simply Soft in Orchid, 6 oz [170 g] / 315 yds [288 m])
small amount of worsted-weight yarn in yellow (Caron Simply Soft in Sunshine, 6 oz [170 g] / 315 yds [288 m])
F-5 (3.75 mm) crochet hook
1 set of size 6 mm safety eyes (if you are making this for a child, please embroider eyes)
Polyester Fiberfill
Tapestry needle
Gauge
5 sts = 1″
5 rows = 1″
Instructions
Body
Note for changing color: This chick is crocheted in joined rounds in order to create almost perfect jogless stripes. In other words, each round ends with “join with slst, ch 1.” On the rounds with a color change, join with slst as usual, but use the next color to ch 1.
Of course, you could always fasten off each color and reattach the new color. This will give you a more precise stripe, but you’ll have to weave in some ends (or just tie them on the inside), which could be annoying… unless it’s your favorite part, then by all means, knock yourself out!
With white, ch 2
Rnd 1: 6 sc in 2nd ch from hook. (6)
Rnd 2: 2 sc in ea sc around, join with slst, switch to purple, ch 1. (12)
Rnd 3: * Sc, inc, rep from * 5 more times, join with slst, switch to white, ch 1. (18)
Rnd 4: * 2 sc, inc, rep from * 5 more times, join with slst, switch to purple, ch 1. (24)
Rnd 5: Sc in ea sc around, join with slst, switch to white, ch 1.
Rnd 6: Sc in ea sc around, join with slst, switch to purple, ch 1.
Rnds 7-8: Rep rnds 5-6.
Rnd 9: * 2 sc, dec, rep from * 5 more times, join with slst, switch to white, ch 1. (18)
Insert posts of safety eyes between stitches in Rnds 5 and 6 and pop on the backs to secure. Stuff chick firmly.
Rnd 10: * Sc, dec, rep from * 5 more times, join with slst, switch to purple, ch 1. (12)
Rnd 11: Dec 6 times, join with slst. FO, leaving a long tail. Using tapestry needle, thread this tail through the remaining sts and pull tight to close the hole. Weave in end.
Wings (Make 2)
With white, ch 2.
Rnd 1: In 2nd ch from hook: sc, hdc, 4 dc, hdc, sc. Join with slst. FO, leaving a long tail for sewing.
Sew wings to sides of the body.
Beak
Using yellow yarn, embroider a beak.
I made my beak by embroidering the outline of a triangle that points down. Then I threaded through the two bottom sides of the triangle twice to fill it in and hid the end inside the bird.
Feet
Thread tapestry needle with yellow yarn again and double it up. Insert the needle through the back of the bird (anywhere is fine) to a spot on the bottom (toward the front) where you want to position a foot. Pull the yarn so there’s only a few inches sticking out the back (we’ll take care of those in a bit).
Insert the needle back through this same hole in the bottom front of the bird and out through a corresponding hole on the other side at the bottom of the bird.
Pull through until the two loops are about a 1/4″ long.
Insert your needle back through the same hole you just came out of and thread it through to the back of the bird again (anywhere is fine). Pull through until the two loops on this side are about the same size as your first two loops.
Trim your yarn and push the ends inside the bird.