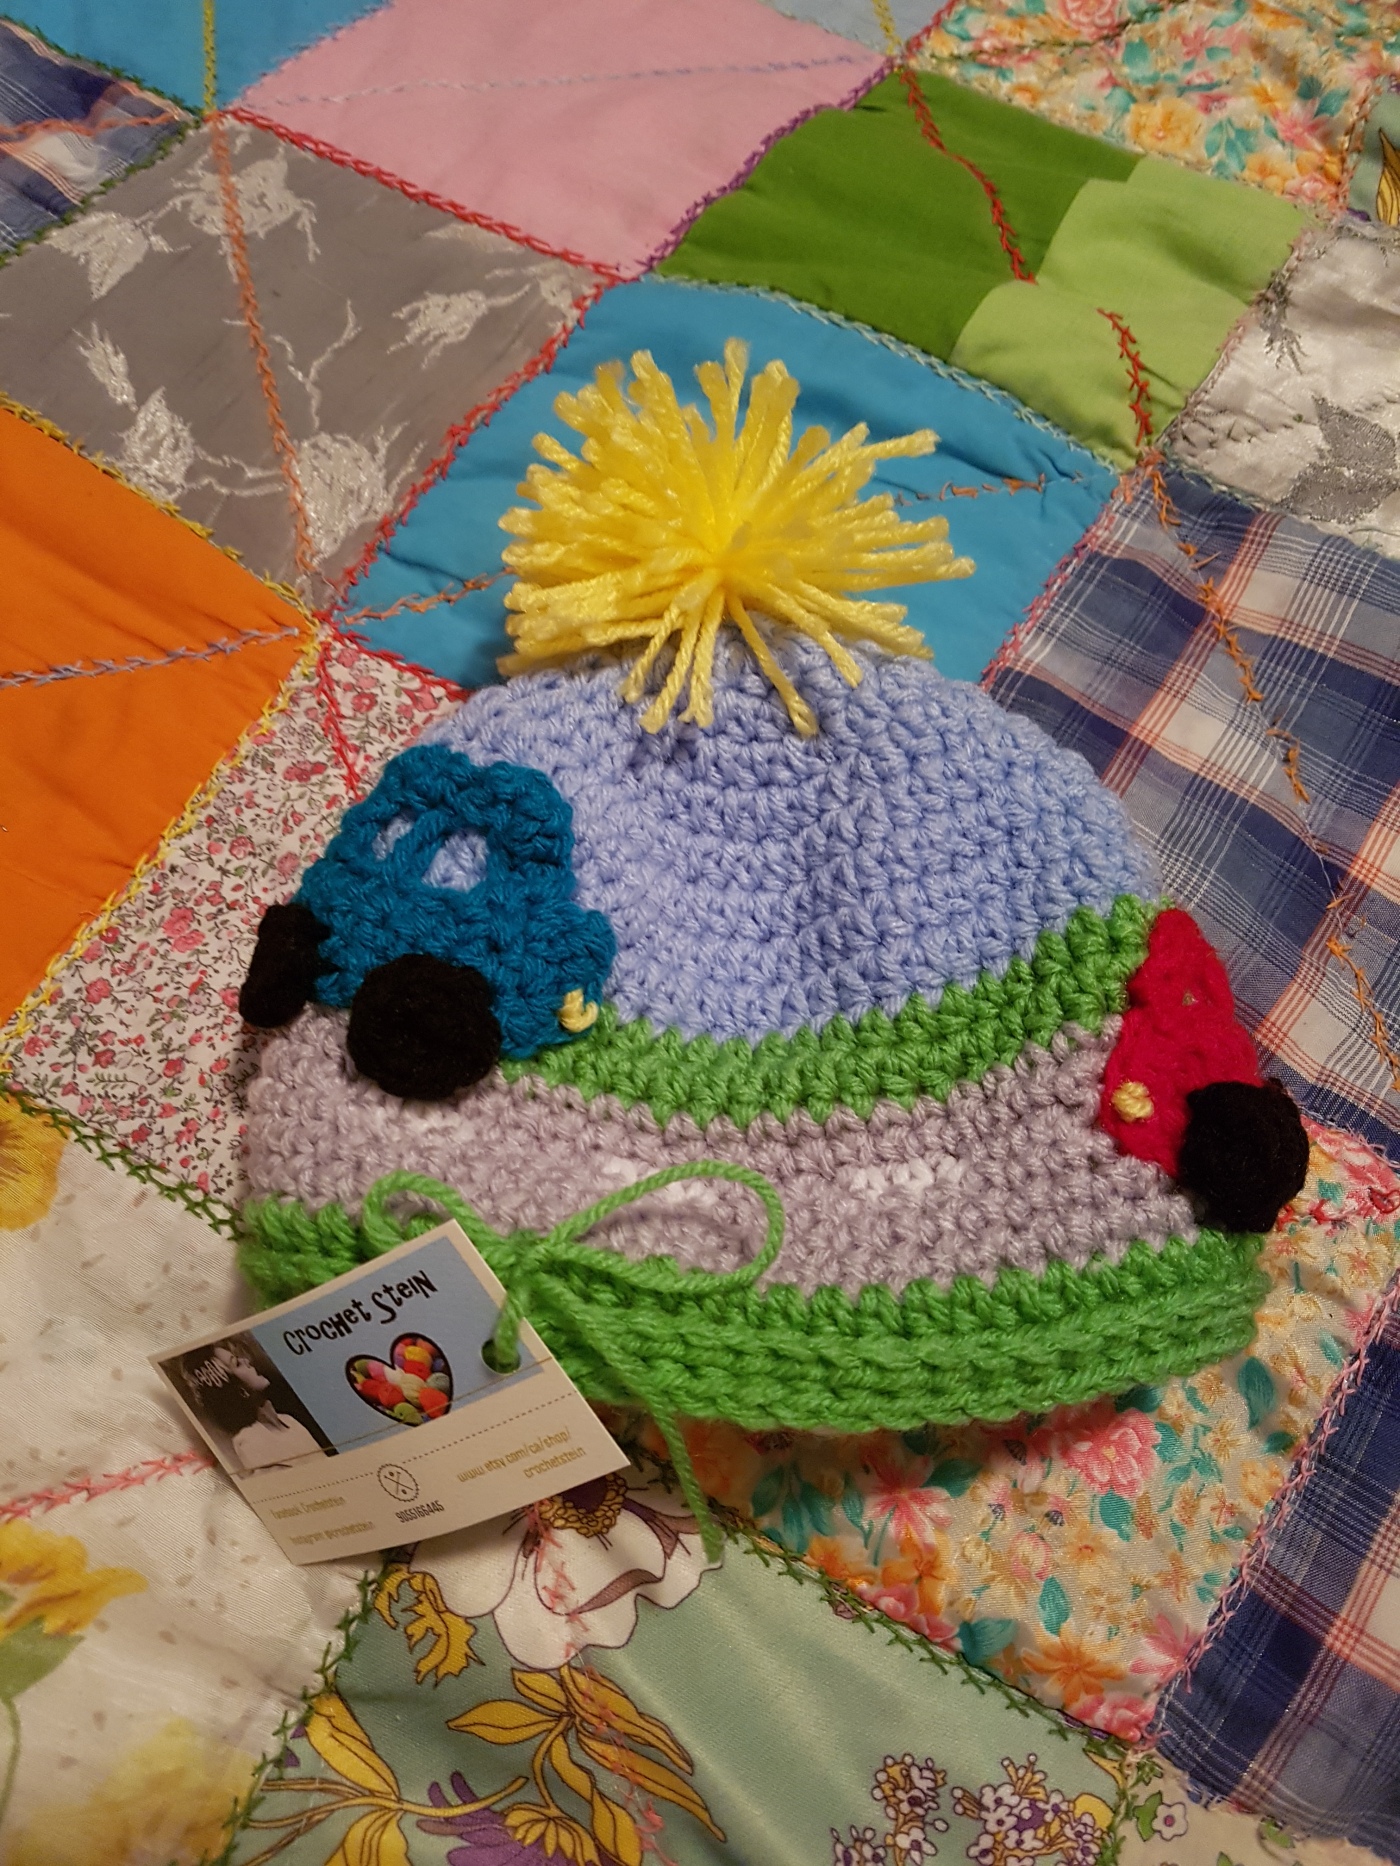
Crochet Infant Car Hat
Looking for the perfect accessory to keep your little one cozy and stylish during car rides? Look no further than the Crochet Infant Car Hat! This adorable hat is not only practical in keeping your baby warm but also adds a touch of cuteness to any outfit. With its soft yarn and comfortable fit, your baby will be all set for those breezy car trips. Get ready for smiles and compliments galore with this charming accessory that will surely make your car rides extra delightful!

Skill Level: Beginner/Intermediate
Materials:
Hook size 3.5 and 6
Yarn needle
Measuring tape for gauge if desired
Light blue medium worsted weight yarn
Light green medium worsted yarn
Light grey medium worsted weight yarn
white medium worsted weight yarn
Dark Red medium worsted weight yarn
Black medium worsted weight yarn
Dark blue medium worsted weight yarn
White Bulky yarn
Yellow medium worsted weight yarn
Techniques:
This hat is completed using both rounds and rows with single crochet and half double crochet stitches. You will also need to know how to do tapestry crochet
Abbreviations:
Rd = round
ch = chain
hk = hook
sl st = slip stitch
sc = single crochet
hdc = half double crochet
st = stitch
sc2tog = single crochet 2 stitches together to form 1 sc
Hat: working in continuous rounds with 3.5 hook
Rd 1: In light blue, ch 3, 8 hdc in 2nd ch from hk (8)
Rd 2: 2 hdc in each st around (16)
Rd 3: ( 2hdc, 1 hdc) repeat around (24)
Rd 4: (2hdc, 1 hdc in 2 st) repeat around (32)
Rd 5: (2hdc, 1 hdc in 3 st) repeat around (40)
Rd 6-9: hdc around (40)
Rd 10-11: Switch to green: hdc around (40)
Rd 12-13: NOTE – the road is worked in sc – Switch to grey: sc around (40)
Rd 14: this round uses tapestry crochet to add the white road line: (in grey, sc 3, in white sc 3) around (at the end or this rd, sc 2 of each colour instead of 3) (40) fasten off the white.
Rd 15-17: in grey, sc around (40)
Rd 18: In Green, hdc around (40)
Rd 19-20: In back bump only – hdc around (40), sl st and fasten off, leaving a long end to sew in the lining
Sun:
I made and attached a yellow pompom to represent the sunshine. I will explain how I did it, but I would recommend checking out a youtube video or picture tutorial if you are unfamiliar with pompom making.
- wind yellow yarn around three fingers until you have a thick consistency. Separate your fingers slightly while you are winding so you will be able to remove the yarn
- cut the yarn from the skein
- cut another strand of the same colour
- carefully remove the yarn from your fingers, making sure you do not lose the shape
- take your strand and tie it as tightly as possible in the middle
- you will have two looped sides on either side of the string you tied – cut the loops
- use your fingers to spread the yarn and fix the look of your pompom and trim if necessary
- sew onto the hat using the ends of the string you tied your pompom with
Car Applique: 3.5 hook in dark red
Row 1: ch 9, sc in 2nd ch from hk and in each ch across (8)
Row 2:, ch 1, turn, sc2tog, sc across (7)
Row 3: ch 1, turn, sc in 5 st, sct2tog (6)
Row 4: ch 6, skip st until the last st and sl st into place
Beginning a rd: ch 1, turn, sc into the same spot as the sl st, and into the chains, continuing around the entire car, working 3 sc into the bottom corners, sl st and fasten off, leaving a long end for sewing. Sew onto the road
Finishing the car applique:
Window: sew two strands of yarn to create a divide between the front and back windows of the car. Embroider a front headlight in yellow
Wheels (make 2): in black, ch 2, 8 sc in 2nd ch from hk, sl st closed. Fasten off and sew to the bottom of the car.
Truck Applique: 3.5 hook in dark blue
Row 1: ch 12, sc in 2nd ch from hk and in each ch across (11)
Row 2:, ch 1, turn, sc across (11)
Row 3: ch 1, turn, sc in 1 st, ch 12, skip 5 sc, sl st in next sc, ch 1, turn, sc in same st as sl st
Start a round here: sc in 12 chains and in each st around, working 3sc into each corner. Continue sc in the 12 sc (adding 3sc to each corner) and sc or hdc in 7 st of truck’s front. sl st and fasten off, leaving a long end for sewing. Sew onto the road
Finishing the truck applique:
Window: sew two strands of yarn to create a divide between the front and back windows of the car. Embroider a front headlight in yellow
Wheels (make 2): in black, ch 2, 8 sc in 2nd ch from hk, sl st closed. Fasten off and sew to bottom of car.
Hat Lining: with chucky white yarn and 6.0 hook:
Rd 1: ch 3, 8 hdc in 2nd ch from hk (8)
Rd 2: 2 hdc in each st around (16)
Rd 3: ( 2hdc, 1 hdc) repeat around (24)
Rd 4: (2hdc, 1 hdc in 2 st) repeat around (32)
Rd 5-10: hdc around (32). sl st and fasten off. Ensure a proper fit and use your green yarn to set into place
FINISHED!!