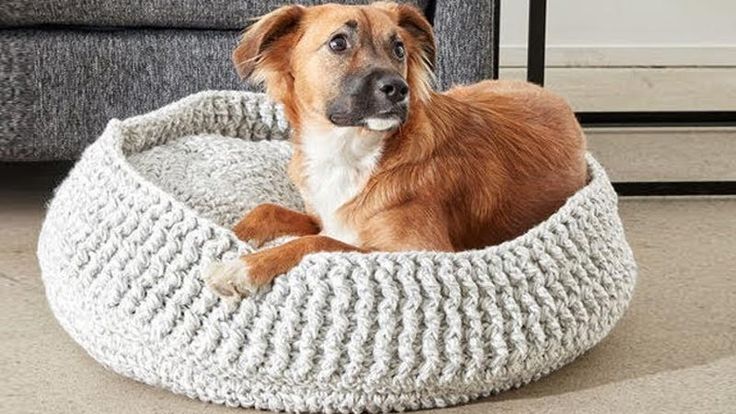
Crochet Pet Bed
Crochet pet beds are not only adorable but also cozy spots for your furry friends to curl up and relax. Crafting a pet bed with soft yarn and your favorite crochet hook can be a fun and creative project that will surely warm your heart. Your pet will appreciate the comfy nest you've made with love, and you'll enjoy seeing them snuggled up in their handmade haven. So, grab your yarn stash, pick a colorful pattern, and get ready to crochet a special place just for your beloved pet to enjoy!
Materials Needed & Measurements:
- Yarn:
- Super Bulky weight yarn (Category 6)
- Use Bernat Blanket O’Go or a similar yarn.
- Colors:
- A: Bottom Base
- B: Top Base
- C: Side Border
- Quilt Batting:
- Cut 2-3 layers for the Base (slightly smaller than the Base diameter).
- Cut 1 layer for the Side Border (1/4 inch smaller than its outer measurement).
- Crochet Hook: Size L/8.0 mm crochet hook (or size needed to obtain gauge).
- Notions:
- T-pins for securing layers.
- Scissors.
Measurements
- Bed Diameter (Bottom Base and Top Base):
- Small: Approx. 16 inches (40.5 cm).
- Medium: Approx. 22 inches (56 cm).
- Large: Approx. 30 inches (76 cm).
- Side Border Height: Approx. 6 inches (15 cm).
- Gauge: 7 single crochets (sc) and 8 rows = 4 inches (10 cm) with 2 strands of yarn held together.
Abbreviations:
- ch: chain
- sc: single crochet
- sl st: slip stitch
- rnd: round
- rep: repeat
- sc2tog: single crochet two together
- RS: right side
Stitching Instructions for Making the Bernat Crochet Pet Bed Pattern:
Bottom Base
- With 2 strands of A held together, ch 4. Join with sl st to the first ch to form a ring.
- 1st rnd: 8 sc in the ring. Join. (8 sc)
- 2nd rnd: Ch 1, 2 sc in each sc around. Join. (16 sc)
- 3rd rnd: Ch 1, 2 sc in the next sc, 1 sc in the next sc. Rep from around. Join. (24 sc)
- 4th rnd: Ch 1, 2 sc in the next sc, 1 sc in each of the next 2 sc. Rep from around. Join. (32 sc)
- 5th rnd: Ch 1, 2 sc in the next sc, 1 sc in each of the next 3 sc. Rep from around. Join. (40 sc)
- Continue increasing by working 2 sc in the next sc, 1 sc in each of the next X sc (where X increases by 1 in each subsequent round). Continue until the diameter measures 16 (22, 30) inches [40.5 (56, 76) cm]. Fasten off.
Top Base
- With 2 strands of B held together, ch 4. Join with sl st to the first ch to form a ring.
- Work the same as the Bottom Base. Do not fasten off at the end of the last round.
- Next 3 rnds: Ch 1, work 1 sc in each sc around. Join. Fasten off at the end of the last round.
Assembling Base with Quilt Batting
- Cut 2-3 layers of quilt batting to match the Bottom Base’s size, minus one round.
- Place the quilt batting between the Bottom and Top Base (Wrong Sides together).
- Secure with T-pins.
- With 2 strands of C, join with sl st to any sc.
- Ch 1, working through both thicknesses, work 1 sc in each sc around. Join with sl st to the first sc. Fasten off.
Side Border (Make 2: Inner and Outer)
- With 2 strands of C, ch 67 (88, 114).
- 1st row: (RS) 1 sc in the 2nd ch from the hook, 1 sc in each ch to the end. Turn. (66 [87, 113] sc)
- 2nd row: Ch 1, 1 sc in each sc across. Turn.
- 3rd to 8th rows: Ch 1, sc2tog, 1 sc in each sc to the last 2 sc, sc2tog. Turn. (54 [75, 101] sc after 8th row)
- Fasten off.
Assembling Side Border with Quilt Batting
- Cut 1 layer of quilt batting 1/4 inch smaller than the Side Border’s size.
- Place batting between the Inner and Outer Side Borders (Wrong Sides together).
- Secure with T-pins.
- With 2 strands of A, join with sl st to any sc.
- Ch 1, working through both layers, work 1 sc in each sc, with 3 sc in each corner. Join with sl st to the first sc. Fasten off.
Joining Side Border to Base
- Position the assembled Side Border around the Base’s outer edge and secure with T-pins.
- With 2 strands of C, join with sl st to the foundation ch of the Side Border.
- Ch 1, working through both thicknesses, work 1 sc in each sc around. Fasten off.
Bed Edging
- 1st row: (RS) Join 2 strands of A with sl st to the Base’s last round before the Side Border. Ch 1, sc2tog over the last sc of the Base and the first sc of the Side Border. Work 1 sc in each sc of the Side Border. Turn.
- 2nd row: Ch 1, work 1 reverse sc (left to right) across the row. Fasten off.
No comments
Write a comment