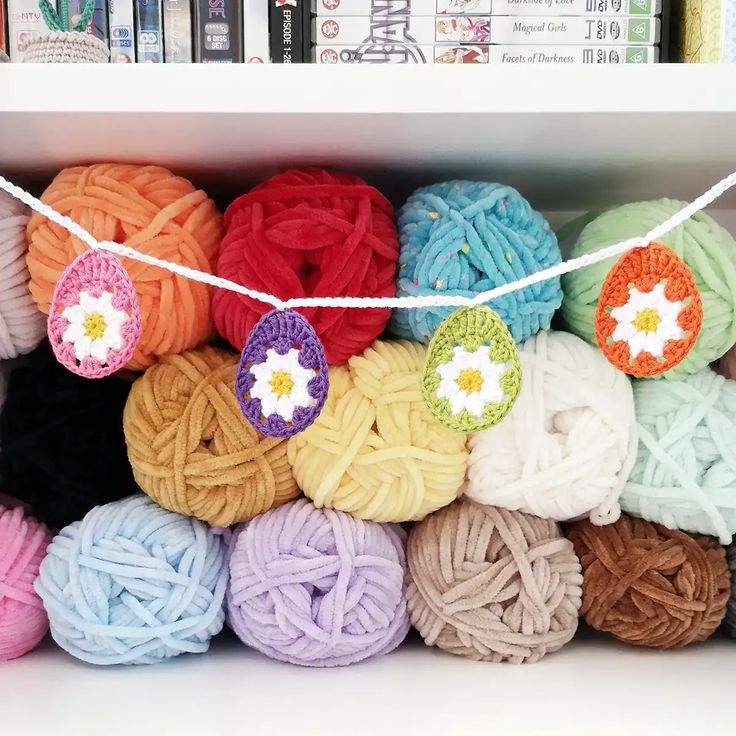
Crochet Easter Garland
Get ready to add a touch of creativity and charm to your Easter decorations with a Crochet Easter Garland! This delightful and whimsical garland is like a pop of springtime happiness, perfect for sprucing up your home or Easter celebration. Picture cute pastel-colored crochet Easter eggs and adorable bunnies strung together, instantly bringing a festive and cozy vibe to any space. Whether you hang it in the living room, across the fireplace, or even outdoors, this handmade garland is sure to spread smiles and add a warm, handmade feel to your Easter decor. Dive into this fun DIY project or find one already made to brighten up your Easter festivities with a touch of handmade love!

Materials
- DK weight yarn in yellow, white and egg colour (I used Paintbox Yarns Cotton DK in Mustard Yellow, Paper White and Lime Green/Bubblegum Pink/Blood Orange/Pansy Purple)
- 3mm crochet hook
- Yarn needle, scissors
Abbreviations (US Terms)
- ch – chain
- bo – bobble stitch
- hdc – half double crochet
- dc – double crochet
- sc – single crochet
- tr – treble crochet
- sl st – slip stitch
- st/s – stitch/es
- […] – repeat the instructions in brackets
- (…) – indicates stitch count at end of round
Special Stitches
Bobble Stitch (bo)
- Yarn over.
- Insert your hook into the indicated stitch.
- Yarn over and pull up a loop (3 loops on hook).
- Yarn over and pull through first 2 loops (2 loops on hook).
- Repeat steps 1-4 three more times in the same stitch (5 loops on hook).
- Yarn over and pull though all 5 loops on hook.
Finished Size
The finished crochet eggs measure approximately 2.25″ tall x 1.75″ wide (6cm x 4.5cm). Size may vary depending on tension and materials used.
Gauge
Gauge is not important in this pattern. However, using a different yarn and hook size will change the size of the finished item.
Notes
- This pattern is worked starting with a magic ring.
- You will be fastening off and joining a new colour after rounds 1-3.
- Crochet over your ends where possible.
- The ch 1 at the beginning of R1 does not count as a stitch.
Pattern Instructions
Egg (starting with yellow)
Make a magic ring.
R1: Ch 1, 8 hdc in magic ring, sl st to first hdc to join (8)
Fasten off yellow yarn.
The next round is made up of bobble stitches. Join white yarn in any st from the previous round with a ch 2 or standing double crochet.
R2: [Bo, ch 2] x8, join with sl st to first bo (8 bobble sts, 8 ch spaces)
Fasten off white yarn.
R3: Join egg colour with a standing double crochet in any ch 2 space from the previous round, 2 dc in same space, ch 1, [3 dc in next ch space, ch 1] x7, sl st to first dc to join.
R4: Sc in next st, hdc in next, dc in ch space, 2 tr in next st, tr in next, 2 tr in next st, dc in ch space, hdc in next st, sc in next (11)
Fasten off invisibly to the ch from the previous round. Weave in all ends.
Make as many eggs as you like.
Blocking
I definitely recommend blocking your finished eggs so that they hang nicely.
Materials
- Blocking mat
- Rust proof pins
- Spray bottle filled with water
Pin your crochet eggs into shape on the blocking mat.
Spray with water until damp and leave to air dry completely.
Finishing
To join the eggs and make into a garland, simply chain your desired amount and sl st through the centre top of each egg (the middle tr st).
For the small garland that I made, I started by chaining 30 and spacing my eggs 20 chains apart.