Crochet Whimsy Willow Cardigan
The Crochet Whimsy Willow Cardigan is the perfect addition to your wardrobe if you're looking for a touch of whimsical charm! With its intricate crochet details and cozy design, this cardigan is sure to become your new go-to piece for a stylish and comfortable look. Whether you're lounging at home or heading out for a casual day, the Whimsy Willow Cardigan will keep you feeling cute and cozy all day long. You'll love how versatile and fun this cardigan is to wear, making it a must-have for any fashion-forward individual looking to add a playful twist to their outfit!

Materials:
- Light (3) Weight Yarn, Lion Brand Truboo in Khaki, 3(3, 4, 4, 4, 5, 5, 5, 6) Skeins or 620(670, 740, 820, 900, 990, 1070, 1140, 1230) yards
- G/4.00mm Crochet Hook
- Yarn Needle
- Scissors
- Stitch Marker (2)
Gauge:
16 Tr by 5 rows= 4×4” (blocked)
Sizes:
XS(S, M, L, XL, 2X, 3X, 4X, 5X)
Finished Measurements:
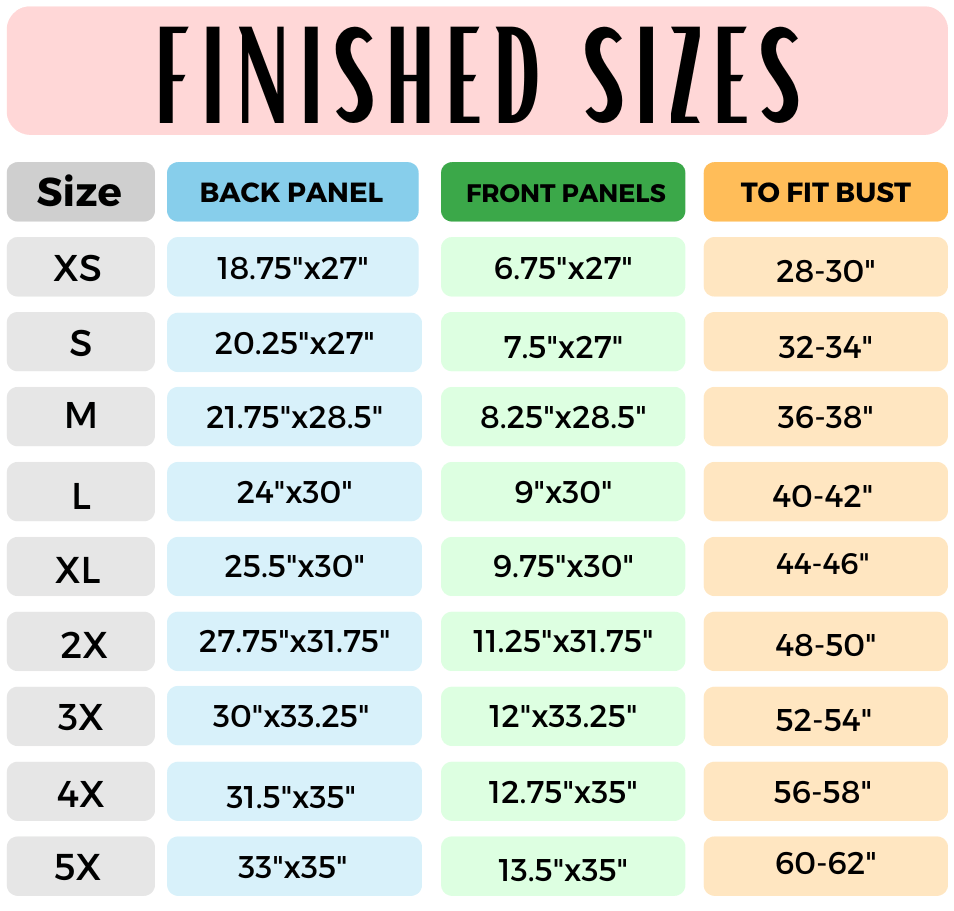
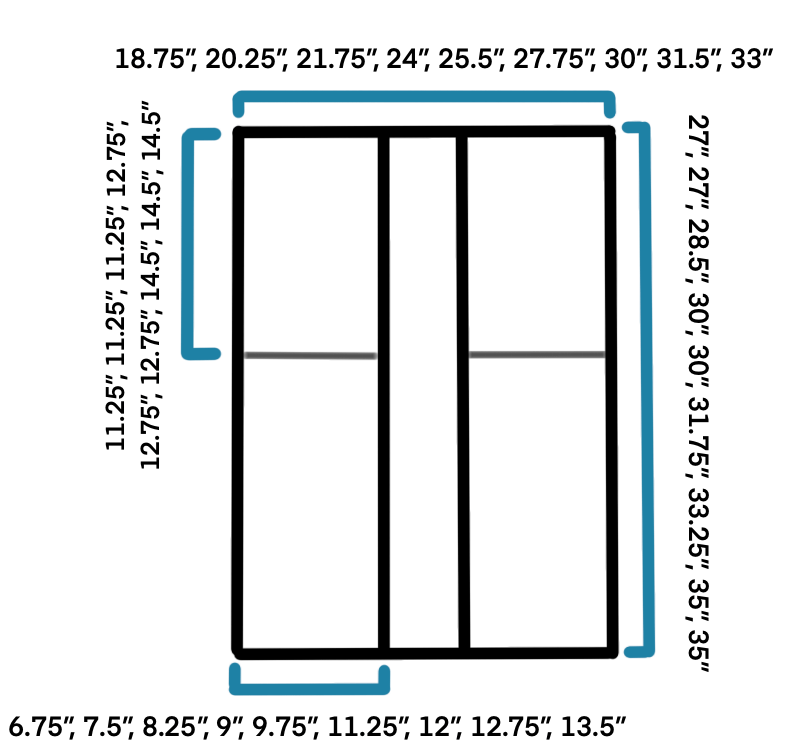
Notes:
This cardigan is worked top down in separate panels.
The starting Ch 4 counts as 1 St.
The Ch-1 Sp counts as 1 St.
The picot counts as 1 St.
The starting Ch 1 does not count as a St.
Leave a long tail of yarn at the start of your panels to use for seaming the shoulders later on.
The numbers in parenthesis at the beginning of the row are the row counts for all 9 sizes. The numbers in parentheses at the end of the row are the St counts for all 9 sizes. The numbers within the row in parenthesis are the instructions for all 9 sizes. Follow the instructions for your size only.
You can adjust the length of your cardigan by adding or removing rows in multiples of 2 before fastening off.
Stitches and Abbreviations (US Terms):
- Fsc- Foundation Single Crochet
- Sc- Single Crochet
- Ch(s)- Chain
- Tr- Treble Crochet
- St(s)- Stitch(es)
- Sk- Skip
- Sp- Space
- Sl St- Slip Stitch
- RS- Right Side
- WS- Wrong Side
- Picot- Ch 4, Sl St into first Ch made
- Bpsc- Back Post Single Crochet
- Fpsc- Front Post Single Crochet
Pattern:
Back Panel-
Row 1(RS): 75(81, 87, 96, 102, 111, 120, 126, 132) Fsc, turn. Alternatively, you can Ch 1 more than the number listed above and work 1 Sc into the second Ch from the hook and each Ch across. (75(81, 87, 96, 102, 111, 120, 126, 132) Sc)
Row 2: Ch 4 (counts as 1 Tr here and throughout), 1 Tr in same St, Sk 1, [1 Tr, 1 Picot, 1 Tr] into next St, *Sk 2, [1 Tr, 1 Picot, 1 Tr] in next*, repeat from * to * across row until 3 remain, Sk 2, 1 Tr in last, turn. (75(81, 87, 96, 102, 111, 120, 126, 132) Sts)
Row 3: Ch 4, 1 Tr in same St, *Sk 2 (skipping the Tr and the picot), [1 Tr, Ch 1, 1 Tr] into next St*, repeat from * to * across row until 2 remain, Sk 1, 1 Tr in last (top of turning ch), turn. (75(81, 87, 96, 102, 111, 120, 126, 132) Sts)
Row 4: Ch 4, 1 Tr in same St, *Sk 2, [1 Tr, 1 Picot, 1 Tr] in next*, repeat from * to * across row until 2 remain, Sk 1, 1 Tr in last (top of turning Ch), turn. (75(81, 87, 96, 102, 111, 120, 126, 132) Sts)
Rows 5-15(15, 15, 17, 17, 17, 19, 19, 19): Repeat Row 3 & 4. You will end on a Row 3 repeat.
Note- the following 4 rows with the Sc Sts will cinch in and be tighter than the previous rows, it’s supposed to! You can adjust where this band hits on your chest/back by adding or removing the previous 2 rows in multiples of 2 before beginning the following row.
Row 16(16, 16, 18, 18, 18, 20, 20, 20): Ch 1, 1 Sc in each St and Ch Sp across row, turn. (75(81, 87, 96, 102, 111, 120, 126, 132) Sc)
Row 17(17, 17, 19, 19, 19, 21, 21, 21): Ch 1, 1 Sc in first St, *1 Bpsc, 1 Fpsc*, repeat from * to * across row, 1 Sc into last St. Note- some sizes might end on a Bpsc and some on a Fpsc, just before the last St. All sizes will finish with 1 Sc into final St. (75(81, 87, 96, 102, 111, 120, 126, 132) Sc)
Rows 18(18, 18, 20, 20, 20, 22, 22, 22) & 19(19, 19, 21, 21, 21, 23, 23, 23): Repeat Rows 16(16, 16, 18, 18, 18, 20, 20, 20) & 17(17, 17, 19, 19, 19, 21, 21, 21).
Row 20(20, 20, 22, 22, 22, 24, 24, 24): Repeat Row 2. (75(81, 87, 96, 102, 111, 120, 126, 132) Sts)
Rows 21(21, 21, 23, 23, 23, 25, 25, 25)-38(38, 40, 42, 42, 44, 46, 48, 48): Repeat Rows 3 & 4.
Fasten off.
Front Panel (make 2)-
Row 1(RS): 27(30, 33, 36, 39, 45, 48, 51, 54) Fsc, turn. Alternatively, you can Ch 1 more than the number listed above and work 1 Sc into the second Ch from the hook and each Ch across. (27(30, 33, 36, 39, 45, 48, 51, 54) Sc)
Row 2: Ch 4 (counts as 1 Tr here and throughout), 1 Tr in same St, Sk 1, [1 Tr, 1 Picot, 1 Tr] into next St, *Sk 2, [1 Tr, 1 Picot, 1 Tr] in next*, repeat from * to * across row until 3 remain, Sk 2, 1 Tr in last, turn. (27(30, 33, 36, 39, 45, 48, 51, 54) Sts)
Row 3: Ch 4, 1 Tr in same St, *Sk 2 (skipping the Tr and the picot), [1 Tr, Ch 1, 1 Tr] into next St*, repeat from * to * across row until 2 remain, Sk 1, 1 Tr in last (top of turning ch), turn. (27(30, 33, 36, 39, 45, 48, 51, 54) Sts)
Row 4: Ch 4, 1 Tr in same St, *Sk 2, [1 Tr, 1 Picot, 1 Tr] in next*, repeat from * to * across row until 2 remain, Sk 1, 1 Tr in last (top of turning Ch), turn. (27(30, 33, 36, 39, 45, 48, 51, 54) Sts)
Rows 5-15(15, 15, 17, 17, 17, 19, 19, 19): Repeat Row 3 & 4. You will end on a Row 3 repeat.
Note- the following 4 rows with the Sc Sts will cinch in and be tighter than the previous rows, it’s supposed to! You can adjust where this band hits on your chest/back by adding or removing the previous 2 rows in multiples of 2 before beginning the following row.
Row 16(16, 16, 18, 18, 18, 20, 20, 20): Ch 1, 1 Sc in each St and Ch Sp across row, turn. (27(30, 33, 36, 39, 45, 48, 51, 54) Sc)
Row 17(17, 17, 19, 19, 19, 21, 21, 21): Ch 1, 1 Sc in first St, *1 Bpsc, 1 Fpsc*, repeat from * to * across row, 1 Sc into last St. Note- some sizes might end on a Bpsc and some on a Fpsc, just before the last St. All sizes will finish with 1 Sc into final St. (27(30, 33, 36, 39, 45, 48, 51, 54) Sc)
Rows 18(18, 18, 20, 20, 20, 22, 22, 22) & 19(19, 19, 21, 21, 21, 23, 23, 23): Repeat Rows 16 & 17.
Row 20(20, 20, 22, 22, 22, 24, 24, 24): Repeat Row 2. (27(30, 33, 36, 39, 45, 48, 51, 54) Sts)
Rows 21(21, 21, 23, 23, 23, 25, 25, 25)-38(38, 40, 42, 42, 44, 46, 48, 48): Repeat Rows 3 & 4.
Fasten off.
Join Panels:
Block your panels to the measurements listed above. I recommend a steam block.
Place your front and back panels together RS facing.
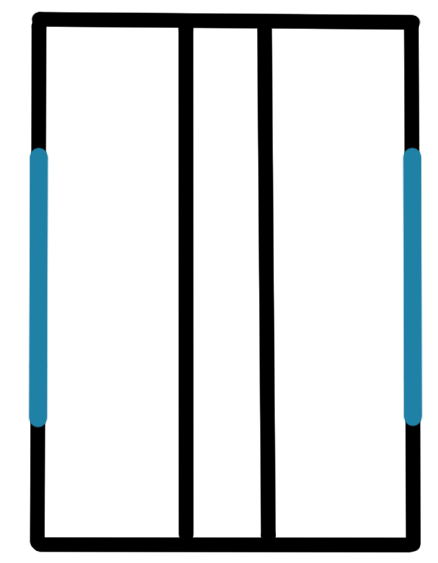
Using your preferred seaming method attach the front panels to the back panel at the shoulders (I used my hook and slip stitched across). Be sure your panels are aligned and that you aren’t bunching or skipping stitches.
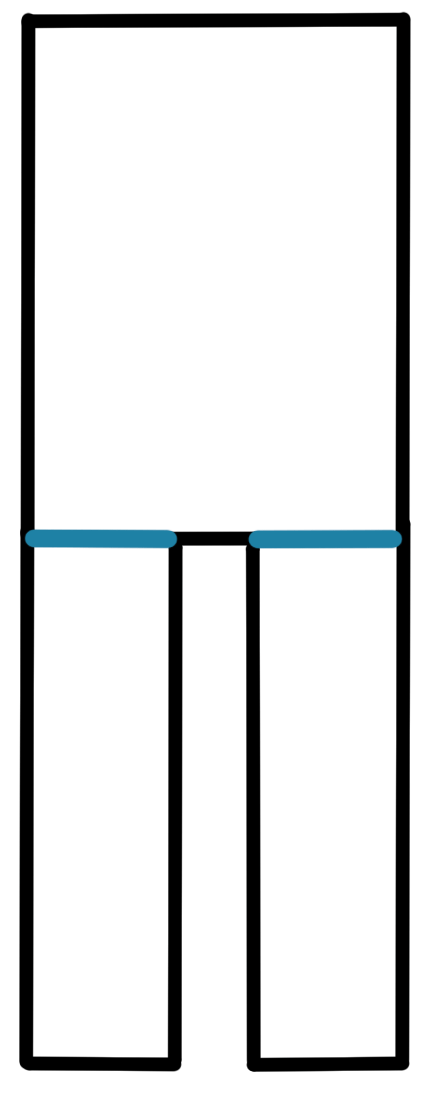
Next, using your measuring tape, measure out 6.5”(7”, 7.5”, 8”, 8.5”, 9”, 9.5”, 10”, 10.5”) from the shoulder seam down the side of your cardigan. Place a SM. This will be the armhole and we will be leaving it un-seamed. Repeat on other side.
Using the same joining method, seam from the SM down the side of the cardigan. Leave approximately 7”(7”, 7”, 8”, 8”, 8”, 9”, 9”, 9”) un-seamed to create the side slit. Fasten off and repeat on other side.
Sleeve Trim:
With your cardigan RS out, join yarn with a SL ST to the left of the side seam at the underarm.
Round 1: Ch 1, Sc evenly around armhole, working approximately 3 Sc per row. Sl St to the first Sc made to join. Note- exact St count is not crucial here, if you find that you need a couple more or less stitches around, feel free to adjust.
Round 2: Ch 4 (counts as 1 Tr), 1 Tr in each St around, Sl St to the top of the Ch 4 to join.
Fasten off and repeat on second side.
Trim and Tie:
With your cardigan RS out, join yarn with a Sl St to the bottom corner of the right (when worn) front panel.
Row 1: Ch 1, Sc evenly up the side of the front panel until you reach Row 18(18, 18, 20, 20, 20, 22, 22, 22)(working approximately 3 Sc per row), Ch 69, work 1 Sc into the second Ch from the hook and each Ch across (68 Sc), Sl St into Row 17(17, 17, 19, 19, 19, 21, 21, 21) and continue working Sc stitches evenly up the side, along the back neckline and down the second front panel. When you reach Row 17(17, 17, 19, 19, 19, 21, 21, 21), Ch 69 and work 1 Sc into the second Ch from the hook and each Ch across, Sl St into Row 18(18, 18, 20, 20, 20, 22, 22, 22) and continue working Sc Sts down until you reach the corner. Fasten off.
If you prefer no ties, simply work the Sc trim and skip the tie instructions. The St count for the trim is not crucial, work approximately 3 Sts per row but you can adjust if needed.
Weave in any remaining ends.