Crochet Beautiful Headwarmer
Crocheting a beautiful headwarmer is not only a fun and creative way to spend your time, but it also results in a cozy accessory to keep you warm during the colder months. With just a crochet hook and some soft yarn, you can create a stylish headwarmer that reflects your personality and style. The best part is that you can customize it with different colors, stitches, and embellishments to make it uniquely yours. So, grab your supplies and let's get crafting a lovely headwarmer that will keep you looking chic and feeling toasty!

Materials and Details
Yarn: worsted weight (approximately 180 yards). Samples were made with Red Heart Yarns Gleam (purple with metallic silver specks) and Red Heart Yarns With Love.
Hook: J
Miscellaneous: Yarn needle for sewing edges together and weaving in ends.
Gauge with J hook: 4” of hdc rows: 9 rows and 16 sts; 4” of cluster pattern = 10.5 rows and 5.5 clusters
Size: One Size to fit older children to adult.
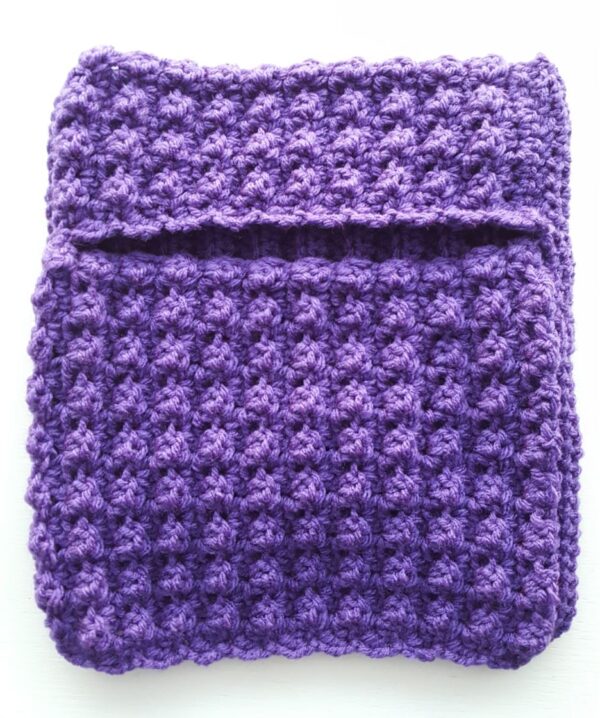
Measurements: Overall at widest points – 10.5” high x 9.5” wide; Headband section height – 3”; Face section height – 7”
A list of crochet stitch abbreviations can be found at the end of this post.
Instructions
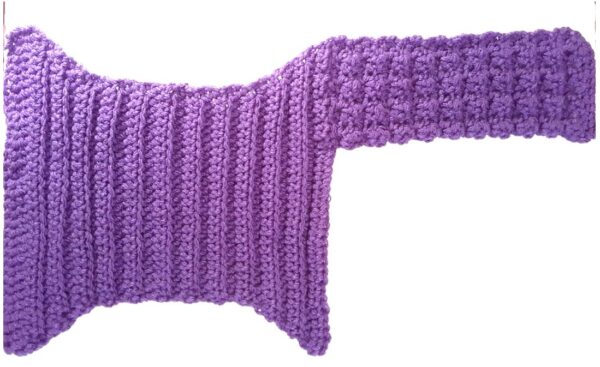
Project is worked back and forth in rows which run up and down (not side to side across the mask). It is one, flat piece, seamed together when complete.
The instructions start at one side. It will decrease to make shorter rows for the back of the neck and then increase to be even with beginning edge.
The numbers below represent “sections” and “rows”. Follow each step and then continue on to the next step.
- Leave a long tail in the beginning for seaming. With J hook and worsted weight yarn, ch 37, sc in 2nd ch from hook and in each chain across. (36sts)
- From this point until noted, the first and last stitch of each row is worked into the stitch as usual. The other stitches are worked into the BLO (back loop only).
- Ch 2, turn, hdc2tog, hdc in BLO of each st until 2 stiches remain, hdc2tog. (34sts)
This step decreases for a shorter area behind the neck. You will work several rows. Ch 2, turn, hdc2tog, hdc in BLO of each st until 2 stiches remain, hdc2tog. Repeat until there are 24 sts.
4-15. Ch 2, turn, hdc in same st, hdc 22 in BLO, hdc in last st.
16. Ch 2, turn, 2hdc in same st, hdc in BLO of each st until 1 stich remains, 2hdc in last st. (26sts)
17. Repeat previous step until there are 36sts.
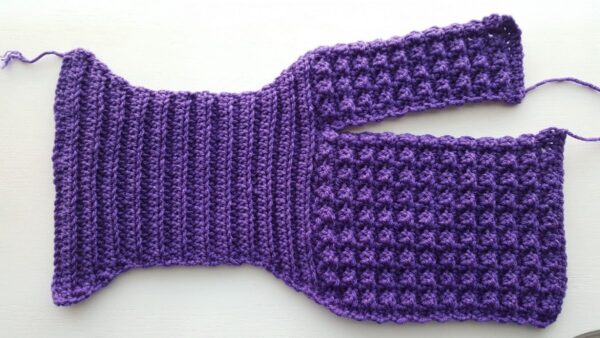
From this point on, all stitches are worked into the stitch as usual, not just BLO. This step starts the thin headband section only. The face section will be added later.
18. Ch 2, turn, (dc, hdc, sc) in same st, sk 2, (dc, hdc, sc) in next st, sk 2, repeat a total of 3 times, sc in next st. There will be 4 clusters and 13sts. Reminder: after the last cluster you need to sk 2 sts to finish the repeat and then sc in next st. The following rows are worked across these 13sts only. There will be 23 stitches left unworked for the face section.
19-37. Ch 2, turn, (dc, hdc, sc) in same st, sk 2, (dc, hdc, sc) in next st, sk 2, repeat until 1 st remains, sc in last st.
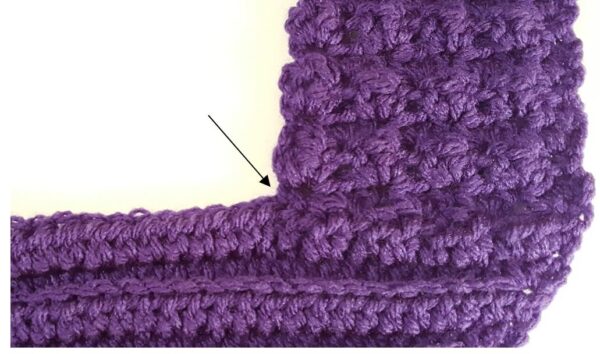
38. Ch 1, turn, sc 11, sc2tog. (12sts) Finish off and weave in end.
With headband strip at the right, attach yarn to last used st from first row of headband (13th st from right edge). See arrow in photo below.
39. Ch 2, (dc, hdc, sc) in same st, sk 1, (dc, hdc, sc) in next st, sk 2, (dc, hdc, sc) in next st, repeat to end of row. (9 clusters and 27 sts)
40. Ch 2, turn, (dc, hdc, sc) in same st, sk 1, (dc, hdc, sc) in next st, sk 2, (dc, hdc, sc) in next st, repeat until 3 sts remain, sk 2, sc in last st. (9 clusters and 28 sts)
41-62. Ch 2, turn, (dc, hdc, sc) in same st, sk 2, (dc, hdc, sc) in next st, repeat until 3sts remain, sk 2, sc in last st.
Note: This fits close to the face. For a looser fit, add 2-4 more cluster rows. Adding in sets of 2 will continue the same look, creating a row up “bumps” for each 2 rows.
63. Ch 1, turn, sc2tog, sc 5, sc2tog, sc 10, sc2tog, 5, sc2tog. (24sts)
Finish off and weave in end.
Line up beginning and ending edges. The final edges will be wider than the beginning edge, but the amount of sts are the same.
With yarn needle and beginning yarn tail (matching yarn), sew edges together, lining up the stitches.