Crochet Shaggy Sheep
The Crochet Shaggy Sheep is an adorable and fuzzy project that will surely bring a smile to your face. With its playful design and soft texture, this DIY creation makes for a delightful addition to any home. You'll love spending time crafting this charming little sheep, and once completed, it will be a cozy and lovable companion for years to come. So grab your yarn and crochet hook, and get ready to create your very own cuddly friend!
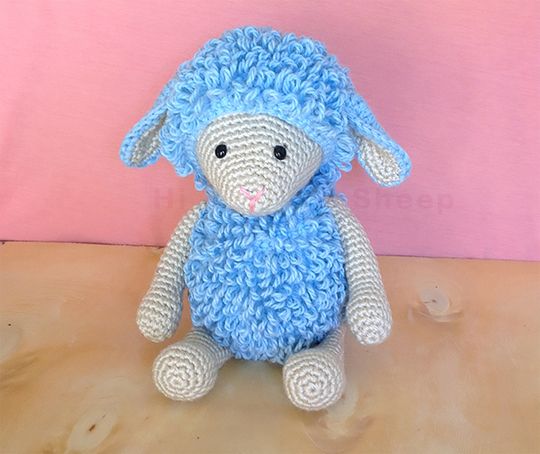
I used a 3 mm hook, the finished sheep is about 17 cm / 6,7 inch tall (without measuring the legs, because it is sitting)
ABBREVIATIONS (U.S.):
- R: round
- sc: single crochet
- sl st: slip stitch
- inc: increase
- dec: decrease
- ch: chain
- lp st: loop stitch
- hdc: half double crochet
- dc: double crochet
- mr: magic ring
- **: repeat to the end of round
- [...] total stitches at the end of round
BODY:
We are always working with loop stitch exept for the magic ring.
R1: 6 sc in mr, close with sl st.
R2: *lp st inc* [12]
R3: *1 lp st, 1 lp st inc* [18]
R4: *2 lp st, 1 lp st inc* [24]
R5: *3 lp st, 1 lp st inc* [30]
R6: *4 lp st, 1 lp st inc* [36]
R7: *5 lp st, 1 lp st inc* [42]
R8: *6 lp st, 1 lp st inc* [48]
R9-16: 48 lp st
R17: *6 lp st, 1 lp st dec* [42]
R18: 42 lp st
R19: *5 lp st, 1 lp st dec* [36]
R20: 36 st
R21: *4 lp st, 1 lp st dec* [30]
R22: *3 lp st, 1 lp st dec* [24]
R23: *2 lp st, 1 lp st dec* [18]
Cut yarn leaving long end to sew to head later.
Stuff.
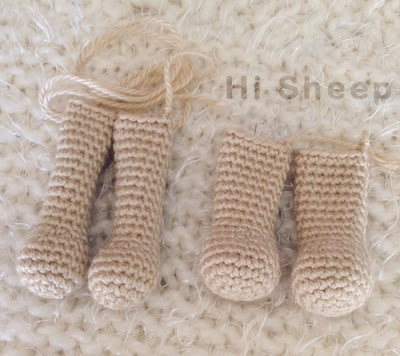
HANDS:
Make 2.
R1: 6 sc in magic ring, close with sl st.
R2: *sc inc* [12]
R3: *1 sc, sc inc* [18]
R4-6: 18 sc
R7: *4 sc, sc dec* [15]
R8: 3 sc dec, 9 sc [12]
R9-20: 12 sc
Cut yarn leaving long end to sew to body.
Stuff firmly the bottom and slightly at the top.
LEGS:
Make 2.
R1: 6 sc in magic ring, close with sl st.
R2: *sc inc* [12]
R3: *1 sc, sc inc* [18]
R4: *5 sc, sc inc* [21]
R5-7: 21 sc
R8: *5 sc, sc dec* [18]
R9: 3 sc dec, 12 sc [15]
R10-19: 15 sc
Cut yarn leaving long end to sew to body.
Stuff firmly the bottom and slightly at the top.
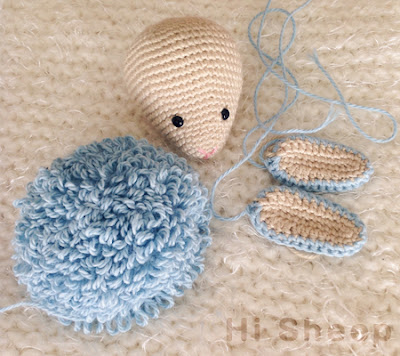
HEAD:
Stuff as you go.
I placed the eyes betwen R8 and R9.
R1: 6 sc in magic ring, close with sl st.
R2: *sc inc* [12]
R3: *1 sc, sc inc* [18]
R4: *2 sc, sc inc* [24]
R5-6: 24 sc
R7: *3 sc, sc inc* [30]
R8: *4 sc, sc inc* [36]
R9-10: 36 sc
R11: *5 sc, sc inc* [42]
R12: *6 sc, sc inc* [48]
R13: 48 sc
R14: *7 sc, sc inc* [54]
R15-20: 54 sc
R21: *7 sc, sc dec* [48]
R22: *6 sc, sc dec* [42]
R23: *5 sc, sc dec* [36]
R24: *4 sc, sc dec* [30]
R25: *3 sc, sc dec* [24]
R26: *2 sc, sc dec* [18]
R27: *1 sc, sc dec* [12]
R28: *sc dec* [6]
Close.
With pink yarn I embroidered a little V for the nose and a straight line for the mouth.
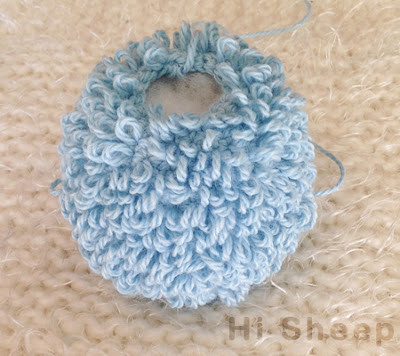
HAIR:
We are always working with loop stitch exept for the magic ring.
R1: 6 sc in magic ring, close with sl st.
R2: *lp st inc* [12]
R3: *1 lp st, 1 lp st inc* [18]
R4: *2 lp st, 1 lp st inc* [24]
R5: *3 lp st, 1 lp st inc* [30]
R6: *4 lp st, 1 lp st inc* [36]
R7: *5 lp st, 1 lp st inc* [42]
R8: *6 lp st, 1 lp st inc* [48]
R9-13: 48 lp st
R14: *14 lp st, 1 lp st dec* [45]
R15-16: 45 lp st
Cut yarn leaving long end to sew to the head.
EARS:
We are making four total. 2 with skin color and 2 with fur color.
Base: 12 ch
R1: 10 sc, 3 sc in the same ch, 10 sc, 1 sc inc [25]
R2: 4 dc, 4 hdc, 8 sc, 4 hdc, 4 dc, 1 hdc
Don't cut the yarn when making the fur one since we are going to be joining it with the skin piece.
To assemble ear: place the skin piece facing the fur piece and aligning the stitches. Increase in the first stitch inserting the hook trough the stitches of both pieces, keep joining around 25 sc (always making sure you are inserting hook trough both pieces), increase one more time, make 1 sc and you'll finish with 28 sts. Cut the yarn leaving long end to sew to the head.
Sew pieces accordingly and done!