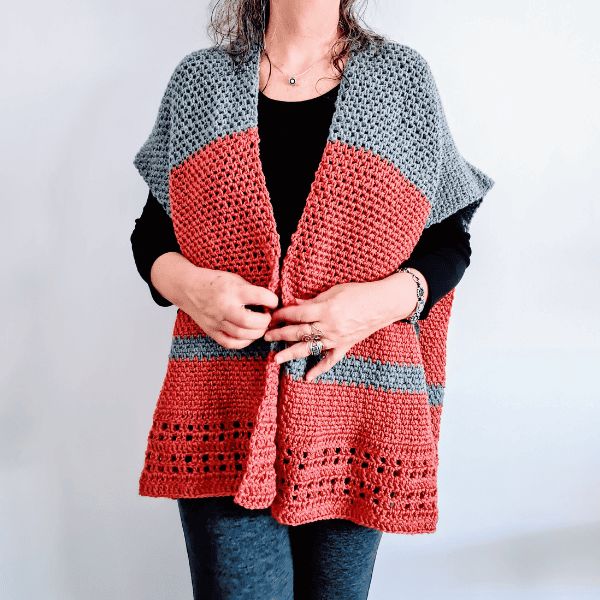
Crochet Cozy Ruana Poncho
The Crochet Cozy Ruana Poncho is the perfect addition to your fall wardrobe! This stylish and versatile piece can be effortlessly layered over any outfit for an extra touch of warmth and flair. Its intricate crochet pattern adds a cozy charm while keeping you snug on chilly days. Whether you're running errands or lounging at home, this poncho is sure to keep you feeling comfy and looking fabulous. Don't miss out on this must-have fashion staple for the season!
Materials
- Vogue with love yarn, weight #4 in pink shade (300gr)
- Vogue with love yarn weight #4 in grey shade (170 gr)
- Substitutions can be any weight #4 yarn
- A total of approx 470 grams of yarn
- Weight-4-Medium
- Hook: US Size (5.5 mm)
- Yarn Needle, Scissors, Measuring Tape
Gauge
14 rows X 14 st (Moss st) 4” X 4”
Sizes
This sample is 30” in height X 26” width
Stitch Key
- Ch = Chain
- Sc = Single Crochet
- Dc = Double Crochet
- Hdc = Half Double Crochet
- St = Stitch
Specialty Stitch & Technique Key
Moss st: [sc1, ch1, skip 1st]
Notes
- This pattern is written in US terms
- This pattern is worked in rows
- Beginning ch 3 does count as 1st st
- The pattern is worked from the back bottom part to the front bottom in two parts
- I used two different colors here, you can choose to make this in one color or more, The changing colors is up to your yarn preferences, you can change at any row as you wish, note no color changing is explained in the instructions
Instructions
Chain 103+3
Row 1: dc1 in 4th ch from hook, dc 1 in next ch and in every ch across to end of row
Row 2: ch3 and turn your work, dc1 in next st, dc1 in every st across to end of row
Row 3: ch3 and turn your work, dc1 in next st, sk 1, *[dc 1 in next 2 st, ch1 ,sk 1]*, repeat from * to * across to the end of row finish row with 2 dc.
Row 4: repeat row 3
Row 5: ch3 and turn your work, dc1 in next st, dc1 in every st, including ch1 spaces across to end of row
Row 6: ch3 and turn your work, dc1 in next st, sk 1, *[dc 1 in next 2 st,ch1, sk 1]*, repeat from * to * across to the end of row finish row with 2 dc.
Row 7: ch3 and turn your work, dc1 in next st, sk 1, *[dc 1 in next 2 st,ch1, sk 1]*, repeat from * to * across to the end of row finish row with 2 dc.
Row 8: ch3 and turn your work, dc1 in next st, dc1 in every st across to end of row including ch1 spaces across to end of row
Row 9: ch 1 and turn your work, sc in 1st st from hook, sc1 in next st and in every st across to end of row.
From now on we will work the back panel with Moss st – If you want to change colors at any point, do so.
Row 10: ch2, sk 1, sc in next st,*[ ch1, sk 1, sc in next]* repeat from * to * to end of row, finish row with sc
This is the repeat Moss st pattern for the rest of the back panel.
Row 11-73: Ch 2, turn,* [sc1 in ch space from prev row, ch1,skip 1 st] * repeat from * to * to end of row
Now we begin one front panel (half of back panel, you will work 2 identical front panels
Row 74: Ch 2, turn,* [sc1 in ch space from prev row, ch1, skip 1st] * repeat from * to * 52 st ( middle of the back panel)- count your total st and divide by 2- If you make a larger size make sure to calculate.
Row 75-138: repeat row 74
Let’s Continue
Row 139: ch 1 and turn your work, sc in 1st st from hook, sc1 in next st and in every st across to end of row. Including ch spaces
Row 140: ch3 and turn your work, dc1 in next st, dc1 in every st across to end of row
Row 141: ch3 and turn your work, dc1 in next st, sk 1, *[dc 1 in next 2 st, ch1,sk 1]*, repeat from * to * across to the end of row finish row with 2 dc.
Row 142: ch3 and turn your work, dc1 in next st, sk 1, *[dc 1 in next 2 st, ch1, sk 1]*, repeat from * to * across to the end of row finish row with 2 dc.
Row 143: ch3 and turn your work, dc1 in next st, dc1 in every st across to end of row
Row 145: ch3 and turn your work, dc1 in next st, sk 1, *[dc 1 in next 2 st, ch1, sk 1]*, repeat from * to * across to the end of row finish row with 2 dc.
Row 146: ch3 and turn your work, dc1 in next st, sk 1, *[dc 1 in next 2 st, ch1,sk 1]*, repeat from * to * across to the end of row finish row with 2 dc.
Row 147: ch3 and turn your work, dc1 in next st, dc1 in every st across to end of row
Row 148: ch3 and turn your work, dc1 in next st, dc1 in every st across to end of row
You finished the back panel and one front panel. Secure your work and cut the yarn.
Now you need to work an exact second front panel starting at the center shoulder part of your work,
Start at the center and work to the side.
Repeat rows 74-148
Finishing
Cut the yarn and weave in the ends using the tapestry needle
You can add tassels or fringe as you wish