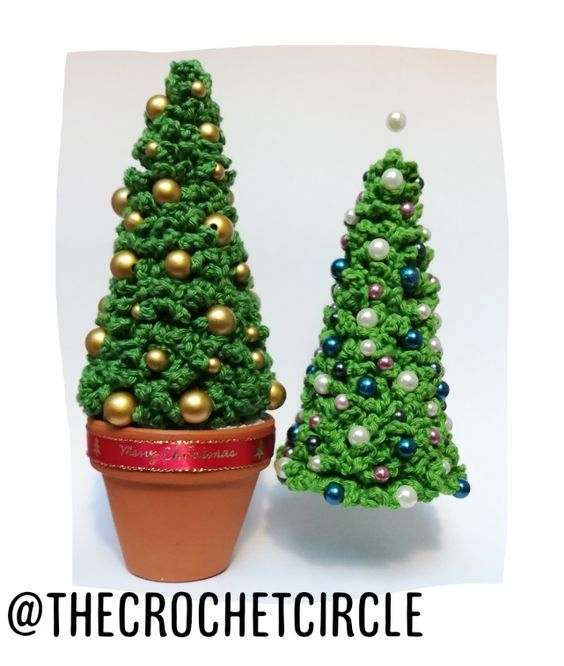
Crochet Mini Christmas Tree
Create your very own festive atmosphere with a charming Crochet Mini Christmas Tree! This delightful project allows you to showcase your creativity and add a touch of holiday spirit to any space. With just a few simple materials and some basic crochet stitches, you can bring this adorable decoration to life. Whether you prefer traditional red and green or a more modern color scheme, the choice is yours! Then, gather your crochet hook and begin working on the base of the tree. Crocheting in rounds, you'll gradually increase the stitches to form a cone shape. Once the base is complete, it's time to move on to the branches.

The stitches used in this pattern for the Christmas tree ornament are:
- magic ring
- sl st — slip stitch
- ch — chain stitch
- sc — single crochet stitch
- dec — sc decrease stitch (join 2sc in 1 — back loops only)
- inc — sc increase stitch (make 2sc in 1)
Notes!
Rows 4, 6, 8, 10, 12, 14, 16, 18, 20, … are worked all in BACK LOOPS ONLY.
You can make more rows to crochet a larger tree or less rows to make a smaller tree. You should always finish with an odd row number so (33, 31, 17, ).
With my 3mm crochet hook the Christmas tree worked till row 33 is about 14cm high.
Note!
The crochet tree is done in two parts:
- make a cone with every second row done in the back loops only
- add branches (little chains) and the needle-shapes leaves to the front loops on the cone base
The pattern is adjustable and can be used with diferent sizes of yarn and crochet hooks. For a more delicate and small Christmas tree — ornament you can use a 1,5mm crochet hook and some lace yarn and for a bigger tree you can use some cotton DK yarn and the apropirate crochet hook for it.
The pattern for the Christmas tree:
I will use BL and it will be for crocheting in the BACK LOOPS ONLY.
- The start is a magic ring and everything is worked in continues rounds.
- R1: 4sc – 4 st
- R2: 4sc – 4 st
- R3: {inc, sc} x2 – 6 st
- R4: BL: {inc, 2sc} x2 – 8 st
- R5: 8sc – 8 st
- R6: BL: {inc, 3sc} x2 – 10 st
- R7: 10sc – 10 st
- R8: BL: {inc, 4sc} x2 — 12st
- R9: 12sc –12 st
- R10: BL: {inc, 5sc} x2 — 14st
- R11: 14sc – 14 st
- R12: BL: {inc, 6sc} x2 — 16st
- R13: 16sc – 16 st
- R14: BL: {inc, 7sc} x2 — 18st
- R15: 18sc – 18 st
- R16: BL: {inc, 8sc} x2 – 20 st
- R17: 20sc – 20 st
- R18: BL: {inc, 9sc} x2 – 22 st
- R19: 22sc – 22 st
- R20: BL: {inc, 10sc} x2 – 24 st
- R21: 8sc – 24 st
- R22: BL: {inc, 11sc} x2 — 26st
- R23: 8sc – 26 st
- R24: BL: {inc, 11sc} x2 — 28st
- R25: 8sc – 28 st
- R26: BL: {inc, 13sc} x2 – 30 st
- R27: 8sc – 30 st
- R28: BL: {inc, 14sc} x2 – 32 st
- R29: 8sc – 32 st
- R20: BL: {inc, 15sc} x2 – 34 st
- R31: 34sc – 34 st
- R32: BL: {inc, 16sc} x2 – 36 st
- R33: 36sc – 36 st
- General formula from Row 4 onward:
- R(2n): BL: {inc, (n) sc} x2 ----> 2n + 4 st
- R(2n+1): ----> 2n + 4 st
DO NOT CUT THE YARN!
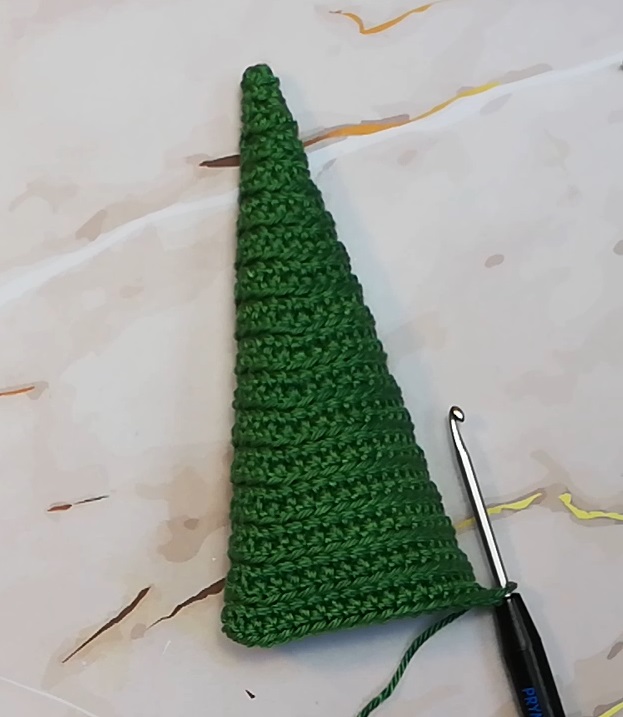
The base cone of the crochet Christmas tree should look like this:

Make a slip stitch and now it is time for the branches and here is where your randomness or creativity comes to shine.
Notes part 2:
Note 1: Not all branches in nature are the same size, so from the bottom I begin with ch6 and every now and then I do a ch5 between. The higher up the tree it goes the lower the number of chains between the single crochet stitches. The bottom branches should have most chains of length 6 with few of length 5 in between. The last row of branches has only 2 chain stitches between single crochet.
Note 2: When switching rows do one extra chain.
Note 3: The branches are worked in the front loops from the base (that is R32, R30, R28, R26, R24, R22, R20, R18, R16, R14, R12, R10, R8, R6, R4 ) except the first two rows, that are worked in the back loops and in the front loops of R33.
- RB1: sc in the back loop only, ch6, sc in the back loop only, ch6, sc in the back loop only, ch6, sc in the back loop only, ch5, sc in the back loop only, ch6, sc in the back loop only,… you can alter ch6 and ch5 randomly, just do more ch6
- RB2-RB5: sc in the front loop only, ch6, sc in the front loop only, ch6, sc in the front loop only, ch6, sc in the front loop only, ch5, sc in the front loop only, ch6, sc in the front loop only,…
- RB6-RB7: sc, ch5, sc, ch6, sc, ch5, sc, ch6, sc, ch5, sc, ch6,...
- RB8: sc, ch5, sc, ch5, sc, ch5, sc, ch6, sc, ch5, sc, ch5,...
- RB9: sc, ch5, sc, ch5, sc, ch4, sc, ch5, sc, ch5, sc, ch4,...
- RB10: sc, ch4, sc, ch4, sc, ch5, sc, ch4, sc, ch4, sc, ch4,...
- RB11: sc, ch4, sc, ch4, sc, ch3, sc, ch4, sc, ch4, sc, ch4, sc, ch3, sc ...
- RB12: sc, ch3, sc, ch4, sc, ch3, sc, ch4,...
- RB13: sc, ch3, sc, ch4, sc, ch3, sc, ch4,...
- RB13: sc, ch3, sc, ch4, sc, ch3, sc, ch4,...
- RB14: sc, ch3, sc, ch3, sc, ch4, sc, ch3,...
- RB15: sc, ch3, sc, ch3, sc, ch2, sc, ch3,...
- RB16: sc, ch2, sc, ch2, sc, ch3, sc, ch2,...
- RB17: sc, ch2, sc, ch2… and join with an invisible join. Get the tail in the work and tie a knot with the starting yarn.
Once you crochet the cone base and all the branches and needles you can start decoration your crochet Christmas tree.
Happy Crafting!