Crochet Festive Bear Amigurumi
Get ready to add some cozy charm to your home with the Crochet Festive Bear Amigurumi! This adorable little bear is the perfect addition to your festive decorations, bringing a touch of handmade warmth to your space. With its intricate crochet detailing and festive colors, this bear is sure to bring a smile to your face every time you see it. Whether you're an experienced crocheter looking for a fun project or a beginner looking to try something new, this amigurumi bear is a delightful and rewarding pattern to work on. Plus, once you're done crafting it, you'll have a cute and cuddly companion to keep you company throughout the holiday season. Get your yarn and crochet hooks ready for a festive crafting adventure!
To create a festive bear amigurumi you’ll need some cotton yarn (YarnArt Jeans used) and 2.0 mm crochet hook. The size of crochet toy without the cap is about 20 cm.
Legs
Rnd 1: 6 sc in a magic ring
Rnd 2: (inc) repeat 6 times [12]
Rnd 3: (sc in the next st, inc) repeat 6 times [18]
Rnd 4: (sc in the next 2 st, inc) repeat 6 times [24]
Rnd 5: (sc in the next st in the back loop only) repeat till the end of the round [24]
At this stage cut soles the size of the foot from the cardboard.
Rnd 6-8: (3 rounds) (sc in the next stitch) till the end of the round [24]
Rnd 9: sc in the next 8 st, (dec) repeat 4 times, sc in the next 8 st [20]
Here or in the next round insert cardboard soles in the feet and the toy will be able to stand upright.
Rnd 10: sc in the next 8 st, (dec) repeat 2 times, sc in the next 8 st [18]
Rnd 11: sc in the next 8 st, dec, sc in the next 8 st [17]
Rnd 12-14: (3 rounds) (sc in the next stitch) till the end of the round [17]
Rnd 15: sc in the next 4 st, inc, sc in the next 7 st, inc, sc in the next 4 st [19]
Rnd 16-17: (sc in the next stitch) till the end of the round [19]
Rnd 18: sc in the next 5 st, inc, sc in the next 7 st, inc, sc in the next 5 st [21]
Rnd 19: (sc in the next stitch) till the end of the round [21]
Rnd 20: sc in the next 4 st, inc, sc in the next 11 st, inc, sc in the next 4 st [23]
Rnd 21: (sc in the next stitch) till the end of the round [23]
Don’t forget to stuff the legs as you go!
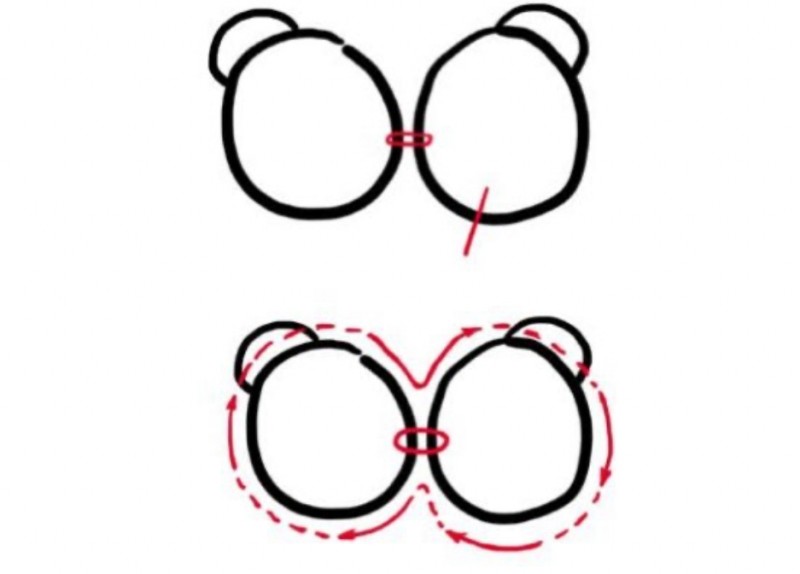
Put the two crocheted legs together. Feet should face a bit to the sides. Join the legs with single crochet in the place where they touch each other. This stitch is the beginning of the next rounds. Crochet 46 sc around both legs beginning from the back and finish just at the stitch between the legs.
Make increases as given, or make them evenly along the round not to get stripes on the body.
One more thing: it’s recommended to crochet the left displacement stitch in every 4th round of the body for the stitch marker to stay in the center.
Body, continue crocheting:
Rnd 22: sc in the next 22 st, inc, sc in the next 22 st, inc [48]
Rnd 23: (sc in the next stitch) till the end of the round [48]
Rnd 24: (sc in the next 11 st, inc) repeat 4 times [52]
Rnd 25: (sc in the next stitch) till the end of the round [52]
Rnd 26: (sc in the next 12 st, inc) repeat 4 times [56]
Rnd 27-30: (4 rounds) (sc in the next stitch) till the end of the round [56]
Rnd 31: sc in the next 13 st, dec, sc in the next 26 st, dec, sc in the next 13 st [54]
Rnd 32: (sc in the next stitch) till the end of the round [54]
Rnd 33: (dec, sc in the next 16 st) repeat 3 times [51]
Rnd 34: (sc in the next stitch) till the end of the round [51]
Rnd 35: (dec, sc in the next 15 st) repeat 3 times [48]
Rnd 36: (sc in the next stitch) till the end of the round [48]
Rnd 37: (dec, sc in the next 14 st) repeat 3 times [45]
Rnd 38: (sc in the next stitch) till the end of the round [45]
Rnd 39: (dec, sc in the next 13 st) repeat 3 times [42]
Rnd 40: (dec, sc in the next 12 st) repeat 3 times [39]
Rnd 41: (dec, sc in the next 11 st) repeat 3 times [36]
Rnd 42: (dec, sc in the next 10 st) repeat 3 times [33]
Rnd 43: (dec, sc in the next 9 st) repeat 3 times [30]
Rnd 44: (dec, sc in the next 8 st) repeat 3 times [27]
Rnd 45: (dec, sc in the next 7 st) repeat 3 times [24]
Rnd 46: (dec, sc in the next 6 st) repeat 3 times [21]
Rnd 47: (dec, sc in the next 5 st) repeat 3 times [18]
When sewing the head the last round will move into the seam. This way the head will be fixed well.
Head
It is crocheted as a simple oval. If you notice that the line of the increases moves crochet a displacement stitch. You can just leave it as it is and when you stuff the head it will be a normal oval head,
Rnd 1: 8 ch, sc in the next 6 st beginning from the second st from the hook, 3 sc in the last st, sc in the next 5 ch (on the other side of the chain), inc [16]
Rnd 2: inc, sc in the next 5 st, (inc) repeat 3 times, sc in the next 5 st, (inc) repeat 2 times. [22]
Rnd 3: inc, sc in the next 6 st, inc, sc in the next st, inc, sc in the next st, inc, sc in the next 6 st, inc, sc in the next st, inc, sc in the next st [28]
Rnd 4: inc, sc in the next 7 st, inc, sc in the next 2 st, inc, sc in the next 2 st, inc, sc in the next 7 st, inc, sc in the next 2 st, inc, sc in the next 2 st [34]
Rnd 5: inc, sc in the next 8 st, inc, sc in the next 3 st, inc, sc in the next 3 st, inc, sc in the next 8 st, inc, sc in the next 3 st, inc, sc in the next 3 st [40]
Rnd 6: inc, sc in the next 9 st, inc, sc in the next 4 st, inc, sc in the next 4 st, inc, sc in the next 9 st, inc, sc in the next 4 st, inc, sc in the next 4 st [46]
Rnd 7: inc, sc in the next 10 st, inc, sc in the next 5 st, inc, sc in the next 5 st, inc, sc in the next 10 st, inc, sc in the next 5 st, inc, sc in the next 5 st. [52]
Rnd 8: inc, sc in the next 11 st, inc, sc in the next 6 st, inc, sc in the next 6 st, inc, sc in the next 11 st, inc, sc in the next 6 st, inc, sc in the next 6 st [58]
Rnd 9: inc, sc in the next 12 st, inc, sc in the next 7 st, inc, sc in the next 7 st, inc, sc in the next 12 st, inc, sc in the next 7 st, inc, sc in the next 7 st. [64]
Rnd 10: inc, sc in the next 13 st, inc, sc in the next 8 st, inc, sc in the next 8 st, inc, sc in the next 12 st, inc, sc in the next 8 st, inc, sc in the next 8 st. [70]
Rnd 11-20: (sc in the next stitch) till the end of the round [70]
Rnd 21: dec, sc in the next 13 st, dec, sc in the next 8 st, dec, sc in the next 8 st, dec, sc in the next 13 st, dec, sc in the next 8 st, dec, sc in the next 8 st. [64]
Rnd 22: dec, sc in the next 12 st, dec, sc in the next 7 st, dec, sc in the next 7 st, dec, sc in the next 12 st, dec, sc in the next 7 st, dec, sc in the next 7 st. [58]
Rnd 23: dec, sc in the next 11 st, dec, sc in the next 6 st, dec, sc in the next 6 st, dec, sc in the next 11 st, dec, sc in the next 6 st, dec, sc in the next 6 st. [52]
Rnd 24: dec, sc in the next 10 st, dec, sc in the next 5 st, dec, sc in the next 5 st, dec, sc in the next 10 st, dec, sc in the next 5 st, dec, sc in the next 5 st. [46]
Rnd 25: dec, sc in the next 9 st, dec, sc in the next 4 st, dec, sc in the next 4 st, dec, sc in the next 9 st, dec, sc in the next 4 st, dec, sc in the next 4 st. [40]
Rnd 26: dec, sc in the next 8 st, dec, sc in the next 3 st, dec, sc in the next 3 st, dec, sc in the next 8 st, dec, sc in the next 3 st, dec, sc in the next 3 st.
Rnd 27: dec, sc in the next 7 st, dec, sc in the next 2 st, dec, sc in the next 2 st, dec, sc in the next 7 st, dec, sc in the next 2 st, dec, sc in the next 2 st.
Rnd 28: dec, sc in the next 6 st, dec, sc in the next st, dec, sc in the next st, dec, sc in the next 6 st, dec, sc in the next st, dec, sc in the next st.
Rnd 29: dec, sc in the next 5 st, (dec) repeat 3 times, sc in the next 5 st, (dec) repeat 2 times [16]
Rnd 30: (sc in the next st, dec) till the end of the round [11]
Rnd 31: decreases till the opening is closed.
Arms
6 sc in a magic ring
Rnd 2: (inc) repeat 6 times [12]
Rnd 3: (sc in the next st, inc) repeat 6 times [18]
Rnd 4-6: (sc in the next stitch) till the end of the round [18]
Rnd 7: (sc in the next st, dec) repeat 6 times [12]
Rnd 8-10: (sc in the next stitch) till the end of the round [12]
Rnd 11: (dec) repeat 2 times, sc in the next 3 st, (inc) repeat 2 times, sc in the next 3 st [12]
Add one more round here.
Rnd 12: (dec) repeat 2 times, sc in the next 3 st, (inc) repeat 2 times, sc in the next 3 st [12]
Rnd 13: (sc in the next stitch) till the end of the round [12]
Rnd 14: (dec) repeat 2 times, sc in the next 3 st, (inc) repeat 2 times, sc in the next 3 st [12]
Rnd 15: (sc in the next stitch) till the end of the round [12]
Rnd 16: (dec) repeat 2 times, sc in the next 3 st, (inc) repeat 2 times, sc in the next 3 st [12]
Rnd 17: (sc in the next stitch) till the end of the round [12]
Add one more round here as well.
Rnd 18: (sc in the next st, dec) till the end of the round [6]
Rnd 19: decreases till the opening is closed.
Ears
Rnd 1: 6 sc in a magic ring
Rnd 2: (inc) repeat 6 times [12]
Rnd 3: (sc in the next st, inc) repeat 6 times [18]
Rnd 4: (sc in the next 2 st, inc) repeat 6 times [24]
Rnd 5: (sc in the next stitch) till the end of the round [24]
Rnd 6: (sc in the next 2 st, dec) repeat 6 times [18]
Rnd 7: (sc in the next st, dec) repeat 6 times [12]
Fold the ear and make 3 decreases along the inner side to make it more pointed.
Inner ears
Rnd 1: 6 sc in a magic ring
Rnd 2: (inc) repeat 6 times [12]
Instead of crochet inner ears you can make cloth inner ears. It’s up to you.
It’s better to sew a bit of cloth into the ear at this stage, because it’s not convenient to do it on sewn ears.
When sewing the ear to the head join its edges together to make the ear pricky.
Tail
Rnd 1: 6 sc in a magic ring
Rnd 2: (inc) repeat 6 times [12]
Rnd 3: (sc in the next st, inc) repeat 6 times [18]
Rnd 4: (sc in the next stitch) till the end of the round [18]
Cut the yarn, leaving the tail for sewing, stuff the tail.
Embroider the muzzle with black thread, glue the eyes, tint the cheeks with rouge.
Cap
Rnd 1: 6 sc in a magic ring
Rnd 2: (sc in the next st, inc) repeat 3 times [9]
Rnd 3: (sc in the next stitch) till the end of the round [9]
Rnd 4: (sc in the next 2 st, inc) repeat 3 times [12]
Rnd 5: (sc in the next stitch) till the end of the round [12]
Rnd 6: (sc in the next 3 st, inc) repeat 3 times [15]
Rnd 7: (sc in the next stitch) till the end of the round [15]
Rnd 8: (sc in the next 4 st, inc) repeat 3 times [18]
Rnd 9: (sc in the next stitch) till the end of the round [18]
Rnd 10: (sc in the next 5 st, inc) repeat 3 times [21]
Rnd 11: (sc in the next stitch) till the end of the round [21]
Rnd 12: (sc in the next 6 st, inc) repeat 3 times [24]
Rnd 13: (sc in the next stitch) till the end of the round [24]
Rnd 14: (sc in the next 7 st, inc) repeat 3 times [27]
Rnd 15: (sc in the next stitch) till the end of the round [27]
Rnd 16: (sc in the next 8 st, inc) repeat 3 times [30]
Rnd 17: (sc in the next stitch) till the end of the round [30]
Rnd 18: (sc in the next 9 st, inc) repeat 3 times [33]
Rnd 19: (sc in the next stitch) till the end of the round [33]
Rnd 20: (sc in the next 10 st, inc) repeat 3 times [36]
Rnd 21: (sc in the next stitch) till the end of the round [36]
Rnd 22: (sc in the next 11 st, inc) repeat 3 times [39]
Rnd 23: (sc in the next stitch) till the end of the round [39]
Rnd 24: (sc in the next 12 st, inc) repeat 3 times [42]
Rnd 25: (sc in the next stitch) till the end of the round [42]
Rnd 26: (sc in the next 13 st, inc) repeat 3 times [45]
Rnd 27: (sc in the next stitch) till the end of the round [45]
Rnd 28: (sc in the next 14 st, inc) repeat 3 times [48]
Rnd 29: With additional colour. (sc in the next stitch) till the end of the round [48] Fasten off and weave in the end.
Colar
Rnd 1: There are 18 sc on the neck, we’ll put on the collar and sew the head at the same time, so make a chain a little longer that 18 sc. Join 22 ch with sl st.
Rnd 2: 2 turning ch, 2 dc in each sc in both loops [44]
Rnd 3: 2 turning ch, 2 dc in each sc in both loops [88]
Rnd 4: 2 turning ch, 2 dc in each sc in both loops [176]
Rnd 5: Crochet around with additional colour till the end of the round (2 ch, sc in the next st), join, weave in the end.
Sew some decorations on the belly and cap and your festive bear amigurumi is finished!
