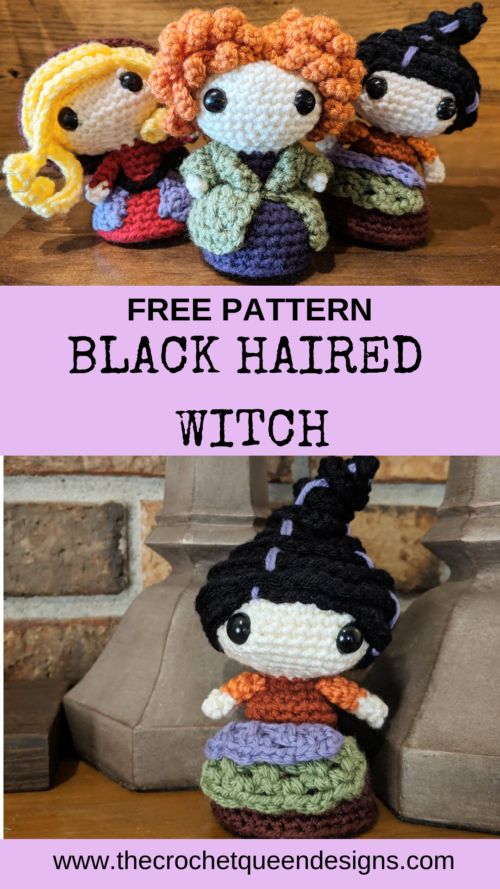
Crochet Black Haired Witch Doll
Crafting a crochet black-haired witch doll can be a delightful and creative project that allows you to bring a touch of magic to your home. Using your imagination and crochet skills, you can design a charming and whimsical doll that embodies the mystique of a witch with its dark locks and enchanting accessories. From the intricate details of her outfit to the intricately crafted broomstick she carries, every stitch brings this mystical character to life. Whether you're an experienced crocheter or a beginner looking for a fun challenge, creating a crochet black-haired witch doll can be a joyous and rewarding experience that adds a dash of spooky charm to your decor. So grab your yarn, hook, and a sprinkle of magic, and let your creativity soar as you craft your own bewitching creation!
Supplies
Yarn weight 4
- Cream (Yarn Bee Soft and Sleek, Cream)
- Dark Orange ( )
- Burgundy (Yarn Bee Soft and Sleek, Burgundy)
- Black (Yarn Bee Soft and Sleek, Black )
- Light Purple (Sugar and Cream, Hot Purple)
- Olive Green (Caron Simply Soft, Sage)
Crochet hook size 3.5
Yarn Needle
Safety Eyes, 12mm plastic
Stuffing (Loops and Threads Classic Fiberfill)
Scissors
Pins

Head
With Cream Yarn, ch 2, sc 6 in second ch from hook
R1 – inc in each sc (12 sts)
R2 – *sc, inc* x6 (18 sts)
R3 – *sc 2, inc* x6 (24 sts)
R4 – *sc 3, inc* x6 (30 sts)
R5 – *sc 4, inc* x6 (36 sts)
R6-8 – sc in each sc (36 sts per row)
R9 – *sc 4, dec* x6 (30 sts)
R10 – *sc 3, dec* x6 (24 sts)
R11 – *sc 2, dec* x6 (18 sts)
Insert safety eyes between R7 and R8, about 7 stitches apart. NOTE: you will want the eyes on the opposite side of the head from where the rows start. This way the color changes are not on the front of the doll.
Begin stuffing head to medium firmness.
R12 – *sc, dec* x6 (12 sts)
R13 – *sc 2, dec* x3 (9 sts)
Do not tie off. Continue to Body.
Body
Switch to Dark Orange Yarn
R14 – sc in each sc (9 sts)
R15 – *sc 2, inc* x3 (12 sts)
R16 – *sc, inc* x6 (18 sts)
R17-18 – sc in each sc (18 sts per row)
R19 – *sc, dec* x6 (12 sts)
Switch to Burgundy Yarn
R20 – *sc, inc* x6 (18 sts)
R21 – *sc 2, inc* x6 (24 sts)
R22 – *sc 3, inc* x6 (30 sts)
R23 – *sc 4, inc* x6 (36 sts)
R24-26 – sc in each sc (36 sts per row) TIE OFF.
Body Base
In Burgundy Yarn, ch 2, sc 6 in second ch from hook
R1 – inc in each sc (12 sts)
R2 – *sc, inc* x6 (18 sts)
R3 – *sc 2, inc* x6 (24 sts)
R4 – *sc 3, inc* x6 (30 sts)
R5 – *sc 4, inc* x6 (36 sts)
TIE OFF and leave a tail long enough for sewing.
Sew base to the bottom of the body, stuffing body as you go. Do not overfill the body though because you want the bottom to be flat. Pull the tail from the body base circle up through the middle of the doll to help flatten out the bottom.
Hair
Cap
With Black Yarn, ch 2, sc 4 into second ch from hook
R1 – sc in each sc (4sts)
R2 – sc, inc, sc, inc (6 sts)
R3-4 – sc in each sc (6 sts per row)
R5 – inc x6 (12 sts)
R6-7 – sc in each sc (12 sts per row)
R8 – *sc, inc* x6 (18 sts)
R9-10 – sc in each sc (18 sts per row)
R11 – inc x18 (36 sts)
R12 – sc in each sc (36 sts)
R13-15 – 9 sc, hdc, 25 dc, hdc (36 sts)
On last row slip stitch after last hdc, then TIE OFF, leaving a tail for sewing
Texture
With Black Yarn, ch 170, turn, sc in each ch. TIE OFF leaving a tail for sewing
(an alternative way to do this is to do a sc chainless foundation stitch, this is my prefered method because you can add or subtract length easier if needed)
Sew this long piece around the cap in a swirl, starting in the back and spiraling up to the top.
Purple Streak
Using a rather long piece of light purple yarn, start at the top of the hair and weave in and out of the spiral until you reach the bottom, then weave back up to the top. Add as many streaks as you like.
Arms (make 2)
With Cream Yarn, ch 2, sc 4 in second ch from hook
R1 – sc in each sc (4 sts)
Switch to Bright Orange
R2 – sc in each sc (4 sts)
R2 – inc x4 (8 sts)
R3 – sc in each sc (8 sts) TIE OFF. Leave a tail for sewing.
To attach to body, pinch R2 and use tail to sew arms to either side of body.
Waist Wrap
In Light Purple Yarn, ch 10
R1 – starting in second ch from hook, sc in each ch. Ch 1, turn (9 sts)
R2 – (sc, ch 3, skip 1) x4, sc in last sc. Ch 3, turn
R3 – (sc in gap, ch 3) x4, ch3, sc in last sc. TIE OFF, leaving a tail for sewing
In Olive Green Yarn, ch 10
R1 – starting in second ch from hook, sc in each ch. Ch 1, turn (9 sts)
R2 – (sc, ch 3, skip 1) x4, sc in last sc. Ch 3, turn
R3 – (sc in gap, ch 3) x4, ch3, sc in last sc, ch 3, turn
R4 – (sc in gap, ch 3) x4, sc in last gap. TIE OFF, leaving a tail for sewing
Sew the green wrap on first, and layer the purple on top. I like to do them off center to the left and not perfectly aligned with one another to give it a more whimsical feel.