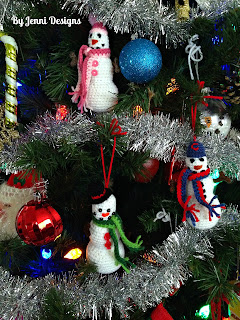
Crochet Christmas Ornament
Crochet Christmas ornaments are a delightful way to add a personal touch to your holiday decorations. Whether you're an experienced crocheter or just starting out, creating your own ornaments can bring a special charm to your tree or home decor. These handcrafted ornaments can be customized to match your preferred color scheme or style, making them a unique and thoughtful addition to your holiday collection. From classic snowflakes to adorable mini stockings, the possibilities are endless. With a cup of hot cocoa and some festive music playing in the background, crocheting these ornaments can be a cozy and joyful activity to get you into the holiday spirit. So grab your crochet hook and yarn, and let your creativity shine as you craft these tiny treasures that will surely bring smiles and warmth to your Christmas celebrations.
Skill Level: Intermediate
Finished Size (depending on chosen hat): 6" x 4" with size G hook, 5.5" x 3.75" with size F hook
Supplies:
Red Heart Super Saver worsted weight yarn
-50-75 yd. of white
-Small amounts in brown, orange and choice colors for scarf & hat.
Size G (4.0 mm) Hook or Size F (3.75 mm) Hook
Poly-fil
Tapestry Needle
Scissors
Stitch Marker
Optional: Safety eyes, size 6 mm
Abbreviations (US Terms):
BLO — Back Loop Only
Ch — Chain
FLO — Front Loop Only
Hdc — Half Double Crochet
Sc — Single Crochet
Sc2tog — Single Crochet 2 Together
Sk — Skip
Sl st — Slip Stitch
Sp — Space
Important Notes:
-Sc2tog counts as an sc.
-Joins are made with a sl st.
-Stitches places in these brackets [ ] indicate a group of stitches that should all be worked into the same space.
-This pattern calls for use of the magic circle (aka magic ring)
-The body of the snowman is worked in the round. To keep track of your rows place a stitch marker in the last stitch of each row and proceed to move the stitch marker up at the end of each row.
Body
Using White:
Row 1: Magic circle, ch 1, 6 sc in circle. Pull circle tight and sew in end, do not join. (6)
Remember to place your stitch marker in the last stitch of the row and continue to move it to the last stitch of each row as you go.
Row 2: 2 sc in the very first sc you made in row 1. (You will now be working in the round) 2 sc in next and in each around. (12)
Row 3: *Sc in next, 2 sc in next.* Repeat *to* around. (18)
Row 4: *Sc in next 2, 2 sc in next.* Repeat *to* around. (24)
Row 5: *Sc in next 3, 2 sc in next.* Repeat *to* around. (30)
Row 6-12: Sc in each around. (30)
Be sure to turn your piece right side out, if you don't it may be difficult to do so later on.
Row 13: *Sc in next 3, sc2tog.* Repeat *to* around. (24)
Row 14: *Sc in next 2, sc2tog.* Repeat *to* around. (18)
Start stuffing the snowman now and continue to do so as you go along.
Row 15: Sc in each around. (18)
Row 16: *Sc in next 2, 2 sc in next.* Repeat *to* around. (24)
Row 17-21: Sc in each around. (24)
Row 22: *Sc in next 2, sc2tog.* Repeat *to* around. (18)
If you want to use buttons on your snowman or stitch on coal, it's easiest to do it now.
Row 23: *Sc in next, sc2tog.* Repeat *to* around. (12)
Row 24: Sc in each around. (12)
Row 25: *Sc in next, 2 sc in next.* Repeat *to* around. (18)
Row 26-30: Sc in each around. (18)
You should now embroider on the carrot nose and eyes or if you are using safety eyes, you should add them now. As a guide, my eyes are worked within row 30, the nose is is in rows 28 & 29 and the smile is worked between rows 26 & 27.
Row 31: *Sc in next, sc2tog.* Repeat *to* around. (12)
Row 32: *Sc2tog.* Repeat *to* around. (6)
Sl sl into next to join then fasten off leaving a long end.
Using the end, sew the hole shut & sew in the end.
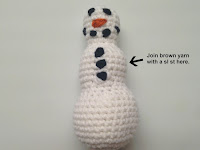
Arms
Using brown:
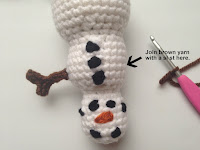
With the snowman upright and facing you, attach brown yarn with a sl st on the right side in row 19.
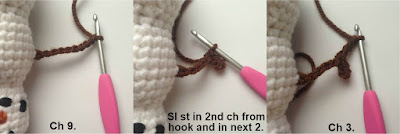
Ch 9, sl st in 2nd ch from hook and in next 2. Ch 3.
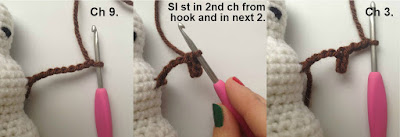
Sl st in 2nd ch from hook and in each remaining sp across. Fasten off. Using the end of your yarn and a tapestry needle, secure arm to the body then sew the ends into the arms to help make them stiffer.
To make the 2nd arm, hold the snowman upside down while he is still facing you. Attach brown yarn with sl st in row 19.
Ch 9, sl st in 2nd ch from hook and in next 2. Ch 3.
Sl st in 2nd ch from hook and in each remaining sp across. Fasten off. Using the end of your yarn and a tapestry needle, secure arm to the body then sew the ends into the arms to help make them stiffer.
Scarf
Using two colors of choice:
Row 1: With first color: Ch 46, sc in 2nd ch from hook and in each across. (45 sc)
Fasten off.
Row 2: Join new color with a sl st. Ch 1, sc in each across. (45 sc)
Fasten off.
Don't bother with sewing in your ends, instead add additional yarn pieces to the ends of the scarf and knot the pieces together to make fringe.
Hat Choices
Beanie Hat
Using two colors of choice:

Starting with the color your would like for the hat:
Row 1: Magic circle, ch 1, 6 sc in circle. Join. (6 sc)
Row 2-3: Ch 1, 2 sc in each around. Join. (12 sc)
Fasten off.
Join contrast color with a sl st.
Row 4: Ch 1, sc in same, 2 sc in next. *Sc in next, 2 sc in next.* Repeat *to* around. Join. (18 sc)
Fasten off leaving a long end to sew hat to the top of the snowman.
Optional: Make a small pom-pom for the top of the hat and attach it to the top of the hat.
Stuff hat then sew hat to top of snowman and sew in ends.
Top Hat
Using Black & choice color:
Starting with black:
Row 1: Magic circle, ch 1, 6 sc in circle. Join. (6 sc)
Pull circle tight and sew in end.
Row 2: Ch 1, 2 sc in each around. Join. (12 sc)
Row 3: In BLO: Ch 1, sc in each around. Join. (12 sc)
Row 4-5: Ch 1, sc in each around. Join. (12 sc)
Fasten off.
Join contrast color with a sl st.
Row 6: Ch 1, sc in each around. Join. (12 sc)
Fasten off.
Join black in front loop with a sl st.
Row 7: In FLO: Ch 1, sc in same, 2 sc in next. *Sc in next, 2 sc in next.* Repeat *to* around. Join. (18 sc)
Row 8: Ch 1, 2 sc in same. sc in 2. *2 sc in next, sc in 2.* Repeat *to* around. Join. (24 sc)
Fasten off leaving a long end to sew hat to the top of the snowman.
Stuff hat then sew hat to top of snowman and sew in ends.
Baseball Cap
Using choice color:
Row 1: Magic circle, ch 1, 6 sc in circle. Pull circle tight. (6)
Pull circle tight and sew in end.
Row 2: Ch 1, 2 sc in each around. Join. (12)
Row 3: Ch 1, 2 sc in first, sc in 2. *2 sc in next, sc in 2.* Repeat *to* around. Join. (16)
Row 4-5: Ch 1, sc in each around. Join. (16)
Row 6: In FLO: Ch 1, sc in first 2, [sc, hdc] in next, [hdc, sc] in next, sc in next, sl st in next. (8)
Row 7: Ch 1, turn, sk first, sc in next 2, 2 sc in next 2, sc in 2, sl st in last.
Fasten off leaving a long end to sew hat to the top of the snowman.
Optional: Stitch on any letter you wish to the front of the hat.
Stuff hat then sew to the top of snowman, sew in ends.