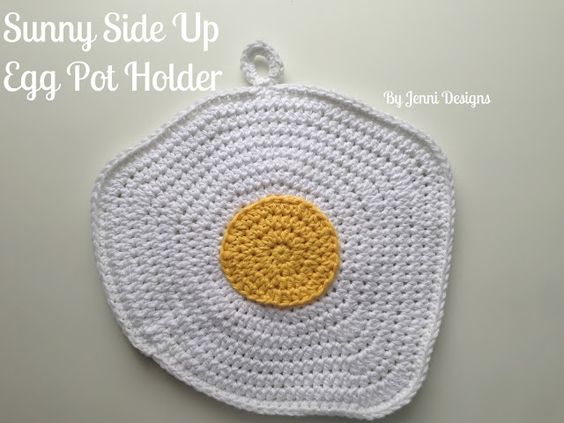
Crochet Sunny Side Up Egg Pot Holder
The Crochet Sunny Side Up Egg Pot Holder is an adorable and practical addition to any kitchen. This charming pot holder adds a touch of whimsy to your cooking space while also serving a functional purpose. Its intricate crochet design mimics the look of a sunny-side-up egg, bringing a smile to your face every time you use it. Whether you’re protecting your hands from hot pots and pans or simply adding a pop of fun to your kitchen decor, this pot holder is sure to brighten up your day. Embrace your love for all things crafty and culinary with this delightful accessory that brings a sunny-side-up vibe to your cooking adventures.
Skill Level: Easy
Finished Size: Approx. 9" x 8"
Supplies:
Size H (5.0 mm) Crochet Hook
Worsted Weight 100% Cotton Yarn in White (135 yds.) & Yellow (25 yds.)
Tapestry Needle
Scissors
Stitch Markers
Abbreviations (US Terms):
Ch – Chain
Dc — Double Crochet
Hdc — Half Double Crochet
Sc — Single Crochet
Sl st – Slip Stitch
Sp — Space
Important Notes:
-This pattern uses a magic circle
-At the end of each row it is very important to remember to move your stitch marker to the last stitch made to help you keep track of rows.
-Stitches placed in these brackets [ ] indicate a group of stitches that should all be worked into the same space.
Gauge: 4 sc = 1"
Egg White
(make 2)
With White:
Row 1: Magic circle, ch 1, 9 sc in circle. DO NOT JOIN. (9)
Place a stitch marker in last stitch made and continue to move it to the last stitch of every row.
For this pattern you will not be joining, instead you will work in the round. To work in the round your first stitches of row 2 should be worked into the very first sc you made in row 1.
Row 2: [Sc, hdc] in first, 2 hdc in next & in each around. (18)
Row 3: *Hdc in next, 2 hdc in next.* Repeat *to* around. (27)
Row 4: *Hdc in 2, 2 hdc in next.* Repeat *to* around. (36)
Row 5: *Hdc in 3, 2 hdc in next.* Repeat *to* around. (45)
Row 6: *Hdc in 4, 2 hdc in next.* Repeat *to* around. (54)
Row 7: *Hdc in 5, 2 hdc in next.* Repeat *to* around. (63)
Row 8: 2 hdc in next. *Hdc in 10, [Hdc, dc] in next, 2 dc in next, [dc, hdc] in next.* Repeat *to* one time. Hdc in 10, 2 hdc in next, hdc in 10. [Hdc, dc] in next, 2 dc in next, [dc, hdc] in next. Hdc in 12. (74)
Row 9: 2 hdc in next. *Hdc in 13, 2 hdc in next, hdc in next, 2 hdc in next.* Repeat *to* one time. Hdc in 25, 2 hdc in next, hdc in next, 2 hdc in next, hdc in 13. (81)
Row 10: Hdc in 16, [hdc, dc] in next, 2 dc in next, [dc, hdc] in next. Hdc in 15, [hdc, dc] in next, 2 dc in next, [dc, hdc] in next. Hdc in 27, [hdc, dc] in next, 2 dc in next, [dc, hdc] in next. Hdc in 14. (90)
Row 11: *Hdc in 8, 2 hdc in next.* Repeat *to* around.(100)
Row 12: Hdc in 20, [hdc, dc] in next, 2 dc in each of the next 3 sp, [dc, hdc] in next. Hdc in 20, 2 hdc in each of the next 3 sp. *Hdc in 10, 2 hdc in next.* Repeat *to* two times. 2 hdc in each of the next 2 sp. Hdc in 15, sc in next, loosely sl st in last. (113)
Fasten off but leave the stitch marker in the sl st space.
After you have made both egg whites move on to the yolk pattern below.
Yolk
(make 1)
With Yellow:
Row 1: Magic circle, ch 1, 9 sc in circle. DO NOT JOIN. (9)
Place a stitch marker in last stitch made and continue to move it to the last stitch of every row.
For this pattern you will not be joining, instead you will work in the round. To work in the round your first stitches of row 2 should be worked into the very first sc you made in row 1.
Row 2: [Sc, hdc] in first, 2 hdc in next & in each around. (18)
Row 3: *Hdc in next, 2 hdc in next.* Repeat *to* around. (27)
Row 4: *Hdc in 2, 2 hdc in next.* Repeat *to* around. (36)
Row 5: Hdc in next, sc in next, loosely sl st in next. Leave remaining sp un-worked.
Fasten off leaving a long end for sewing.
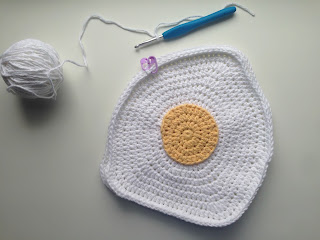
Sew yolk to the center of one of the egg whites & sew in all the ends
Next you need to stack one egg on top of the other, lining up the stitch markers. Place the egg with the yolk on top.
Now, holding together both egg whites, with the yolk facing you: Join with a sl st in the same spaces as the stitch markers on both egg whites.

Ch 1, sc in same and in each around making sure you are working through all 4 loops. Join.
Fasten off and sew in ends.
Loop
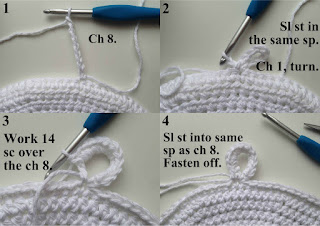
To add a loop to your pot holder first decide where you would like the loop, if you are making 2 pot holders you may want to place your loops in different places to make the eggs look slightly different while hanging. For the pot holder I am using in this tutorial I worked in the 39th sp before the fasten off on the egg white.
Turn pot holder over and join in your chosen sp on the back of the egg. Work the following into the sp you joined in: [Ch 8, sl st]. Ch 1, turn, work 14 sc over the ch, sl st into the same sp as the ch 8.
Fasten off and sew in ends.