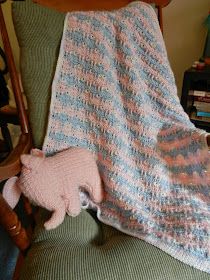
Crochet Peek-a-Boo Striped Blanket
The Crochet Peek-a-Boo Striped Blanket is a delightful and charming project for those who love to crochet. This lovely blanket features a fun peek-a-boo design with alternating stripes that add a pop of color and whimsy. With a playful combination of stitches and colors, this blanket is perfect for cozying up on the couch or adding a touch of handmade warmth to any room. Whether you're a seasoned crocheter or just starting out, this project is sure to bring joy and satisfaction as you craft your own cozy masterpiece. Get your hooks ready and let your creativity shine with this delightful crochet blanket!

Difficulty Level: Intermediate(I have placed it at intermediate because of the color changes and the fpdc to a lower row)
Yarn: Georga yarn: bebe luv baby, 120g, 100% acrylic (1 ball pink), (1 ball blue), ( 1 ball baby combo)
(Now I do have to say something about this yarn. I bought it at Wal-mart here in Canada. It had a crazy amount of knots in it, maybe I had the luck of the draw, but there was a lot. This was also some of the softest creamiest yarn I have worked with. It was also a great price. Each skein was under 3 dollars, and 10 cents of every ball gets donated to the Children's Miracle Network.)
Hook: H/8- 5.00MM
Gauge: 5 sc st =1 inch, 6 sc rows = 1 inch
Size: 28 inches by 30 inches, If you want a larger size increase your stitches by 8s.
Blanket Pattern
Row 1: With the blue, Ch 112, dc in 3rd ch from hook, for 109 dc total
Row 2: Ch 3 (counts as first dc here and throughout), turn, dc in each st across for a total of 109 dc.
Row 3: Change to baby combo, Ch 1, turn, sc in the next 5 dc, {sk 1 dc, (dc, ch 2, dc) in the next dc, sk 1 dc, sc in the next 5 sc}, repeat {to} till the last st. (13 v st.)
Row 4: Change color to pink, Ch 1, turn, sc in first sc, spike st around dc post of dc two rows below, sk one sc, sc in next sc, sk one sc, fpdc around dc post of dc two rows below (there will be a dc between the two fpdc), sc in the next sc, sc in the next dc, sc in the next ch 2 sp, sc in the next dc, sc in the next sc, {fpdc around dc post of dc 2 rows below (there will be 5 dc between the last fpdc made), sk one sc, sc in next sc, fpdc around dc post of dc two rows below (there will be a dc between the two fpdc), sk one sc, sc in the next sc, sc in the next dc, sc in the next ch 2 sp, sc in the next dc, sc in the next sc}, repeat {to} 11 times, fpdc around dc post of dc 2 rows below (there will be 5 dc between the last fpdc made), sk one sc, sc in next sc, fpdc around dc post of dc two rows below (there will be a dc between the two fpdc) sk 1 sc, sc in the last sc.
Rows 5 and 6: Repeat row 2.
Row 7: Change to the baby combo color, ch 1, turn, sc in sc, {sk 1 dc, (dc, ch 2, dc) in next dc, sk 1 dc, sc in the next 5 sc} repeat {to} 12 more times, sk 1 dc, (dc, ch 2, dc) in the next dc, sk 1 dc, sc in the last dc.
Row 8: Change color to blue, ch 1, turn, {sc in the sc, sc in the next dc, sc in the ch 2 sp, sc in the next dc, sc in the next sc, fpdc in 6th dc from 2 rows down, sk 1 sc, sc in the next sc, fpdc in the dc 2 rows below, (there will be one dc between the last fpdc), sk 1 sc}, repeat {to} 12 more times, sc in the sc, sc in the next dc, sc in the ch 2 sp, sc in the next dc, sc in the last sc.
Rows 9 and 10: repeat row 2
Rows 11 – 111: repeat rows 3 through 10. At the end of row 111 finish off, and weave in your ends. For projects like this I like to weave in my ends right after I cut it to start a new color, so if you do this you will just have one end to weave in.
Edging:
With the Umber join at any corner, (sc, ch 1, sc) in the corner space, sc in each st evenly around, and in each corner space (sc, ch 1, sc). Continue this pattern for 4 rounds.