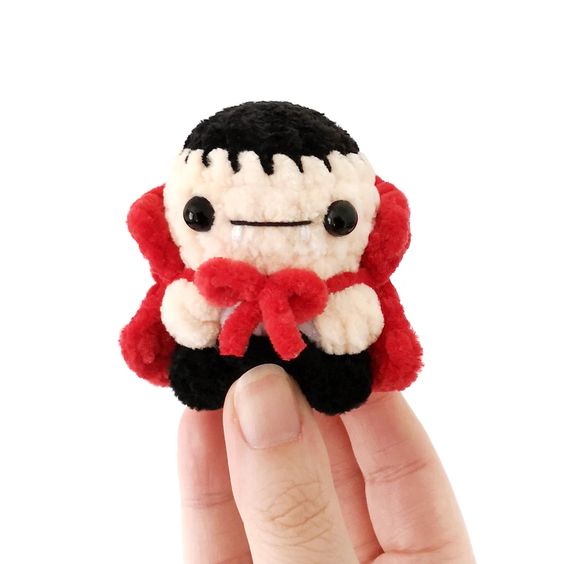
Crochet No-Sew Vampire
Crochet No-Sew Vampire is such a fun and unique project that allows you to get crafty without the hassle of sewing! With this technique, you can create adorable vampire-themed amigurumi or decorations using just your crochet skills. By following simple patterns and instructions, you can bring to life cute little vampires perfect for Halloween or any spooky celebration. Not only is it a fantastic way to show off your creativity, but it also makes a great gift for fellow crafters or friends who appreciate handcrafted items. So gather your yarn and crochet hooks, and let's get started on making some fang-tastic creations with the Crochet No-Sew Vampire technique!
Materials
- Super bulky yarn in black, skin colour, light grey and red (I used Premier Yarns Parfait Chunky in Black, Shell, Fog and Cardinal)
- 4.5mm crochet hook
- 8mm safety eyes
- 4 ply yarn in black and white or black and white embroidery floss
- Polyester fiberfill
- Stitch marker, yarn needle, scissors
- Fray stop or clear glue
Abbreviations (US Terms)
- ch – chain
- sc – single crochet
- inc – increase
- invdec – invisible decrease
- FLO – front loop only
- bo – 4dc bobble stitch
- hdc – half double crochet
- hdc-inc – half double crochet increase
- hdc-dec – half double crochet decrease
- 3hdc-inc – 3 half double crochet in same stitch
- sl st – slip stitch
- st/s – stitch/es
- […] – repeat the instructions in brackets
- (…) – indicates stitch count at end of round
Special Stitches
4 Double Crochet Bobble Stitch (bo)
- Yarn over.
- Insert your hook into the indicated stitch.
- Yarn over and pull up a loop (3 loops on hook).
- Yarn over and pull through first 2 loops (2 loops on hook).
- Repeat steps 1-4 three more times in the same stitch (5 loops on hook).
- Yarn over and pull though all 5 loops on hook.
- Push bobble to the right side of fabric.
How to Crochet Bobbles in a Contrasting Colour
- Draw through the new colour on the last yarn over of the previous stitch.
- Follow bobble stitch steps 1-5.
- Drop the bobble colour and yarn over with the main colour, pull through all 5 loops on hook.
- Push bobble to the right side of fabric.
Finished Size
The finished vampire measures approximately 2.75″ (7cm) tall. Size may vary depending on tension and materials used.
Gauge
Gauge is not important in this pattern. Use a hook size to match your chosen yarn. Make sure that your stitches are tight enough to prevent stuffing showing through and adjust hook size if necessary.
Notes
- Pieces are worked in a continuous spiral. Mark the first stitch of each round with a removable stitch marker.
- All bobble stitches are worked in the front loop only.
Pattern Instructions
Vampire (starting with black)
R1: Ch 2, 6 sc in second ch from hook (6)
R2: [Inc] x6 (12)
R3: [Sc, inc] x6 (18) – change to skin colour
Tip: To minimise the colour change, fasten off invisibly after R3 and join skin colour yarn with a standing sc. Only do this for the head NOT the body as it will change the bobble st placement.
R4-6: [Sc] x18 (18) 3 rounds
R7: [Sc, invdec] x6 (12) – change colour to light grey in last st
R8: [FLO sc] x12 (12)
The bobble stitches in the next round are worked in skin colour as indicated in bold. All colour changes take place in the last yarn over of the previous colour. Cut the skin colour yarn after each bobble and knot the ends together inside the piece to secure.
R9: 4 sc, FLO bo, 3 sc, FLO bo, 3 sc (12) – change colour to black in last st
Insert safety eyes between R5 and R6, 3 sts apart.
Stuff the head and continue to stuff as you go.
Using 4 ply white yarn or white embroidery floss, sew 2 vertical sts for the fangs between R5 and R6 approximately 1 st away from each eye, 2 sts apart and 1/2 a st long.
Using 4 ply black yarn or black embroidery floss, sew a line for the mouth from fang to fang.
R10: [Sc] x12 (12)
R11: 4 sc, FLO bo, 3 sc, FLO bo, 3 sc (12)
R12: [Sc, invdec] x4 (8)
Cut the yarn leaving a tail and pull through last st. Weave the yarn tail through the front loops only of the final round and pull to close. Hide the end inside the vampire.
Cape
The cape is worked flat in turned rows. The ch 2 at the beginning of each row does not count as a st.
Tip: Mark the first row with a stitch marker so you can easily identify the top of the cape.
R1: Ch 16, hdc in third ch from hook and each ch across (14)
R2: Ch2, turn. [hdc-dec] x2, 2 hdc, hdc-dec, 2 hdc, [hdc-dec] x2 (9)
R3: Ch 2, turn. 3hdc-inc, 7 hdc, 3hdc-inc (13)
R4: Ch 2, turn. Hdc-inc, 11 hdc, hdc-inc (15)
Fasten off and weave in ends.
Take a long piece of red yarn and weave it through the back of the cape every couple of sts between R2 and R3 where the cape narrows.
Use the ties to secure the cape around the vampire’s neck. Tie in a bow and trim ends.
Add a drop of fray stop or clear glue to the bow ends to prevent shedding.