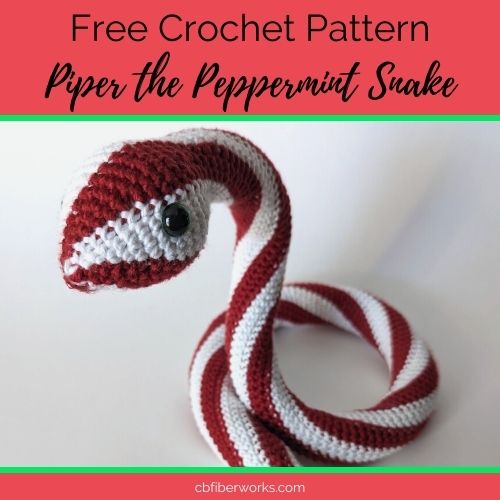
Crochet Piper the Peppermint Snake
Crochet Piper the Peppermint Snake is a charming and whimsical creation that captures the magic of handcrafted artistry. With vibrant red and white stripes reminiscent of a peppermint candy, Piper radiates warmth and joy. The meticulous stitching that brings Piper to life showcases the skill and dedication of the crafter behind this delightful creation. Whether displayed as a whimsical decoration or gifted to a loved one, Piper is sure to bring a smile to anyone's face. Embracing the spirit of creativity and imagination, Crochet Piper the Peppermint Snake is a wonderful addition to any collection of handmade treasures.

Project Materials
- Yarn: Hobby Lobby I Love This Cotton (2 skeins)
- Color A: White (82yds)
- Color B: Burnt Sienna (82yds)
- 3.25mm hook
- 12mm safety eyes
- Stitch markers
- Tapestry needle
- Scissors
- Polyfil/stuffing
- Pipe cleaners/ wire (optional)
Stitch Abbreviations
(**) – See Project Notes section
- MR – magic ring (**)
- Sc – single crochet (**)
- Inc – increase (**)
- Dec – decrease (**)
- St(s) – stitch(es)
- Rnd – round
Project Notes
- Final dimensions: L: 31in x W: 2.5in
- This length will vary depending on your yarn, hook, tension and the number of body rows you work.
- This project is written in US terminology.
- Unless otherwise specified, work in continuous rounds without using a slip stitch to join rows.
- Move stitch markers up each row as you go.
- Magic Ring: Create a magic ring and work the specified number of single crochet into it (ex. MR6 = 6sc into the ring).
- Single Crochet: Unless otherwise specified, this project uses the yarn under technique. Insert your hook into the stitch, yarn under, pull up a loop (2 loops on your hook), yarn under, and pull through both loops.
- Increase: work 2sc into the same stitch.
- Decrease: Unless otherwise specified, use the invisible decrease method. Insert your hook into the front loop of the next stitch, then insert your hook into the front loop of the following stitch, yarn over and pull through the first loop (3 loops on the hook), then yarn over and pull through all 3 loops on the hook.
- Changing Colors: In this pattern, always change colors in the last stitch stitch of the working color by finishing the stitch with the new color:
- How to change colors: Insert your hook into the next st, yarn under, pull up a loop, then finish the sc by pulling through the last 2 loops with the second color.
- When to change colors: Ex. Color A: 2sc, Color B: 2sc.
- Work 2sc in Color A, then use the method above to change colors in the 2nd st.
- Work 2sc in Color B, then change colors in the 2nd st.
- Keep your floats loose: We’re using fair isle crochet in this pattern, which means you’ll have yarn running along the inside of your work. I suggest keeping the stitches where you change color just a little bit looser and you can always tug on the float to tighten it as needed.
- Wire: Using wire in this project is optional and only needed if you want your snake to be poseable. I used pipe cleaners and connected them as I crocheted the body, but it’s not super stiff. So if you want something stronger, I recommend using a thicker wire wrapped in tape.
Piper the Peppermint Snake Pattern
Head
Start by holding Color A and B together.
Rnd 0: form a MR,A: ch 1, sc, B: sc, A: sc, B: sc, A: sc, B: sc. (6)
Rnd 1: [A: inc, B: inc] 3 times. (12)
Rnd 2: [A: 2sc, B: 2sc] 3 times. (12)
Rnd 3: [A: inc, sc, B: inc, sc] 3 times. (18)
Rnd 4: [A: 3sc, B: 3sc] 3 times. (18)
Rnd 5: [A: sc, inc, sc, B: sc, inc, sc] 3 times. (24)
Rnd 6: [A: 4sc, B: 4sc] 3 times. (24)
Rnd 7: [A: inc, 3sc, B: inc, 3sc] 3 times. (30)
Rnd 8: [A: 5sc, B: 5sc] 3 times. (30)
Rnd 9: [A: 2sc, inc, 2sc, B: 2sc, inc, 2sc] 3 times. (36)
Rnds 10-12: [A: 6sc, B: 6sc] 3 times. (36)
Rnd 13: [A: 2sc, dec, 2sc, B: 2sc, dec, 2sc] 3 times. (30)
Place your safety eyes between Rnds 8-9 with one red stripe and one white stripe between them. (Your stitch marker will be at the top.)
Rnd 14: [A: sc, dec, 2sc, B: sc, dec, 2sc] 3 times. (24)
Rnd 15: [A: sc, dec, sc, B: sc, dec, sc] 3 times. (18)
Start stuffing the head, leaving a center gap for the wire.
NOTE: Using pipe cleaners or wire is optional–it’s just to make your snake posable.
Body
Rnds 16-18: [A: 3sc, B: 3sc] 3 times. (18)
Finish stuffing the head and push the end of the wire into the head. Try to keep the wire in the center of the body and stuff around it as you go.
Make sure to pause and add stuffing every inch or so (about 6 to 8 Rnds).
Rnds 19-165: [A: 3sc, B: 3sc] 3 times. (18)
NOTE: In total, the body is 150 Rnds, but feel free to work more or less depending on how long you want your snake to be. When your snake is as long as you want, continue to Rnd 166 to start the tail.
Tail
Rnd 166: [A: dec, sc, B: dec, sc] 3 times. (12)
Rnds 167-168: [A: 2sc, B: 2sc] 3 times. (12)
Rnd 169: [A: dec, B: dec] 3 times. (6)
If you’re using wire, trim it now and tuck any sharp bits down inside the body.
Rnds 170-171: [A: sc, B: sc] 3 times. (6)
Fasten off and sew the remaining hole closed. Weave in any excess yarn tails.
You’re done!