Crochet Skirt with Pleats
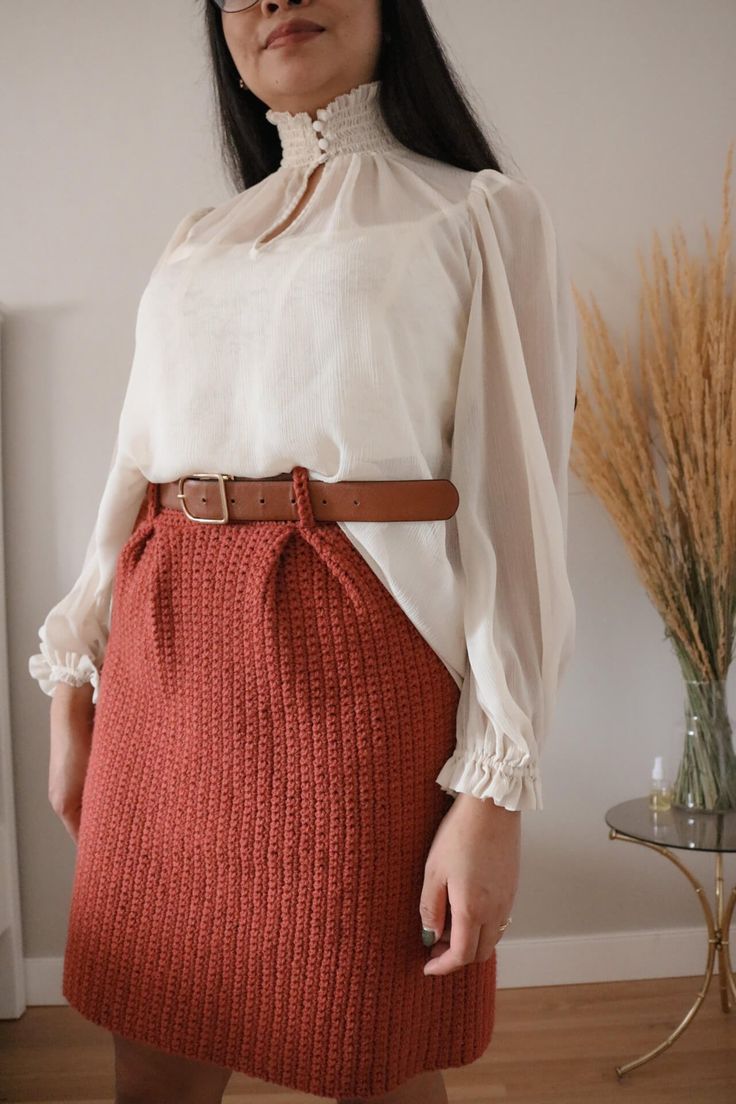
Whether you're looking for a stylish summer staple or a unique piece to add to your wardrobe, the Crochet Skirt with Pleats is sure to make a statement! With its delicate crochet detailing and flattering pleats, this skirt combines elegance with a touch of bohemian charm. Perfect for pairing with a simple tee for a casual day out or dressing up with a blouse for a special occasion, this versatile skirt is a must-have for any fashion-forward individual. So go ahead, embrace your inner fashionista and twirl your way through the day in this effortlessly chic crochet skirt!

Pattern Notes:
- This pattern is made using US terminology.
- The pattern is written in rows. Turn after each row.
- FOR THE BODY – The ch 1 at the beginning of the row is counted as a stitch in the final count. This is the first stitch, move on to the next st after each initial ch st.
- FOR THE GARTER – the ch ch 1 at the beginning of the row is not counted as a st. continue with a slst in the ending st below.
Materials:
- CYC 4 weight yarn
- 4.0 mm crochet Hook
- Stitch Markers
- Scissors
- Darning Needle
- Tape measure
Gauge:
Body of the skirt – 16 sts x 17 rows = 4×4” in single crochet
Ribbed portion for back garter – 21 sts x 32 rows in slip stitch
Size Guide:
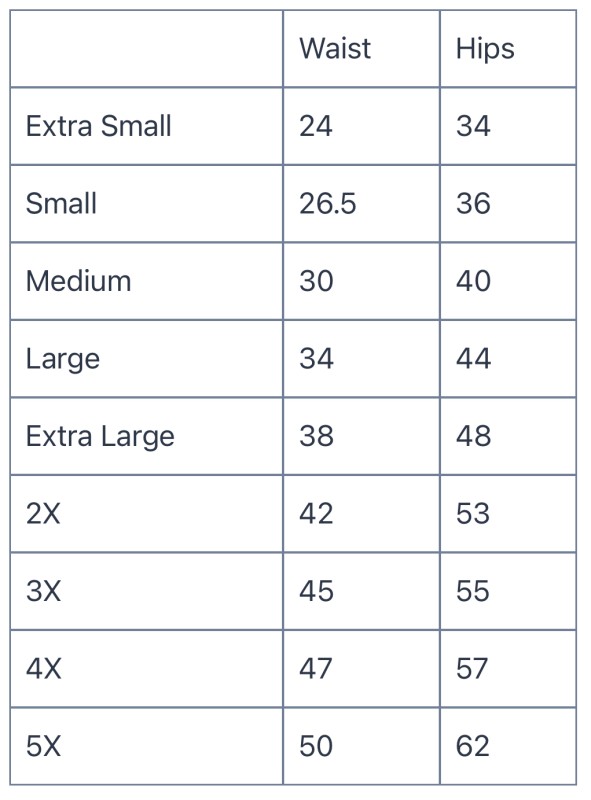
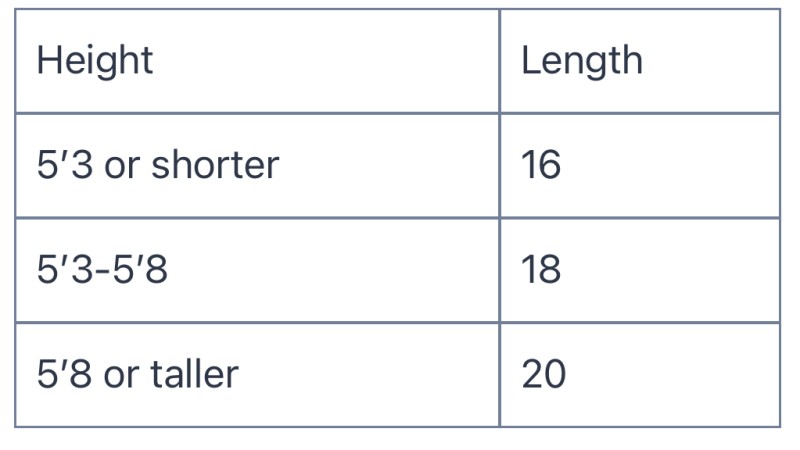
The length varies depending on person’s height. Choose the length and follow this number for your ch sts at the beginning of the pattern. If the length on the chart does not meet your desired length, measure from your waist down to the desired length. Divide this number by 4 then multiply by 16. This will be your initial ch st for the body of the skirt.


*Measure from waist. This does not include 2″ waist band.
Abbreviations:
- Ch – Chain stitches
- Sc – single crochet
- Fsc – Foundation Single Crochet
- Slst – Slip Stich
- St/s – stitch/es
Body of the Crochet Skirt Pattern:
Ch 72 (80, 88) + 1
Note: If you computed your desired length, use that number for your chsts+ 1.
R1: sc into 2nd ch from the hook (this serves as your first and second st), sc into each ch down the row. 72 (80, 88) sts.
R2 – 110 (118, 136, 152, 170, 190, 200, 208, 230): ch 1, sc into next st, sc into each st down the row. 72 (80, 88) sts.
R136: ch 1, sc into next 55 (63, 71) sts. 56 (64, 72) sts.
Note: if you started with another chthat you measured, minus 16 from that number.
R137 – 144 (152, 170, 186, 204, 224, 234, 242, 264): ch 1, sc into next st, sc into each st down the row. 56 (64, 72) sts.
Garter:
Ch 32 +1
R1: slst into 2nd ch from hook, slst into each ch down the row. (32 sts)
R2 – 32: ch 1, slst into same st, slst into each st down the row (32 sts)
Fasten off with a long tail (you will you this to attach the garter to the open space in the back)
You are now going to work on making your pleats and the waistband.
We need to set up our stitch markers for the pleats. To start, we need to locate the center of the skirts top.
Count 55 (59, 68, 76, 85, 95, 100, 104, 115) rows from the first row of the body and mark with a st marker (A). Place the fabric against your body, aligning the marker to your navel. Estimate where you want the pleats, this is typically a couple few inches from the center where you can feel the inner part of your hip bone. Place st markers to mark these points (B). Count eight rows on each side of B stitch markers and mark these points as (C ). Count 4 rows from C markers and mark these points as (D).
Crocheting the Waistband of the Skirt
Attach yarn to top right corner of the skirt. This is the corner right before the drop in level. You are going to be crocheting along the side of the rows. One single crochet per row.
R1: ch 1, sc into each row side until you reach the first stitch marker D.
Pleat Process
Fold C marker inwards to meet B, then fold outwards so D is in line with the crease. Sc through all folds until you reach B (4 sts). Repeat folds on the opposite side of the marker. Sc through folds (4 sts).
Continue sc into each row side until you reach another D marker and repeat pleat process. After second pleat, sc in each row side until end of the row.
R2 – 9: ch 1, sc into next st. sc in each st until end of the row.
Fasten off with a long tail (you will use this to seam the skirt closed.
Attaching the Garter
Align the garter against the short side of the skirt body. Seam down until the corner. Stretch the bottom of the garter to align with the width of the gap. Seam the stretched garter to the skirt body (this roughly equates to one row each).
Seaming the Crochet Skirt Close:
Closing the skirt
Attach needle to the long tail from the waistband. Align the sides together and seam the skirt shut.
Adding the bell Loops
To make a loop, crochet a single crochet foundation chain of 9. Around 6” of yarn before making the foundation chain and allow a tail of 6” when fastening off. (make 6 total)
Lay the skirt flat to mark where you need to place the loops. Place a loop on the sides, At the pleats, and in the back directly in line with the pleats.