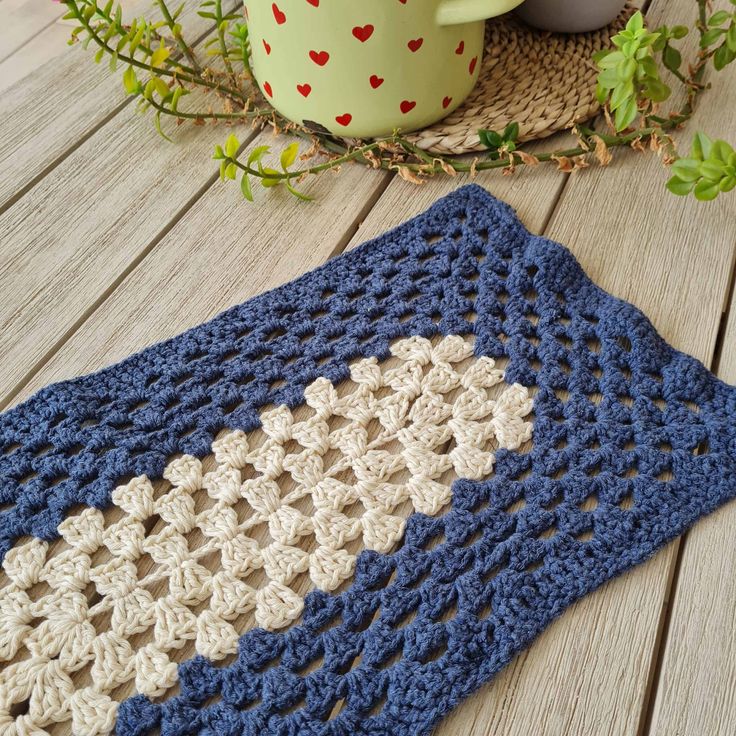
Crochet Granny Rectangle Table Runner
The Crochet Granny Rectangle Table Runner is a charming addition to any home decor, adding a touch of cozy elegance to your dining or coffee table. This beautiful handmade piece combines intricate crochet work with timeless design, making it a lovely focal point for your living space. With its warm colors and delicate patterns, this table runner not only protects your furniture but also brings a sense of handmade charm to your home. It's the perfect way to add a touch of warmth and personality to your dining area or living room, making every meal or gathering feel a little more special.
Difficulty
Beginner
Materials
- Any #4 weight Cotton yarn
- Hook: US Size H-8 (5 mm), Yarn Needle, Scissors, Measuring Tape
Gauge
16 st X 7 rows
Sizes
This sample is 11” X 20”
Stitch Key
- Ch = Chain
- Slstc = Slip stitch
- St = Stitch
- Dc =Double Crochet stitch
- Specialty Stitch & Technique Key
- GRst = Granny stitch [Dc3 + Ch1] in same stitch
Notes
- This pattern consists of one rectangle worked in rounds
- Ch3 does counts as st at beginning of the row
- This pattern calls for multiples of 3 +3
- You can work this pattern with one color or multiple as you wish. I used two colors
- You can adjust the length by adding multiples of 3 to the foundation chain to suit your style and preference
- This pattern can also be used as Placemats
Instructions
For this pattern rectangle, Please decide if and when to change colors.
I used the cream shade in the first 3 rounds and changed to the navy color for the rest.
Chain 25
Row 1: Dc2 in 4th Ch from hook( forms 1st GRst), Ch1, Skip 2 Ch, GRst in next, skip 2 ch, Grst in next, skip 2 Ch, continue across to end, Dc3 in last st, Ch2, Dc3 in same st, Ch2, Dc3 again in same st, (this forms the rectangle corner), Ch1, now we continue on the same row on the opposite side, GRst in next GRst from the prev row on the opposite side, GRst in next GRst, continue to next corner, skip 2, Dc3 in last Ch (1st Dc3), Ch2, Dc3 in the same spot, Ch2, and Slst to 1st Ch3 from the beginning. (2 corners + 6 X 2 Dc3 clusters)
Now you should have a closed rectangle.
Round 2: Sl st 3 to the near Ch1 space, Ch3 (counts as 1st st), Dc2, Ch1,GRst in next Ch1 space, GRst in next and continue until reach next corner, (Dc3+Ch2+Dc3) in next Ch2 space, Ch1, (Dc3+Ch2+Dc3) in next Ch2 space, Ch1, GRst in next ch1 space and across, finish Slst to 1st Ch1 from the beginning. ( 4 corners + 7 X 2 Dc3 clusters)
Round 3: Sl st 3 to the near Ch1 space, Ch3 (counts as 1st st), Dc2, Ch1, GRst in next Ch1 space, GRst in next and continue until reach next corner, (Dc3+Ch2+Dc3) in next Ch2 space, Ch1, (Dc3+Ch2+Dc3) in next Ch2 space, Ch1, GRst in next ch1 space and across, finish Slst to 1st Ch1 from the beginning. ( 4 corners + 1 Dc3 cluster in between + 8 X 2 Dc3 clusters)
Here I changed colors, so fasten up the yarn and cut.
Rounds 4-9: Introduce new color in a corner Ch3 (counts as 1st st), Dc2 + Ch2 + Dc3 in same Ch2 corner, Ch1, Grst in next Ch1 space, GRst in next and continue until reach next corner, Dc3+Ch2+Dc3 in next Ch2 space, Ch1, GRst in next, and across to next corner, Dc3+Ch2+Dc3 in next Ch2 space, Ch1, GRst in next Ch1 space and across, to next and corner, repeat until you finish the round, finish Slst to 1st Ch1 from the beginning.
If you wish to make a larger piece continue repeating rounds
Round10: Ch3 (counts as 1st st, Dc1 in next 2 Dc from prev round, Dc1 in Ch1 space, *[Dc1 in next 3 dc from prev round, Dc1 in Ch1 space]* repeat from * to* to corner, (Dc3+Ch2+Dc3), continue *to* to next corner and repeat to end of the round, Slst to 1st Ch1 from the beginning
Round 11 (Final Round): Ch1, Sc1 in 1st st, Sc1 in next st and across to the corner, (Sc1+Ch2+Sc1) in the corner, continue Sc1 in every st to next corner and repeat to end of the round, Slst to 1st Ch1 from the beginning
Finishing
Cut yarn and weave in ends, I suggest to hand-wash in room temperature water with fabric soap the item and block it to straighten and have a perfect rectangle.
DONE!!