Crochet Whirlwind Hat
Experience the magic of the Crochet Whirlwind Hat, a true masterpiece that will leave you in awe. This exquisite hat is crafted using the intricate technique of crochet, where every stitch is carefully woven together to create a stunning whirlwind pattern. The hat features a unique blend of colors, reminiscent of a vibrant whirlwind swirling through the sky. Crafted with love and attention to detail, the Crochet Whirlwind Hat is a must-have accessory for those who appreciate the beauty of handmade items. Whether you're strolling through a winter wonderland or attending a cozy gathering, this hat will keep you warm and stylish. So, embrace the magic of crochet and let the whirlwind of colors and patterns take you on a journey of fashion and creativity.

Skill level: Intermediate
Finished Size: 21” circumference
Materials:
- Yarn
- Worsted wt (Sample uses Lion Brand Yarns “Vanna’s Choice” 100% Acrylic (3.5 oz/100g, 170 yd/156 m)
- Color A: #105 Silver Blue (used approximately 28 yds)
- Color B: #109 Colonial Blue (used approximately 46 yds – this was my Brim color)
- Color C: #099 Linen (used approximately 28 yds)
- Color D: #146 Dusty Purple (used approximately 28 yds)
- Hook I / 5.5mm
Notions: Yarn/tapestry needle

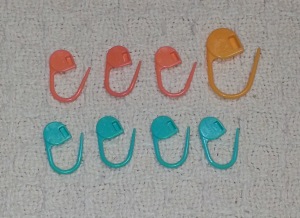
8 Stitch markers in 3 colors (1 in first color, 3 in next color, 4 in last color)
Gauge
First 5 rounds of pattern = 4” in diameter
Abbreviations/Special Stitches
Adjustable Slip Knot – Beginning tail tightens the loop on the hook shaft.
Hdc – Half double Crochet stitch
PM – Place stitch marker
FPhdc – Front Post half double crochet stitch
BPhdc – Back Post half double crochet stitch
BPsc – Back Post single crochet stitch
Pattern Notes:
Hat uses 4 colors, follow instructions for using stitch markers so you don’t lose your place.
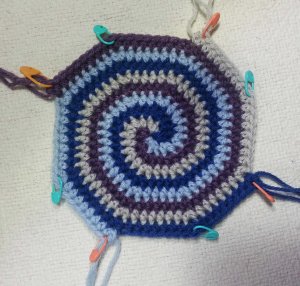
Color 1 of stitch markers is used to mark last stitch of entire round as well as last stitch/increase point of that color section.
Color 2 of stitch markers is used to mark the other 3 last stitch/increase point of color sections.
Color 3 of stitch markers is used to mark the first increase point in each color section.
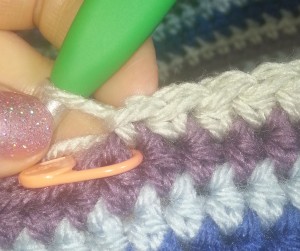
When working the first 9 rounds move stitch markers up to 2nd stitch worked in each increase point, For Rounds 10 – 18 you will only be using the markers for the last stitch of each color section.
Instructions
CROWN

Rnd 1: Starting with color A make an adjustable slip knot, ch 2, (sc, hdc) in 2nd ch from hook, pull up a long loop and remove hook, with color B *insert hook in center/first ch of round, pull up a loop on hook, ch 1, (sc, hdc) in same center/ch, pull up a long loop and remove hook,*; Repeat from * to * with Color C and D. PM in each hdc w/end of color/round markers (placing single color marker in hdc of Color D), PM in each sc with first increase markers. [4 sc, 4 hdc]
Rnd 2: *2 hdc in next 2 sts, move st marker to 2nd st worked in each st, pull up long loop and remove hook**, insert hook in next color*; Repeat from * to * 2 times; Repeat from * to ** once. [16 hdc]
Rnd 3: *(Hdc in next st, 2 hdc in marked st, move st marker to 2nd st worked) 2 times, pull up long loop and remove hook, insert hook in next color*; Repeat from * to * 2 times; Repeat from * to ** once. [24 hdc]
Note: Measure gauge after finishing Round 5, if your gauge is small and you don’t want to start over work 10 rounds following the increase pattern, if your gauge is large only work 8 rounds following the increase pattern.
Rnds 4 – 9: *(1 hdc in each unmarked st, 2 hdc in marked st, move st marker to 2nd st worked in marked st) 2 times, pull up long loop and remove hook,** insert hook in next color*; Repeat from * to * 2 times; Repeat from * to ** once. Stitch count for end of Rnd 9 [72 hdc]
SIDES

Remove the Color 3 stitch markers – you will not be increasing any further.

I put one of these stitch markers in the side of the last stitch in Round 9, this makes it easier to keep track of the number of side rounds worked.

Rnd 10: * hdc in each st until work in marked st, move marker up to st worked in marked st,** insert hook in next color*; Repeat from * to * 2 times; Repeat from * to ** once. [72 hdc]
Rnds 11 – 20: Repeat Rnd 10.
Rnd 21: Step down to one color: Decide which of your 4 colors you want to be your brim color,

then with each of the other 3 color segments: Hdc in each st until one st remains un-worked before the marked st, sc next st, slip st loosely in next st, pull up a long loop, remove st marker.
With brim color: Hdc in each st ending in the marked st, place stitch marker in last st;
Go back to other 3 colors: slip st snugly in next st, fasten off and pull end thru last slip st.
Stitch counts at end of Round 21 [66 hdc, 3 sc, 3 loose slip st]
BRIM
Rnd 1: Hdc in each st around, move st marker up to st worked in marked st. [72 hdc]
Rnd 2: (FPhdc next st, BPhdc next st) 36 times. [36 FPhdc, 36 BPhdc]
Rnd 3 (FPhdc next st, BPhdc next st) 35 times, FPhdc next st, BPsc next st, loose slip st next 2 sts, slip st snugly next st, fasten off and pull end thru last slip st. [35 BPhdc, 36 FPhdc, 1 BPsc, 2 loose slip st]
Finishing
Weave in tails.
Now have some fun making hats. Play around with the colors you use, make 2 arms of the spiral in 1 color and the other 2 arms in a contrasting color for a 2 color version. Mix it up with using a variegated yarn for one of the arms and pulling solid colors for the yarns you make the other 3 arms with.