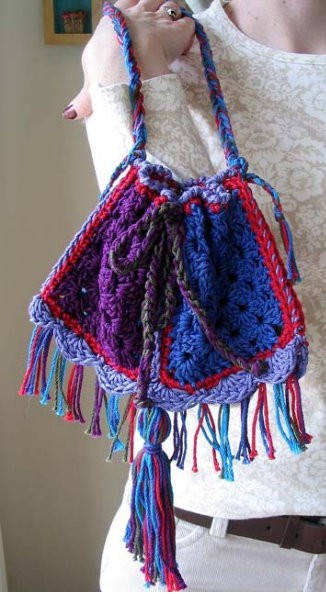
Crochet Gypsy Bag
The Crochet Gypsy Bag is a bohemian-inspired treasure that exudes free-spirited elegance. This stylish bag features a unique and intricate crochet pattern, with intricate details and tassels adding a touch of whimsy and charm. The soft, chunky yarn provides a sturdy and durable fabric, making it perfect for carrying all your essentials, from a phone and wallet to a book and keys. Whether worn as a shoulder bag, cross-body bag, or carried as a clutch, the Crochet Gypsy Bag is a fashion statement that's sure to turn heads with its eclectic charm and laid-back vibe.
Skill level: Easy
Sizes:
4-square bag: approx. 9" w. x 5" deep (before closing with drawstring tie)
8-square bag: approx. 9" w. x 10" deep(before closing with drawstring tie)
Materials:
100 yds. ea. of 5 (or more!) different colors of DK-wt. cotton yarn (sample 4-square bag shown in Tahki Cotton Classic)
Size G/6 (4.25 mm) or H/8 (5 mm) crochet hooks, or sizes needed to achieve gauge
Tapestry needle
Optional: fabric, sewing thread and needle for lining
Gauge: 1 granny square = 4.5” on size H/8 (5 mm) hook
Stitches/Terms: beginning (beg), chain (ch), double crochet (dc), half double crochet (hdc), increase (inc), repeat (rep), single crochet( sc), slip stitch (sl st), space (sp), stitch (st)
Bag
Make four (or eight) 4-1/2" granny squares, one (or two) each in choice of color as follows:
Rnd 1: Ch 4, join into ring, ch 3, work 2 dc in ring, ch 2, work 3 dc in ring, ch 2, work 3 dc in ring, ch 2, work 3 dc in ring, join with sl st to top of beg ch-3 (four 3-dc groups)
Rnd 2: Sl st into first sp, ch 3, work (2dc, ch2, 3dc) in same sp (first corner made), *in next sp work (3dc, ch2, 3dc), rep from * around, join with sl st to beg ch-3 (four corners made)
Rnd 3: Sl st into first sp, ch 3, work (2dc, ch2, 3dc) in same sp, in next sp work 3dc, *in next corner work (3dc, ch2, 3dc), in next sp work 3dc, rep from * around, join with sl st to beg ch-3.
Rnd 4: Sl st into first sp, ch 3, work (2dc, ch2, 3dc) in same sp, in next sp work 3 dc, in next sp work 3 dc, *in next corner work (3dc, ch2, 3dc), in next sp work 3dc, in next sp work 3dc, rep from * around, join with sl st to beg ch-3. Fasten off and weave in ends.
(If necessary, repeat as in Rnd 4 until square measures 4-1/2".)
Edging and joining squares:
Step 1: Work a single crochet edging evenly around each square, working 3 single crochet at each corner. Fasten off and weave in ends.
Step 2: Hold Square 1 and Square 2 with wrong sides together. Join with an overcast (whipstitch) or slip stitch seam. Fasten off and weave in ends.
Step 3: Hold Square 2 and Square 3 with wrong sides together. Join with an overcast (whipstitch) or slip stitch seam. Fasten off and weave in ends.
Step 4: Hold Square 3 and Square 4 with wrong sides together. Join with an overcast (whipstitch) or slip stitch seam. Fasten off and weave in ends.
Note: For 8-square bag: Repeat Steps 1-4, then join the two rows of 4 squares together with whipstitch or slip stitch seam to form square shape.
Step 5: Work a reverse single crochet (shrimp stitch, crab stitch) edging, working from left to right, on one long side of piece (this will be the top edge of the bag when finished). Fasten off and weave in ends.
Step 6: Work a shell stitch edging along other long side of piece (this will be the bottom edge of the bag when finished) IN FRONT LOOPS ONLY as follows: Join yarn at beginning of side, chain 1, single crochet in same single crochet, *skip 2 single crochet, work 5 double crochet in next single crochet, skip 2 single crochet, single crochet in next single crochet, repeat from * across. Fasten off and weave in ends.
Step 7: Hold beginning and ending edges of strip (or square) with wrong sides together and work an overcast (whipstitch) or slip stitch seam to join entire piece into a tube.
Step 8: Fold piece flat, so two (or four) squares show on each side. Turn piece upside down so shell edging is facing you, then work overcast (whipstitch) or slip stitch seam in the free loops behind the shell edging. This will close the bottom of the bag.
Step 9: Turn bag right side up so opening is at top. For handle, attach several strands of yarn to one of the side seams (leaving approx. 8" tails hanging to braid later), chain length desired, then attach to other side seam. Fasten off. If desired, braid tails and tie in an overhand knot to secure ends.
For drawstring tie: Holding 2 or 3 strands of yarn together, chain desired length (to allow for bag to be fully opened at top), fasten off and tie ends in overhand knot to secure. Thread drawstring through spaces at top of bag, pull gently to draw bag closed and tie in a bow.
For fringe: Make fringe by winding yarn several times around a book or piece of cardboard. Cut at one end. Attach fringe as follows: Decide where you want to place a piece of fringe, then insert hook into piece at that point. Fold a strand (or 2 or 3) of fringe in half around hook, pull loop through fabric, then pull strand ends through loop on hook and pull to tighten knot. Repeat across bottom of bag as desired.
For tassels: Wind yarn around a 6" measure several times but do not cut. Run a length of yarn through one end to tie strands together at top. Cut strands at other end, then wrap a separate length of yarn around top of tassel about 1" down from top tie. Weave all ends in securely. Attach tassels to bag wherever desired by using top ties to secure them to the bag.
For fabric lining: Cut two squares of fabric slightly smaller than dimensions of finished bag, sew with a 1/4" seam along sides and bottom, hem the top, then insert lining into bag and tack top of lining all around inside top edge of crocheted bag.