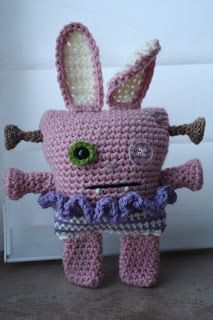
Crochet Franken Bunny
The Crochet Franken Bunny is a delightful and quirky creation that brings together the cuteness of a bunny and the spookiness of Frankenstein in a charming way. This unique crochet project allows crafters to showcase their creativity by combining soft yarn with a touch of Halloween fun. With its cute floppy ears and playful stitches, the Crochet Franken Bunny is sure to capture the hearts of all who see it. Whether you're an experienced crocheter looking for a fun challenge or a beginner wanting to try something new, this whimsical project is a perfect choice to add a touch of whimsy to your crafting repertoire. So, grab your crochet hooks and some colorful yarn, and get ready to bring this adorable monster bunny to life!
Pattern Abbreviations
ch~chain
sc~single crochet
hdc~half double crochet
dc~double crochet
sl st~slip stitch
sk st~skip stitch
invdec~invisible decrease
fo~fasten off
Supplies:
This project is perfect for using up scraps! I didn’t even use a full skein of yarn on the body. You will also need a 4mm crochet hook, needle, stuffing, safety eye, button and your mad crochet skills!
Ch 25
Sc in second ch from hook and remaining chains across.
When you get to the end do 2sc in last stitch.
Now you will be working on the other side of your foundation ch….sc across and then 2sc in the last corner stitch.
Then continue to sc x 350 in the round.
If you are not at a corner….sc a few until you reach the nearest corner and invdec, then sc across to the other corner and invdec in this corner as well.
Sc x 60
Sc over to the nearest corner and invdec, sc to the next corner and invdec.
Sc to the middle of the side you’re working on and switch to the colours you want to use for the skirt (in this case I will be using purple) and sc around (where you attached this new colour, this is now the back of your ami).
Now switch to the second colour of your skirt (in this case white) and sc around, continue in this manner until you have 3 stripes of each colour.
Then fold your ami flat and sc to the end of your ami.
Sl st in the last stitch and fo leaving a really long tail, you will use this to sew your ami closed later.
Now embroider on your mouth, teeth, add eyes a few stitches really let your imagination run wild!
Skirt
Insert your hook into the middle stitch on your ami’s back on top of the first stripe of colour of your skirt, then yo and pull up loop and sl st, then sc around.
Sc, hdc, dc around in each st.
Fo weave in ends.
Eye Patch
Ch 2
6sc in second ch from hook.
2sc in each stitch.
Fo, weave in ends.
Then add safety eye in the middle of the circle and add it to your bunny.
Leg (Make 2)
Ch 7
Sc in second ch from hook and remaining 5 ch’s.
Now you will be working on the other side of your foundation ch, sc x 100 around.
Fo leave a long tail, you will use this to sew it to the body of your ami.
Arm (Make 2)
Ch 2
Sc 7 in second ch from hook.
2sc in each st.
Sc x 14
Sc, invdec (x 7)
Sc around x 35
Fo, leave a long tail, you will use this to sew it to the body of your ami later
Ear (Make 2)
Ch 5
Sc in second ch from hook and remaining 3 ch’s
Ch 1 turn, sc across
Ch 1 turn, 2sc in next st, sc ,sc ,2 sc in next st
Ch 1 turn, sc across (repeat this round 4 more times)
Ch 1 turn, invdec, sc, sc, invdec
Ch 1 turn, sc across
Ch 1 turn, invdec x 2, fo, weave in ends
Now you will attach the yarn colour you used for the body of your bunny (in this case pink )to the bottom of your ear and sc around the entire ear
Fo and leave a long tail, you will use this to sew the ear to your ami
Bolt (Make 2)
Ch 2
6sc in second ch from hook.
2sc in each st
Sc, 2sc in next st (x6)
Sc, sc, invdec (x4) sc, sc
Sc, invdec (x7)
Sc around x 25
Fo, leave a long tail, you will use this to sew the bolt to your ami.
Now stuff the body of your bunny,use a needle and use the long tail you have left and sew straight across the bottom. Sew on legs, arms, and bolts! Voila you now have a Franken Bunny of your very own!