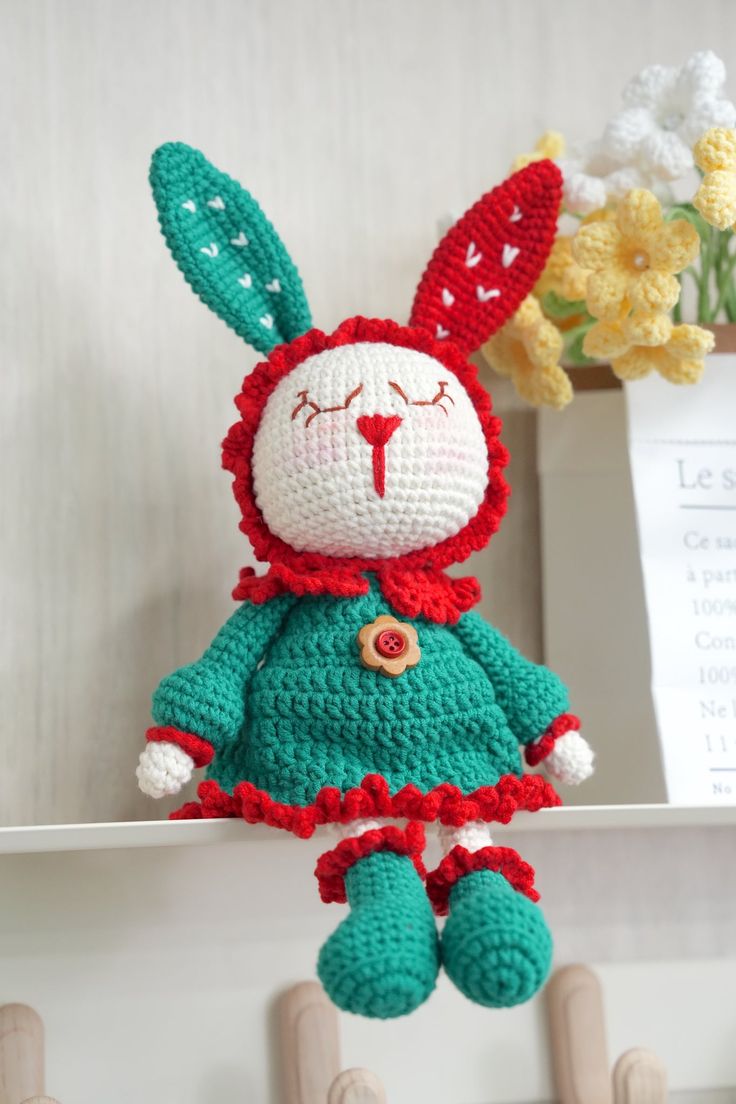
Crochet Bunny Girl
The crochet bunny girl is an adorable creation that brings joy and cuteness to all who meet her. With her fluffy ears and sweet demeanor, she is sure to become a beloved friend to everyone who lays eyes on her. Whether as a gift for a loved one or a charming addition to your own home decor, this crochet bunny girl is bound to bring a smile to your face. Embrace her whimsical charm and let her enchant you with her soft yarn and lovable charm.
Materials Needed:
- Yarn– Loopara 5ply combed cotton (Green14, Red 24, Brown 54 and White 61)
- Hook- 3.0mm
- Fiber fill
- Yarn needle
- Buttons
- Positioning beads
- Stitch marker
- Scissors
- Tweezers
How to Crochet the Head
- R1: Magic ring, ch, 8 sc in ring, sl.
- R2: Ch, 8 sc inc, sl.
- R3: Ch, (sc, sc inc) 8 times, sl.
- R4: Ch, (sc, sc inc, sc) 8 times, sl.
- R5: Ch, (3 sc, sc inc) 8 times, sl.
- R6: Ch, 40 sc, sl.
- R7: Ch, (2 sc, sc inc, 2 sc) 8 times, sl.
- R8-R11: Ch, 48 sc, sl.
- R12: Ch, (7 sc, sc inc) 6 times, sl.
- R13-R15: Ch, 54 sc, sl.
- R16: Ch, (4 sc, sc inc, 4 sc) 6 times, sl.
- R17: Ch, (4 sc, sc2tog, 4 sc) 6 times, sl.
- R18: Ch, (7 sc, sc2tog) 6 times, sl.
- R19: Ch, (3 sc, sc2tog, 3 sc) 6 times, sl.
- R20: Ch, (5 sc, sc2tog) 6 times, sl.
- R21: Ch, (2 sc, sc2tog, 2 sc) 6 times, sl.
- R22: Ch, (3 sc, sc2tog) 6 times, sl.
- R23: Ch, (sc, sc2tog, sc) 6 times, sl.
- R24: Ch, (sc, sc2tog) 6 times, sl.
- R25: Ch, 6 sc2tog, sl, fasten off leaving long tail for closing.
How to Crochet the Hat
- R1: Magic ring, 6 sc in ring, sl.
- R2: Ch, 6 sc inc, sl.
- R3: Ch, (sc, sc inc) 6 times, sl.
- R4: Ch, (sc, sc inc, sc) 6 times, sl.
- R5: Ch, (3 sc, sc inc) 6 times, sl.
- R6: Ch, (2 sc, sc inc, 2 sc) 6 times, sl.
- R7: Ch, (2 sc, sc inc) 6 times, (5 sc, sc inc) 3 times, sl.
- R8: Ch, (3 sc, sc inc) 6 times, (6 sc, sc inc) 3 times, sl.
- R9-R17: Ch, 54 sc, sl.
- R18: Change to red, ch, 54 sc, sl.
- R19: Ch, 10 sc, (ch 3, sc) 44 times, sl, fasten off leaving long tail.
How to Crochet the Ear (Make 2)
- R1: Magic ring, 6 sc in ring, sl.
- R2: Ch, (sc, sc inc) 3 times, sl.
- R3: Ch, (sc, sc inc, sc) 3 times, sl.
- R4: Ch, 12 sc, sl.
- R5: Ch, (2 sc, sc inc) 4 times, sl.
- R6: Ch, (3 sc, sc inc) 4 times, sl.
- R7-R13: Ch, 20 sc, sl.
- R14: Ch, (4 sc, sc2tog, 4 sc) 2 times, sl.
- R15-R16: Ch, 18 sc, sl.
- R17: Ch, (7 sc, sc2tog) 2 times, sl.
- R18-R19: Ch, 16 sc, sl.
- R20: Ch, (3 sc, sc2tog, 3 sc) 2 times, sl.
- R21-R22: Ch, 14 sc, sl, fasten off leaving long tail.
How to Crochet the Leg (Make 2)
- R1: (With green) Magic ring, ch, 8 sc in ring, sl.
- R2: Ch, 8 sc inc, sl.
- R3: Ch, sc, sc inc, 4 sc, 4 sc inc, 4 sc, sc inc, sc, sl.
- R4: Ch, BLO 22 sc, sl.
- R5-R6: Ch, 22 sc, sl.
- R7: Ch, 7 sc, 4 sc2tog, 7 sc, sl.
- R8: Ch, 18 sc, sl.
- R9: Ch, 5 sc, 4 sc2tog, 5 sc, sl.
- R10: Ch, 6 sc, sc2tog, 6 sc, sl.
- R11-R14: Ch, 13 sc (stuff with fiberfill), sl.
- R15: (With white) BLO,ch, (sc, sc2tog) 4 times, sc, sl
- R16-R30: Ch,9 sc, sl, ch.
- R31: Flatten and work 5 sc, fasten off leaving long tail.
- Shoes Edging: (With red) in FLO of R14: Ch,(Sc, ch 3) 13 times, sl, fasten off.
How to Crochet the Hand (Make 2)
- R1: (With white) Magic ring, 6 sc in ring, sl.
- R2: Ch, (Sc, sc inc) 3 times, sl.
- R3-R4: Ch, 9 sc, sl.
- R5: Ch, (Sc, sc2tog) 3 times, sl, fasten off.
- R6: (With green) BLO ,ch,6 sc inc, sl.
- R7: Ch, 12 sc inc, sl.
- R8: Ch, 24 sc, sl.
- R9: Ch, (4 sc, sc2tog) 4 times, sl.
- R10: Ch, (2 sc, sc2tog) 5 times, sl.
- R11: Ch, (Sc, sc2tog) 5 times, sl.
- R12-R20: Ch,10 sc, sl.
- R21: Ch,5 sc, fasten off leaving long tail.
- Sleeve edging: With red in FLO of R5: ch,(Sc, ch 2) 6 times, sl.
How to Crochet the Body
- R1: Magic ring, ch, 8 sc in ring, sl.
- R2: Ch, 8 sc inc, sl.
- R3: Ch, (sc, sc inc) 8 times, sl.
- R4: Ch, (sc, sc inc, sc) 8 times, sl.
- R5: Ch, (3 sc, sc inc) 8 times, sl.
- R6-R9: Ch, 40 sc, sl.
- R10: Ch, (6 sc, sc2tog) 5 times, sl.
- R11-R12: Ch, 35 sc, sl.
- R13: Ch, (5 sc, sc2tog) 5 times, sl.
- R14-R15: Ch, 30 sc, sl.
- R16: Ch, (4 sc, sc2tog) 5 times, sl.
- R17-R18: Ch, 25 sc, sl.
- R19: BLO, ch, (3 sc, sc2tog) 5 times, sl, fasten off.
How to Crochet the Skirt
- R1: (With green) On R9 FLO: Ch, 25 sc, sl.
- R2: BLO, ch 2, 25 dc, sl.
- R3: Ch, (2 sc, sc inc, 2 sc) 5 times, sl.
- R4: Ch 2, 30 dc, sl.
- R5: Ch, (5 sc, sc inc) 5 times, sl.
- R6: Ch 2, (3 dc, dc inc, 3 dc) 5 times, sl.
- R7: Ch, (7 sc, sc inc) 5 times, sl.
- R8-R13: Ch 2, 45 dc, sl.
- R14: (With red) Ch, 45 sc, sl.
- R15: Ch, (Sc, ch 5) 45 times, sl.
How to Crochet the Collar
- R1: (With red) (On skirt r2 FLO, starting from center front) Ch, sc, hdc, 21 dc, hdc, sc, sl.
- R2: Ch, sc, hdc, 21 dc, hdc, sc, sl.
- R3: Ch, (sc, ch 4) 25 times, sl.
Crochet Couple Bunny Girl Assembly
- Position the arms at the sides of the body, below the collar. First secure with pins to mark placement, then sew in place. Tie off yarn ends together at the back to secure.
- Position the legs at the sides of the body, aligned with the arms. Attach between Rounds 5 and 6. Ensure legs are facing the correct direction with toes pointing forward. First secure with pins to mark placement, then sew in place. Tie off yarn ends together at the back to secure.
- Place the hat on the head with joining seam at the back and the starting chain at the top. Align the hat's final round of single crochet with the head's closing point. Use the reserved yarn tail from the head to sew around once, securing firmly.
- Center the hat with the collar, adjusting position while sewing.
- Fold the ears and secure with a few stitches, keeping the embroidery facing forward. Attach to hat with 8 stitches between them.
- Finally, embroider the facial features.
Crochet Tips:
Mark the beginning of each round with a stitch marker to keep track of your progress.
Assembly Tips:
1. Pin all parts in position before sewing to ensure proper placement and symmetry.
2. When attaching the head, align it carefully with the collar center and secure firmly.
No comments
Write a comment