Crochet Fox Beanie
The Crochet Fox Beanie is an adorable and cozy accessory that will bring a touch of whimsy to your winter wardrobe. With its cute fox design and soft, warm yarn, this beanie is perfect for keeping you snug and stylish on chilly days. Whether you're heading out for a walk in the crisp air or just lounging at home, this hat will add a fun and playful element to your outfit. It's also a great gift idea for anyone who loves cute and quirky accessories. So, why not add a pop of personality to your look with this charming Crochet Fox Beanie?
Fox Beanie Pattern
Size: 6-12 months (I hope to add smaller sizes in the near future)
Yarn: Red Heart Super Saver in Carrot and Black (less than 1 skein of Carrot and a very small amount of Black)
Hook: I used a size K, but I crochet very tightly, so most people would probably need a size I.
Gauge: 12 stitches and 10 Rounds (rows) = 4 inches
Note: Either join the last stitch of each row with a slip stitch and chain 2 or for a seamless hat, mark the first stitch of each round and crochet continuously (don’t join each round)
Round 1: 12 DC in a magic circle
Round 2: 2 DC in each stitch around (24 stitches)
Round 3: *1 DC in first stitch, 2 DC in next stitch, repeat from * around (36 DC)
Round 4: *1 DC in first 2 sitches, 2 DC in next stitch, repeat from * around (48 DC)
Rounds 5-13: DC in each stitch around (48 DC per round)
NOTE: your hat should measure about 5-5.5 inches in height at this point. Adjust your number of rounds accordingly
Rounds 14-16: * FPDC around first stitch, BPDC around next stitch, repeat from * around (48 stitches, 12 each FPDC and BPDC)
Note: Your hat should now measure approximately 6.5- 7 inches in height. You can do more or fewer rounds of DC around or of the FPDC/BPDC to achieve your desired look. I wrote the pattern using the number of rounds I used, but I tend to have short rows due to my habit of crocheting too tightly.
Ears:
Make 4
Start using MC (Carrot)
Row 1: Chain 10
Row 2: DC in third chain from hook and in each chain across (8 DC)
Row 3: CH 2, Decrease DC over first 2 stitches, DC in next 4 stitches, Decrease DC over last 2 stitches (6 DC)
Row 4: CH 2, Decrease DC over first 2 stitches, DC in next 2 stitches, Decrease DC over last 2 stitches (4 DC), Finish Off
R0w 5: Join black yarn with slip stitch, CH 2, Decrease DC over 1st 2 stitches and over last 2 stitches (2 DC)
Row 6: Ch 2, Decrease DC over 2 stitches (1 DC), finish off
Sew 2 triangles together to make one ear. Using 2 will make the ears more sturdy. I turned them inside out when I finished to make the edges cleaner.
Sew each ear onto your hat.
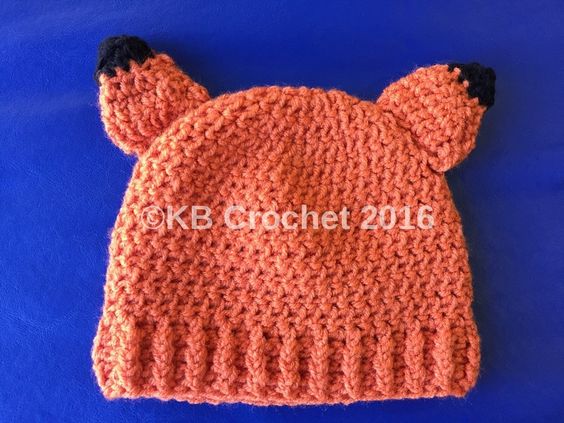
Here is another picture on a background that shows the ear tips a little better:
