Crochet Twist Headband
Crochet twist headbands are a trendy and versatile accessory that adds a touch of style to any outfit. These headbands are not only fashionable but also practical, keeping your hair in place and adding a cozy touch to your look. With a wide range of colors and patterns to choose from, you can easily find a crochet twist headband to match your personal style and mood. Whether you're running errands or having a casual day out with friends, these headbands are a fun and charming way to elevate your everyday look. Plus, the handmade touch of crochet adds a unique and special element to your accessories collection. Give your outfits a cute twist with a crochet headband that's as playful and friendly as you are!
Materials:
CROCHET HOOK: 7.0mm or size needed to obtain gauge
EXTRAS: Scissors, yarn needle
OPTIONAL: Stitch markers
YARN: Chunky yarn
- Estimated yardage: 35 (47, 53, 59, 64) yards. Yardage requirements are estimates. Your actual yardage may vary. Measurements are rounded to the nearest yard.
- Recommended yarn: Paintbox Yarns Simply Chunky
- Alternative recommendations: Paintbox Yarns Chunky Pots, Hobbii Glitter Delight, Hobbii Amigo Chunky, WeCrochet Brava Bulky, Lion Brand Feels Like Bliss
- You can also try combining a strand of worsted/aran yarn with a strand of DK or sport yarn to create your own chunky yarn!
Gauge:
2” x 2” (5cm x 5cm) = 6 sts x 5 rows worked over alternating DC & SC
Stitch Key:
ST/STS: Stitch/Stitches
CH: Chain
SC: Single Crochet
DC: Double Crochet
FO: Fasten Off
Notes:
- Crochet skill level: beginner/easy
- This pattern is written in US crochet terms
- Information is listed in the following order: Baby (Toddler, Child, Adult Small, Adult Large)
- The stitch count at the end of each row is shown in brackets [ ]
- The CH 1 at the beginning of each row does not count as a stitch
- This pattern uses the lemon peel stitch which is just alternating dc and sc stitches. You don’t need to learn how to create this stitch, you will create it by simply following the pattern.
Finished Measurements / Size Chart:
SizeHead CircumferenceFinished Headband LengthFinished Headband Width
Baby14-16″ (35.6-40.6cm)14″ (35.6cm)3.33″ (8.5cm)
Toddler16-18″ (40.6-45.7cm)16″ (40.6cm)4″ (10.2cm)
Child18-20″ (45.7-50.8cm)18″ (45.7cm)4″ (10.2cm)
Adult Small20-22″ (50.8-55.9cm)20″ (50.8cm)4″ (10.2cm)
Adult Large22-24″ (55.9-61cm)22″ (55.9cm)4″ (10.2cm)
This headband has about 1-2″ (2.5-5.1cm) of negative ease.
I’ve included instructions for adjusting the length and/or width of your crochet twist headband below.
Adjustments:
ADJUSTING THE WIDTH:
This headband is about 3.33″ (8.5cm) wide for the baby size, and about 4″ (10.2cm) wide for all other sizes. If you’d like to adjust the width of your headband you can follow this simplified pattern. Keep in mind, the twist style looks best when the headband is at least 3″ (7.6cm) wide.
***This step is optional! If you don’t wish to customize the width of your headband, please skip to the PATTERN section.***
Foundation Chain: Ch any even number. Add one turning ch.
Row 1: Sc in 2nd ch from hook. Dc in the next st. * sc 1, dc 1 * repeat from * to * until you reach the end of Row 1.
Row 2: Ch 1, turn. Sc in the first st. Dc in the next st. * sc 1, dc 1 * repeat from * to * until you reach the end of the row.
Repeat Row 2 until you have a total of 35 (40, 45, 50, 55) rows, or until you’ve reached your desired length.
ADJUSTING THE LENGTH:
If you need to adjust the length of your headband, simply add or subtract rows as needed.
Pattern:
CH 11(13, 13, 13, 13)
Row 1: Sc in 2nd ch from hook. Dc in the next st. * sc 1, dc 1 * repeat from * to *3 (4, 4. 4, 4) times. [10 (12, 12, 12, 12)]
Row 2: Ch 1, turn. Sc in the first st. Dc in the next st. * sc 1, dc 1 * repeat from * to * 3 (4, 4. 4, 4) times. [10 (12, 12, 12, 12)]
Rows 3 – 35 (40, 45, 50, 55): Repeat row 2
Note: check to make sure your headband is close to the measurement needed for your size. See the “Finished Measurements / Size Chart” in the previous section. Add or subtract rows as needed if you need to adjust the length.
Cut the yarn, leaving a tail about 20″ long and FO. Continue to the Finishing Instructions.
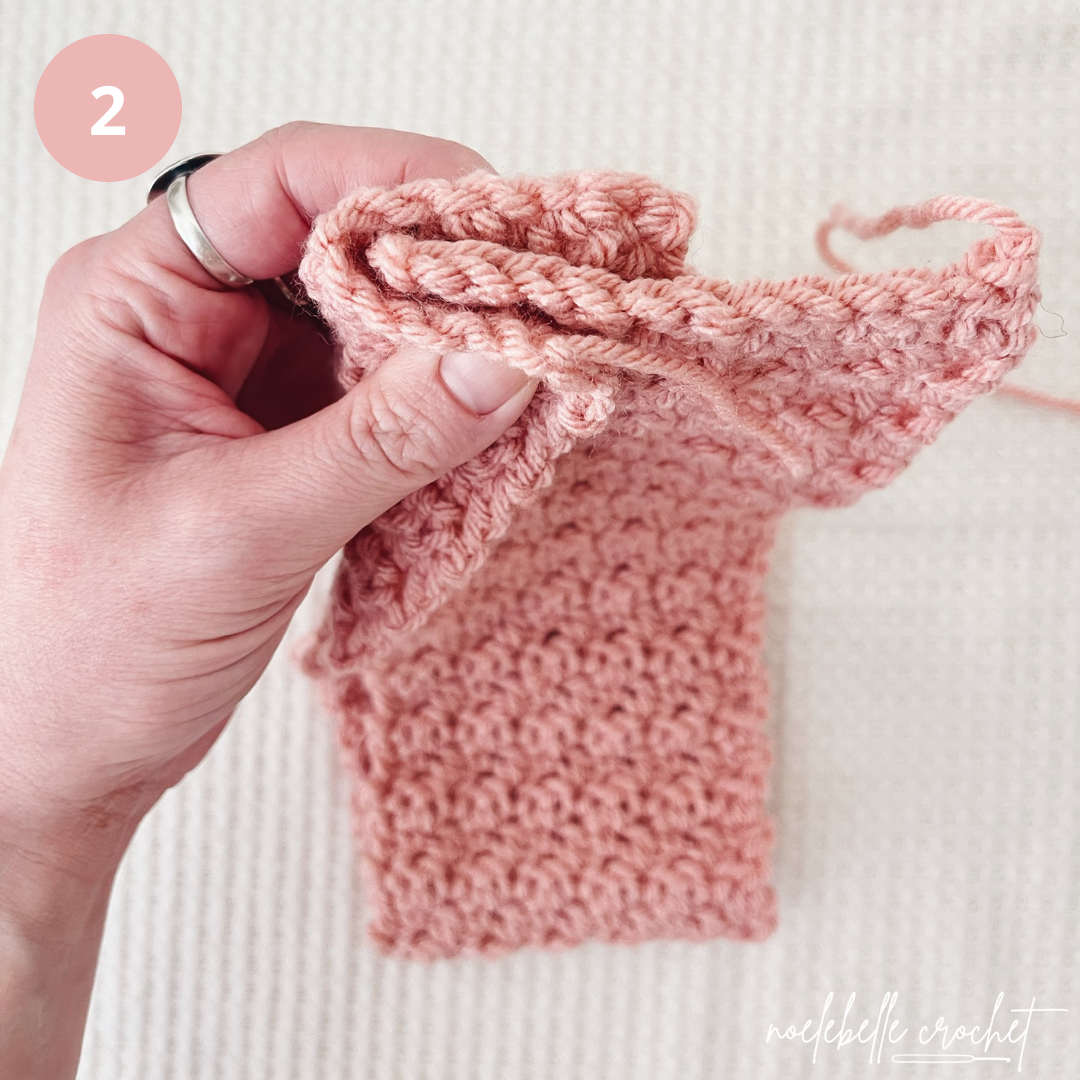
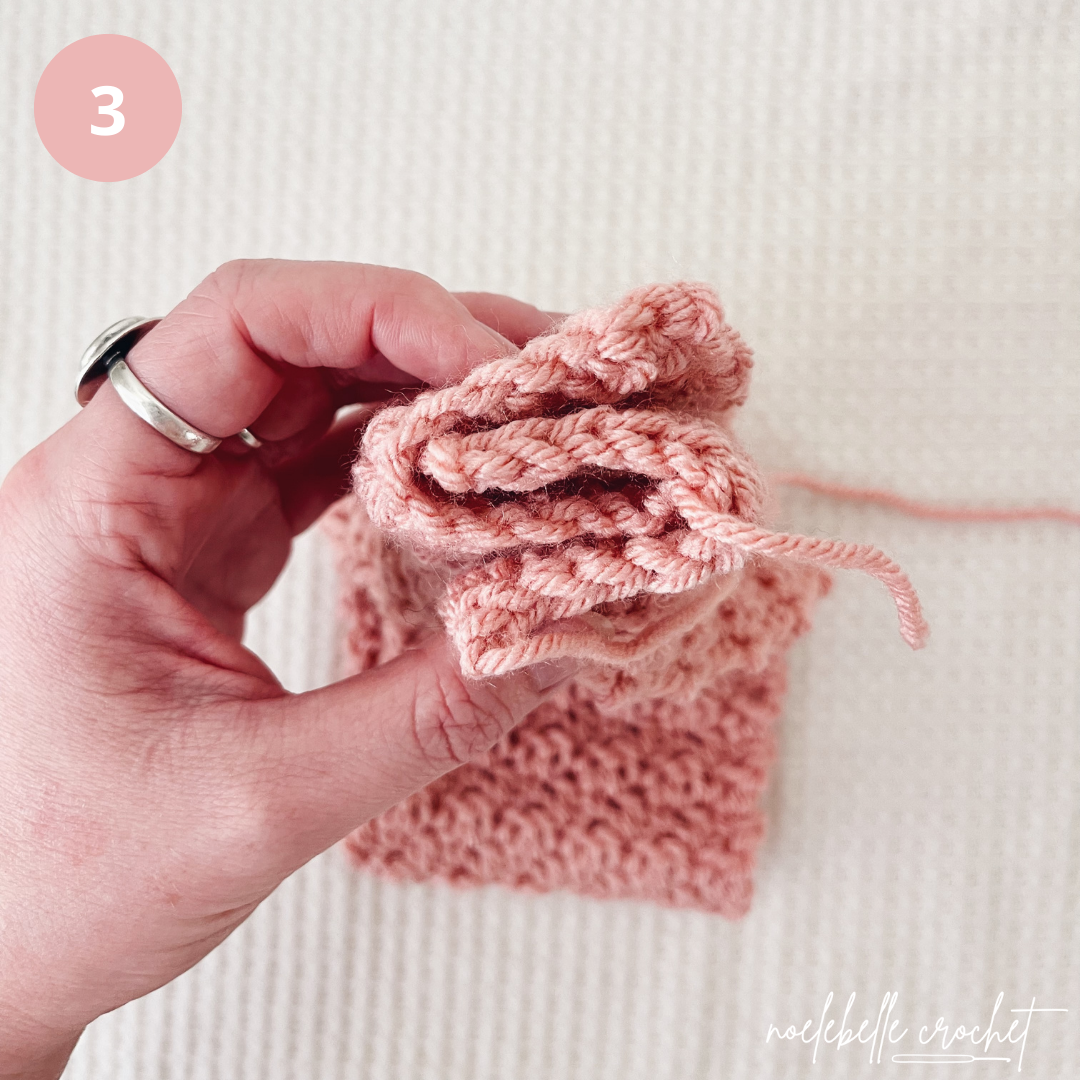
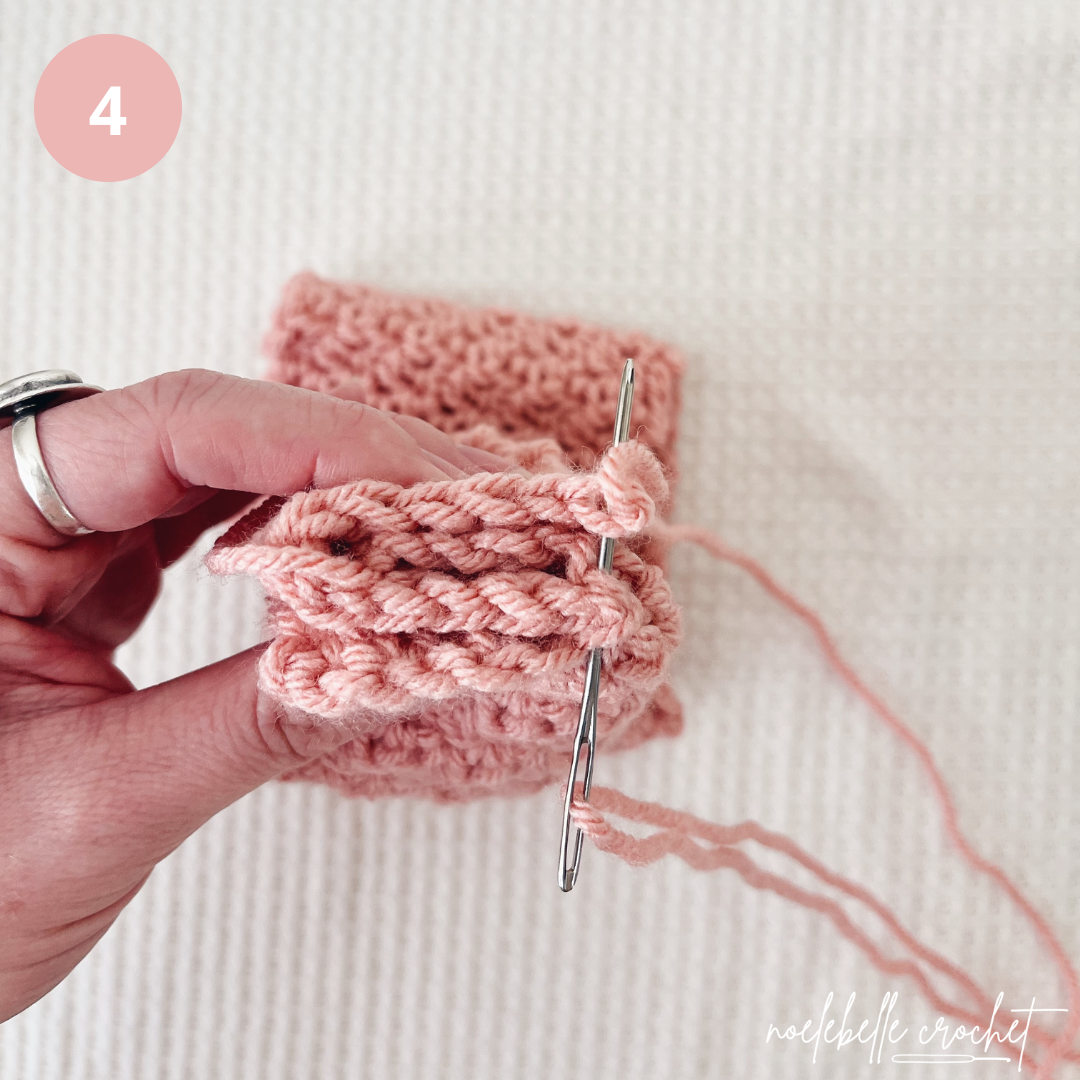
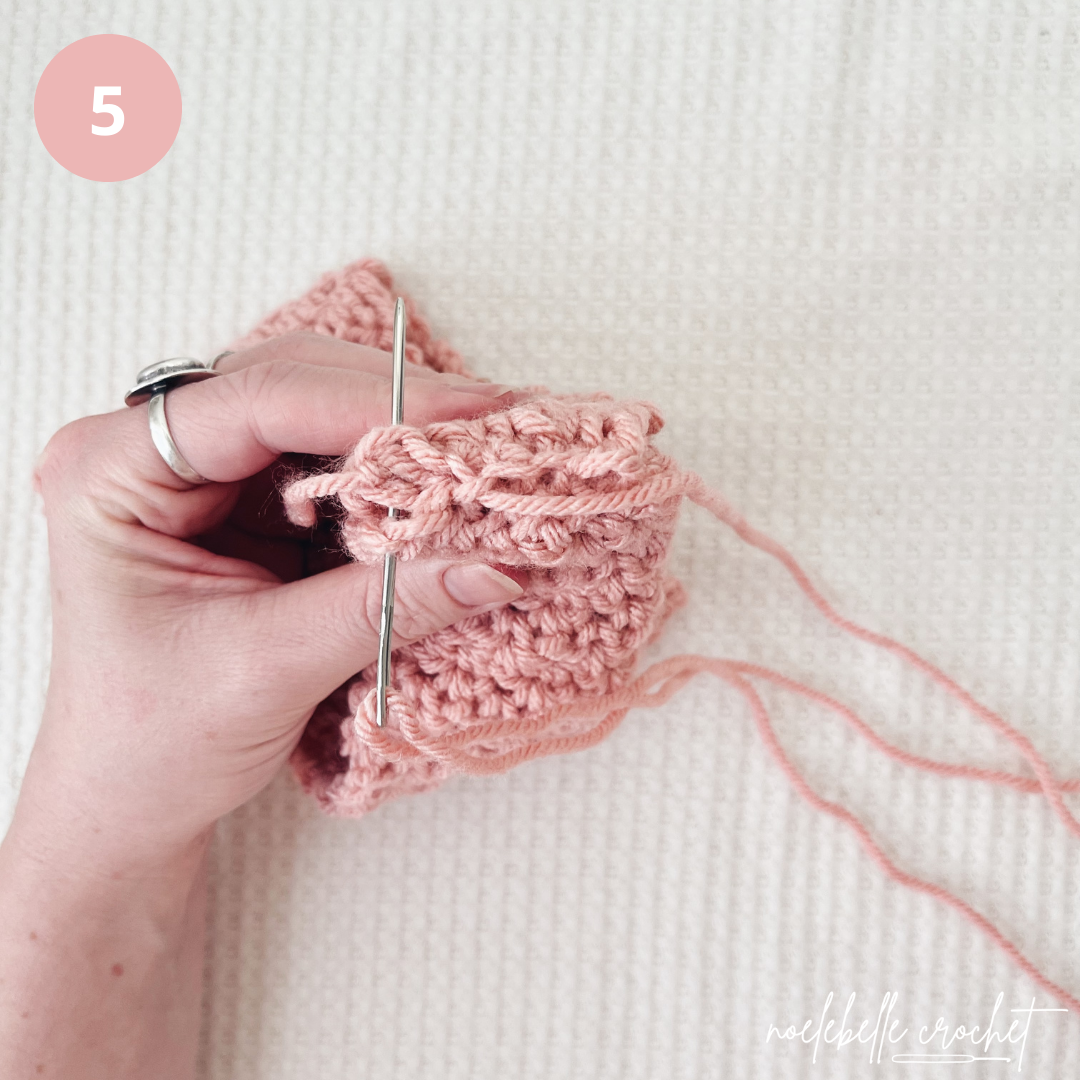
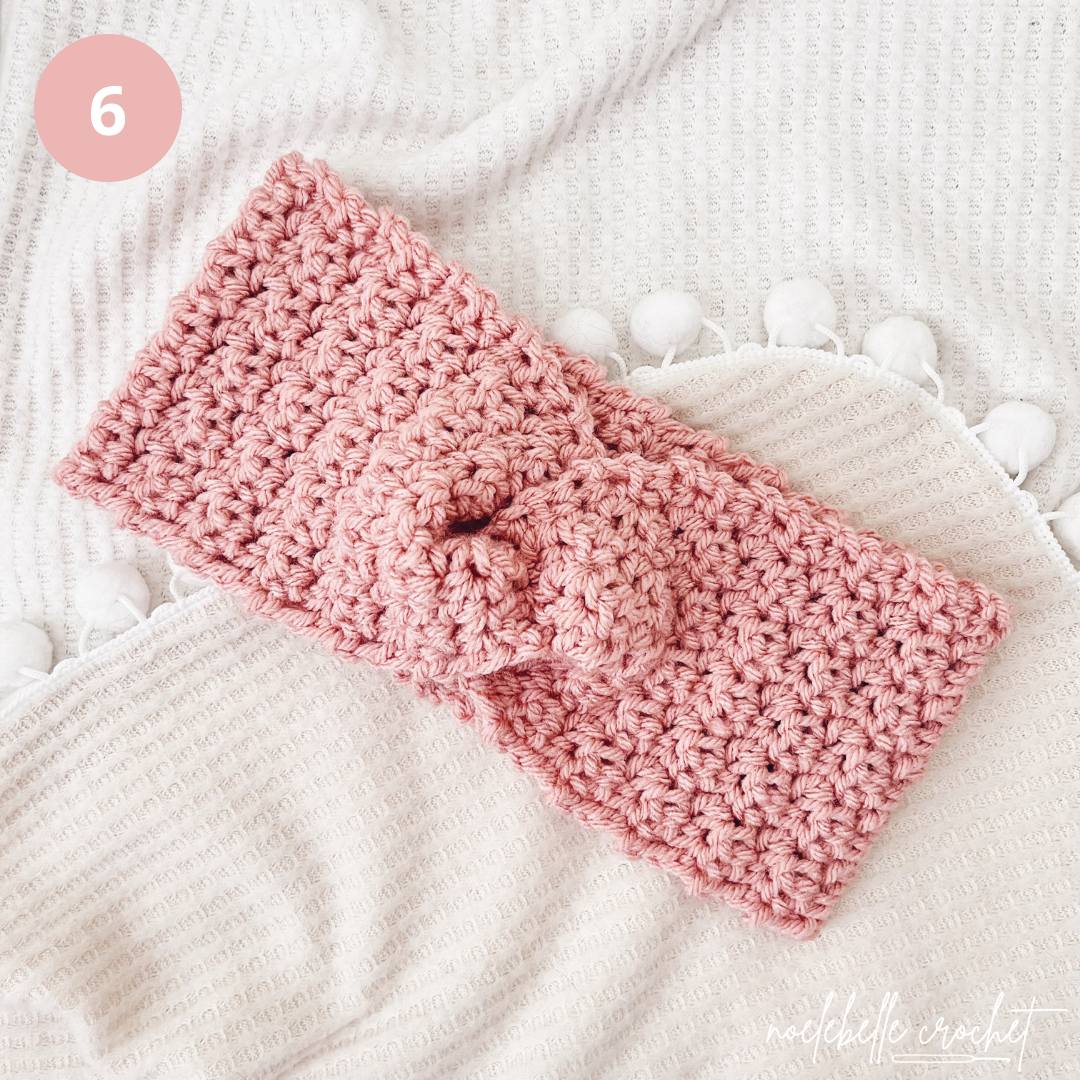
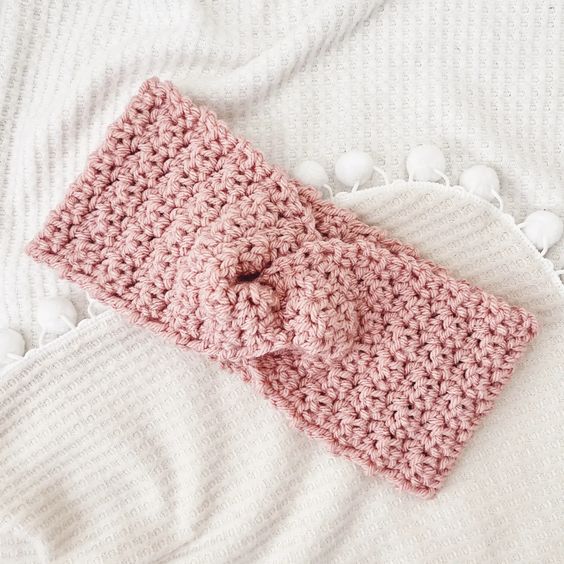
Finishing Instructions:
- Fold your headband in half and line the corner of one side up with the middle of the other side as shown in the photo.
- Wrap the left side around the front as shown in the photo.
- Then, wrap the right side around the front to create four layers as shown in the photo. Optional: you can use stitch markers to hold your ends in place.
- Attach your needle to the long yarn tail, and sew through all four layers. You can use a whipstitch, or I prefer to use a blanket stitch for extra security.
- Once you’ve sewn all the way across, tie your yarn tail off with a couple good, strong knots. Finally, weave in your ends.
- Then, turn your headband right-side out, and you’re all done!