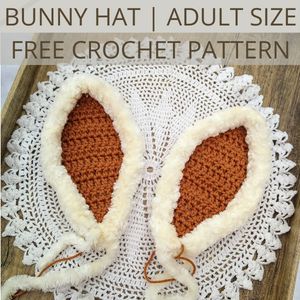
Crochet Bunny Ears
Crochet bunny ears are a delightful and charming craft project that adds a touch of whimsy to any occasion. These cute, floppy ears can be crocheted in different colors to suit your personal style or the theme of the event you're attending. Whether you're making them for Easter, a costume party, or simply to bring a smile to someone's face, crochet bunny ears are a fun and enjoyable way to express your creativity. You can customize their size and shape to fit children or adults, making them a versatile and adorable accessory that will surely turn heads wherever you go. Grab some yarn, a hook, and get ready to hop into the world of crochet bunny ears – you'll be amazed at how quickly you can create a pair of these adorable adornments!
Yarn
Crochet Hook
BUNNY EARS PATTERN (MAKE 2)
CH 6 and turn
ROW 1 SC in the 2nd stitch from your hook and in every stitch to the end (5 SC) CH 1 and Turn
ROW 2 DC in the first 2 ST, 2 DC in the third ST and DC in the last 2 ST (6 DC)CH 1 and Turn
ROW 3 DC in every ST across (6 DC) CH 1 and Turn
ROW 4 2 DC in the first ST, 1 DC in the next 4 ST, 2 DC in the last ST (8 DC)CH 1 and Turn
ROW 5 2 DC in the first ST, 1 DC in the next 6 ST, 2 DC in the last ST (10 DC)CH 1 and Turn
ROW 6 2 DC in the first ST, 1 DC in the next 8 ST, 2 DC in the last ST (12 DC)CH 1 and Turn
ROWS 7-10 DC in every ST across (12 DC) CH 1 and Turn
ROW 11 DC2TOG in the first ST, 1 DC in the next 8 ST, DC2TOG the last 2 ST (10 DC) CH 1 and Turn
ROW 12 DC2TOG in the first ST, 1 DC in the next 6 ST, DC2TOG the last 2 ST (8 DC) CH 1 and Turn
ROW 13 DC2TOG in the first ST, 1 DC in the next 4 ST, DC2TOG the last 2 ST (6 DC) CH 1 and Turn
ROW 14 DC2TOG in the first ST, 1 DC in the next 2 ST, DC2TOG the last 2 ST (4 DC) CH 1 and Turn
ROW 15 DC2TOG twice, cut, pull through and weave in your end.
**To customize the length of the ears, you can add more of row 7, for longer floppy ears add 3-5 more rows of 12 DC** You will still decrease as it says in Rows 11-15
TRIMMING THE EARS
Starting at the bottom corner, where your beginning tail is, pull a loop of faux yarn or blanket fuzzy yarn through and SL ST, then working on the sides of your ear, SC in the chain spaces of each row. If your yarn is pretty thick, you may want to skip a space every few so that the fur trim lays flat. SC all the way around the ear from starting tail all the way back to that point and cut and pull through. Don’t weave your ends of the fur in, as you’re going to use these to help attach the ears to the hat. (be sure and leave a tail of 4-6” on both ends, this will help when attaching your ears to the hat)
Your ears are done….You now attach them to you hat!
ATTACHING THE EARS
Lay your hat flat with the seam in the middle of the back. Using stitch markers place your ears at about rows 2 and 4 on either side of the top center (see photo on hat pattern) Sew one of your blanket or fur yarn tails down through the hat at the stitch marker and back up. Weave the end through the side of where you trimmed the ear. Do this with both tails before sewing and weaving in your yarn tail.