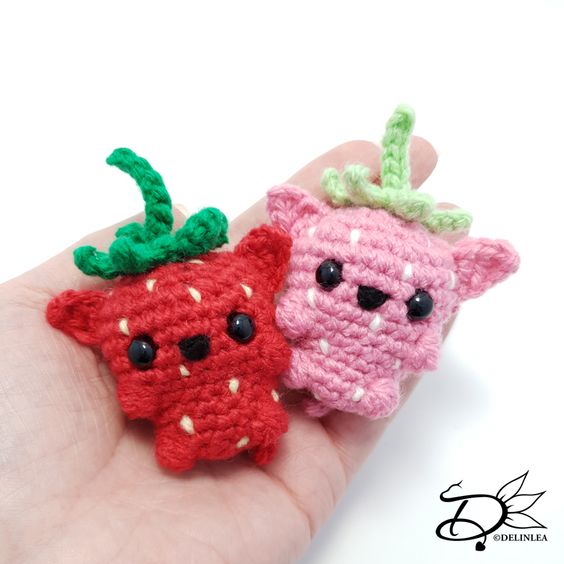
Crochet BerryCat Amigurumi
Creating a Crochet BerryCat Amigurumi can be a delightful and engaging experience for any crafting enthusiast. The adorable design of the amigurumi, with its cute berry-shaped body and whiskers, makes it a fun project to work on. The intricate details of crocheting the cat's features, such as its tiny ears and tail, add a touch of charm to the finished product. Whether you're a beginner or an experienced crocheter, this project offers a perfect opportunity to showcase your skills and creativity. Once completed, the Crochet BerryCat Amigurumi can make a lovely handmade gift or a charming addition to your own collection of crocheted creations. So grab your crochet hook and yarn, and get ready to bring this lovable feline to life!
For this Pattern you’ll need:
♥ Yarn in Pink and Light Green (Or Red and Green). (I used Budgetyarn.com)
♥ Extra White or Light Yellow yarn, around 30-40cm, for the ‘seeds’.
♥ Black Felt or Yarn for the nose.
♥ Crochet Hook, 2,5mm.
♥ Stuffing.
♥ Stitch Markers.
♥ Yarn Needle.
♥ Sewing Pins.
Stitches used (US Terms):
Magic Ring.
CH = Chain.
SLST = Slip Stitch.
SC = Single Crochet.
HDC = Half Double Crochet.
DC = Double Crochet.
Bobble = For 1 Bobble Stitch you work 5 DC in one stitch, but without finishing the last loop of each DC, after you have 6 loops on your hook, yarn over and pull through all 6 loops.
ST = Stitch.
Inc = Increase.
Dec = Decrease.
(…) = Repeat the space in brackets the given number of times.
[…] = Total number of stitches.
Pattern BerryCat
Work in continues rounds, use a stitch marker to mark your first stitch of every row. This is for every part, unless stated otherwise.
Body
Use Pink colored yarn.
1: 6SC in Magic Ring. [6]
2: 2SC in each st around. [12]
3: 12SC. [12]
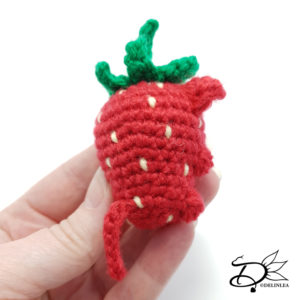
4: 1SC, Ch8, insert in second ch from hook, 7SlSt, continue working on the ‘base’, 2SC, inc, (Bobble, 2SC, inc) 2 times. [15]
5: 15SC. (You skip working in the ’tail’) [15]
6: (4SC, inc) 3 times. [18]
7: (5SC, inc) 3 times. [21]
8: 6SC, inc, (Bobble, 5SC, inc) 2 times. [24]
9: (7SC, inc) 3 times. [27]
10: (8SC, inc) 3 times. [30]
11: 30SC. [30]
12: 30SC. [30]
13: (3SC, dec) 6 times. [24]
14: (4SC, dec) 6 times. [18] stuff here and place the eyes between row 10 and 11, about 2cm apart.
15: (1SC, dec) 6 times. [12]
16: (dec) 6 times. [6]
Fasten off and weave in tail.
Ears (Make 2)
Use Pink colored yarn.
Ch4, insert in second Ch from hook, 1SC, 1HDC, 1DC.
Fasten off and leave a long tail for sewing.
Stem
Use the light Green colored yarn.
Ch7, insert in second Ch from hook, 6SlSt.
Fasten off and leave along tail for sewing.
Crown
Use the light Green colored yarn.
1: 6SC in Magic Ring. [6]
2: (Ch4, insert in second Ch from hook, 1SlSt, 2SC, 1SlSt in Base) 6 times.
Fasten off and leave a long tail for sewing.
Assembling
Whenever I start assembling amigurumi’s, I prefer to use sewing pins first. This way I can position and reposition all parts until I am happy with how it looks. I recommend you do so as well.
Start sewing the stem to the crown, and then the crown to the top of the strawberry.
Then position the ears and sew them on.
Last with the extra white yarn you can stitch on the ‘seeds’. With black felt or yarn create a small nose.
That was it already for today’s pattern! I hope you liked this BerryCat! I can imagine them hanging around everywhere!