Crochet Merlion Amigurumi
Crocheting a Merlion amigurumi is such a delightful and enjoyable project! This whimsical creation combines the art of crochet with the iconic symbol of Singapore, resulting in a unique and charming piece of handmade art. The intricate details of the crochet stitches bring this mythical creature to life, making it a wonderful addition to any amigurumi collection or a heartfelt gift for someone special. So grab your crochet hook and yarn, let your creativity flow, and have a magical time crafting your very own Crochet Merlion Amigurumi!

Materials:
Using fingering yarn with 2.5mm hook will produce a Merlion of about 11cm/4.3in tall.
All yarn threads are assumed to be of the same thickness.
- White
- Red yarn
- Light Pink Embroidery Thread
- Black Embroidery Thread
- Safety Eyes 6mm x 2 (based on fingering yarn, use a bigger size if using a thicker yarn)
- Stuffing
Abbreviations:
- sc — single crochet
- sc inc — single crochet increase
- sc dec — single crochet decrease
- ss — slip stitch
- ch — chain stitch
- hdc — half double crochet
- dc — double crochet
- dc inc — double crochet increase
- bo — bobble stitch with 3 double crochet
- Rnd – Round
Head & Body
With white yarn,
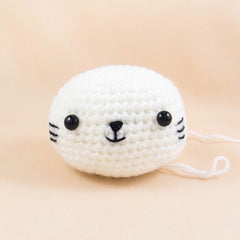
Rnd 1: 6sc into magic ring (6)
Rnd 2: sc inc x 6 times (12)
Rnd 3: (sc, sc inc) x 6 times (18)
Rnd 4: (2 sc, sc inc) x 6 times (24)
Rnd 5: (3 sc, sc inc) x 6 times (30)
Rnd 6: (4 sc, sc inc) x 6 times (36)
Rnd 7: (5 sc, sc inc) x 6 times (42)
Rnd 8: (6 sc, sc inc) x 6 times (48)
Rnd 9 — Rnd 15 (7 rnds): sc all around (48)
Rnd 16: (6 sc, sc dec) x 6 times (42)
Rnd 17: (5 sc, sc dec) x 6 times (36)
Rnd 18: (4 sc, sc dec) x 6 times (30)
Rnd 19: (3 sc, sc dec) x 6 times (24)
Rnd 20: (2 sc, sc dec) x 6 times (18)
Insert the eyes between Rnd 10 — Rnd 11, about 8 stitches apart.
Sew the nose and mouth from Rnd 11 — Rnd 12.
Sew whiskers from Rnd 11 — Rnd 13
Rnd 21: (2 sc, sc inc) x 6 times (24)
Rnd 22: (3 sc, sc inc) x 6 times (30)
Rnd 23 — Rnd 24 (2 rnds): sc all around (30)
Rnd 25: (4 sc, sc inc) x 6 times (36)
Rnd 26: sc all around (36)
Rnd 27: (4 sc, sc dec) x 6 times (30)
Rnd 28: (3 sc, sc dec) x 6 times (24)
Rnd 29: sc all around (24)
Rnd 30: (6 sc, sc dec) x 3 times (21)
Rnd 31: sc all around (21)
Rnd 32: (5 sc, sc dec) x 3 times (18)
Rnd 33: sc all around (18)
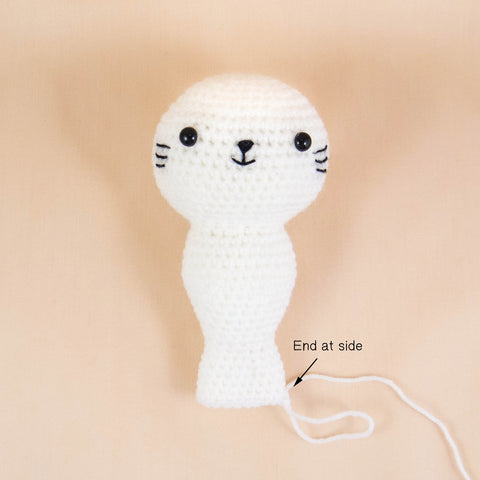
Put stuffing in.
Rnd 34: (4 sc, sc dec) x 3 times (15)
Rnd 35: (4 sc, sc inc) x 3 times (18)
Rnd 36: (8 sc, sc inc) x 2 times (20)
Rnd 37 — Rnd 40 (4 rnds): sc all around (20)
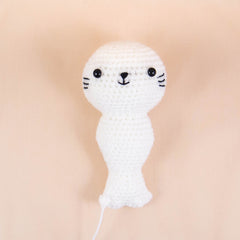
Add a few stitches until Rnd 40 end at the side of the merlion.
Rnd 41: hdc, dc inc, ss, hdc, dc inc, hdc, ss, (hdc, dc inc, ss) x 2 times,
hdc, dc inc, hdc, ss, hdc, dc inc, ss (26)
Stuff the tail portion lightly as you need to fold it later.
Flatten the tail portion and sew the hole close.
Body Details
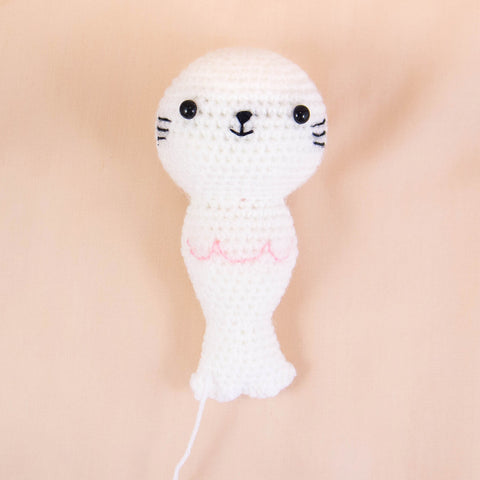
With light pink embroidery thread, sew a wave pattern from Rnd 25 – Rnd 27.
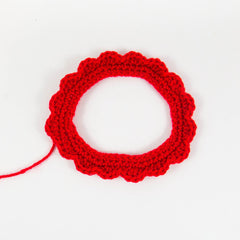
Mane
With red yarn,
Rnd 1: ch 56, ss to make into a ring (56)
Rnd 2: sc all around (56)
Rnd 3: (6 sc, sc inc) x 8 times (64)
Rnd 4: (hdc, dc inc, hdc, ss) x 16 times (80)
Fasten off and leave a length of yarn for sewing
(Note: The mane may curl up and you may want to block it to make it lay flat.)
Ears (Make 2)
With white yarn,
Rnd 1: 4sc into magic ring (4)
Rnd 2: (sc, sc inc) x 2 times (6)
Fasten off, leaving a length of yarn for sewing.
Assembly
Sew the mane to the head.
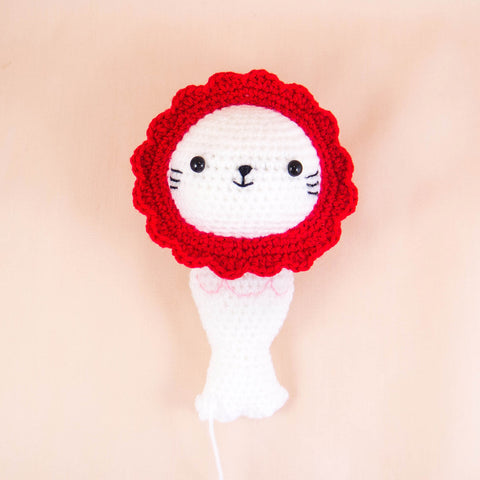
Sew the ears to the head.
Fold up the tail and sew it to secure it.