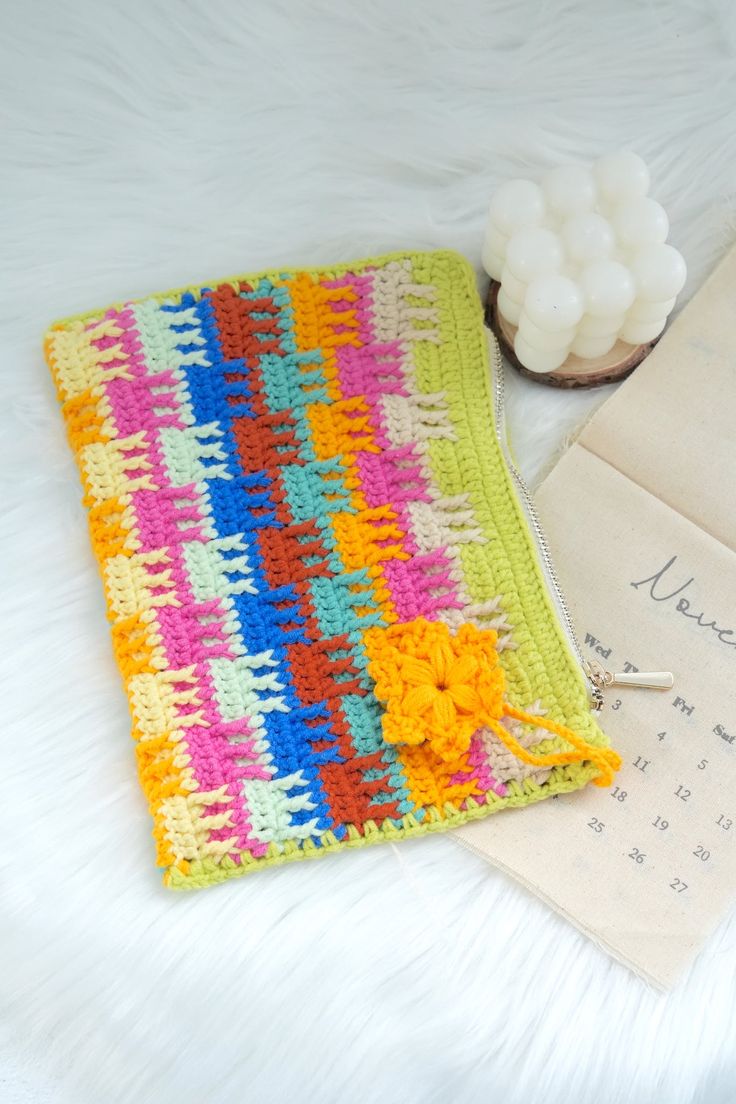
Crochet Granny Square Makeup Bag
The Crochet Granny Square Makeup Bag is the perfect addition to your beauty routine! This charming accessory combines vintage vibes with practicality, making it a must-have for storing your makeup essentials in style. The intricate crochet design adds a touch of handmade charm, while the granny square pattern brings a nostalgic feel to your daily routine. With its vibrant colors and versatile size, this makeup bag is not only functional but also a cute statement piece to show off your personality. Whether you're a crochet enthusiast or just love a touch of homemade flair, this makeup bag is sure to brighten up your beauty collection!
Materials Needed
- Yarn– Loopara 5ply combed cotton (Green 01, Green 03, Blue 13, Pink 20, Yellow 28, Yellow 33, Orange 37, Blue 43 and Apricot 50)
- Hook- 3.0mm
- Scissors
- Yarn needle
- Stitch marker
- Zipper
Step By Step Tutorial
How to Crochet the Main Body
- R1: Ch 28
- R2: Ch 3, 28 dc, turn
- R3: Ch 3, 28 dc, turn
- R4: Change color, ch 3, dc, (FPtr, sk, dc, FPtr, sk, dc, FPtr, sk, 5 dc) 2 times, FPtr, sk, dc, FPtr, sk, dc, FPtr, sk, 2 dc, turn
- R5: Ch 3, 28 dc, turn
- R6: Change color, ch 3, 6 dc, FPtr, sk, dc, FPtr, sk, dc, FPtr, sk, 5 dc, FPtr, sk, dc, FPtr, sk, dc, FPtr, sk, 7 dc, turn
- R7: Ch 3, 28 dc, turn
- Repeat r4-r7 three times, then repeat r4-r7 twice more, and finally repeat r4-r5 once
How to Assemble and Sew the Bag
- Start with chain 55 for the first row. Follow the granny square pattern shown in diagram. Repeat rounds 4-5 until you reach your desired length.
- Fold the piece in half at the center. Begin joining from the bottom. Make a standing stitch, single crochet, then chain. Work (single crochet, chain) pattern to the end of the row.
- Work one row of double crochets along the opening.
- Chain 3,Work (single crochet, chain) pattern to the end of the row.
- Leave 4 stitches on each side for markers.
- Start sewing zipper from the right marker position. Use back-and-forth stitching method. Keep your stitching line straight all the way to the left marker.
- Sew the other side using the same method. Remember to keep the zipper open while sewing. Make sure zipper teeth align perfectly.
- After zipper installation, use slip stitch to join the 4 marker stitches. Secure all corners with slip stitches. Fasten off and weave in ends neatly.
How to Make the Snowflake Pendant
- Wrap yarn 8 times around index finger. Pull through with hook to create base ring. Work a chain to secure.
- Work 22 single crochets around the ring.
- Chain 2. [Work 5 incomplete double crochets. Pull yarn through all loops at once. Insert hook through first thread on left. Single crochet to secure. (Chain 4, single crochet) 3 times. Chain 2] Repeat 6 times. Slip stitch to join.
- Chain 40 for hanging loop. Thread through side of bag. Secure with slip stitches to snowflake. Weave in all ends.
Notes
Crochet Tips:
1. Keep tension consistent for even texture.
2. Count stitches regularly to maintain 28 stitches.
3. Make color changes neat at row beginnings.
Assembly Tips:
1. Install zipper first, keep it open while sewing, and leave 4 stitches at ends for neat finish. Work slowly for even seams.
2. Use (single crochet, chain) pattern for invisible seaming. Work from bottom up with consistent tension.