Crochet Summer Blush Tank
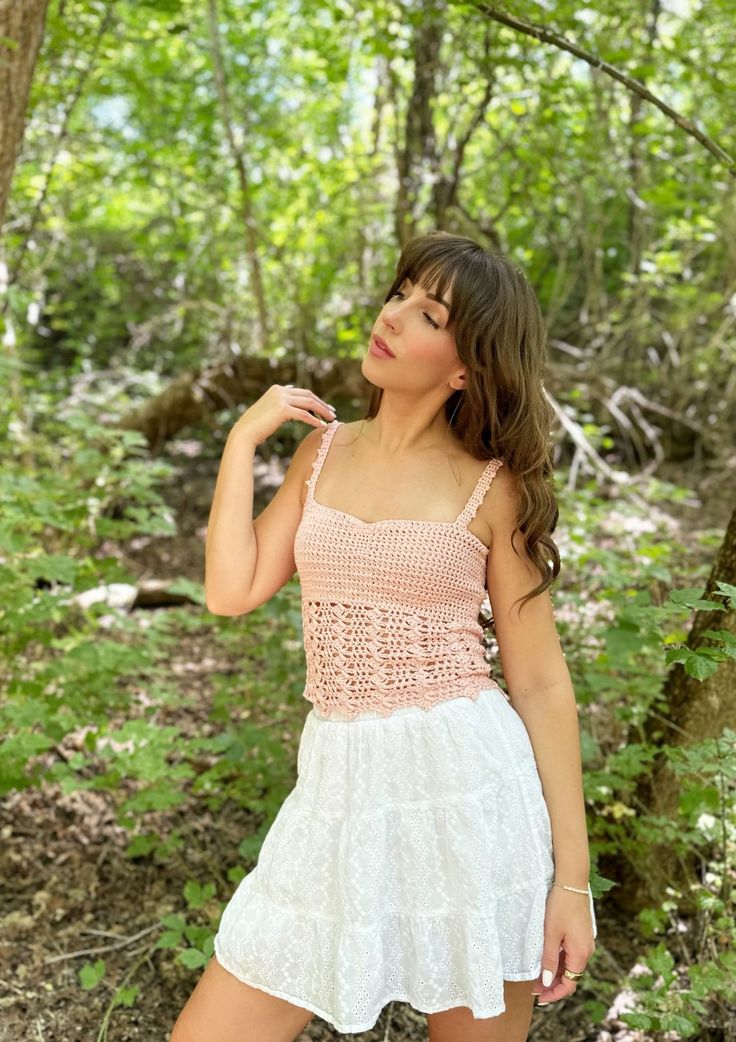
The Crochet Summer Blush Tank is the perfect addition to your warm-weather wardrobe! This delightful piece features intricate crochet details and a beautiful blush color that exudes summertime vibes. Whether you're heading to the beach or a casual outing with friends, this tank top is sure to keep you feeling cool and stylish. Pair it with your favorite shorts or a flowy skirt for a chic and effortless look. Embrace the sunny days ahead with this charming and versatile tank that will have you feeling fabulous all season long!

Materials:
- Worsted Weight (4) Yarn, Lion Brand Botanic in Blush 2(2, 3, 3, 3, 4, 4, 4, 5) skeins or 260(290, 330, 370, 430, 480, 510, 570, 630) Yards
- H/5.00mm Crochet Hook
- Needle
- Scissors
- Stitch Markers (8)
Gauge:
15 Esc by 14 Rows= 4×4” (blocked)
Sizes:
XS(S, M, L, XL, 2X, 3X, 4X, 5X)
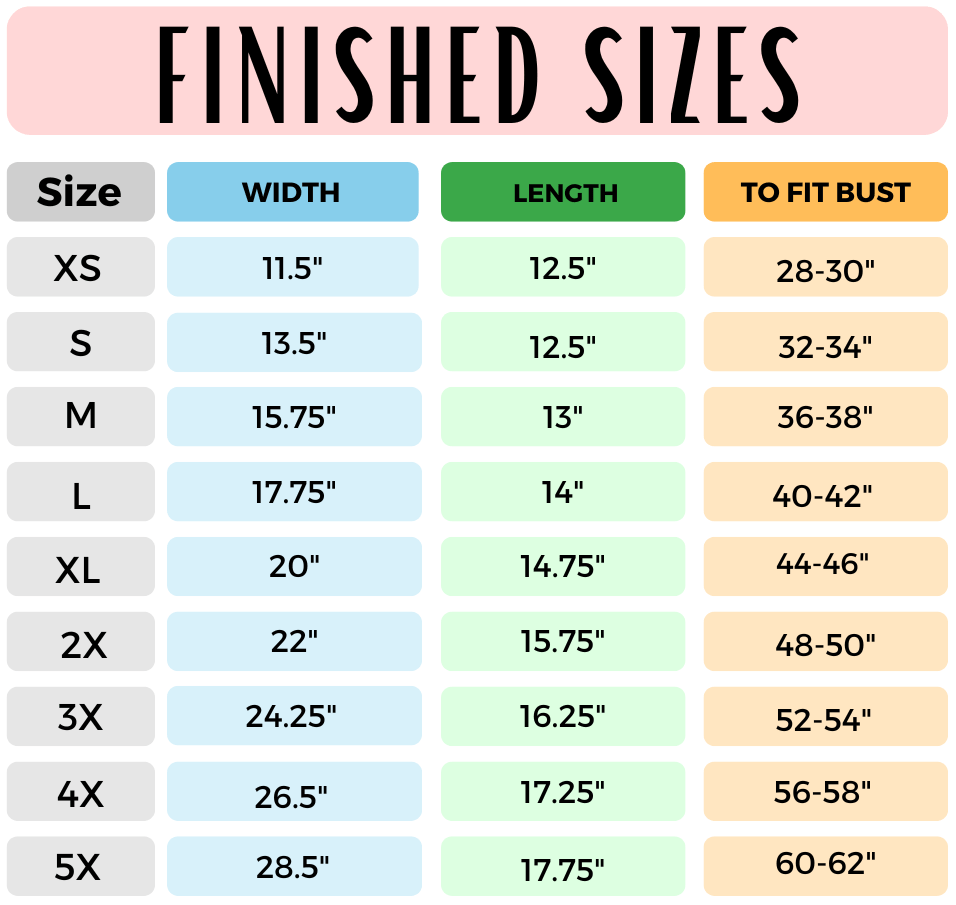
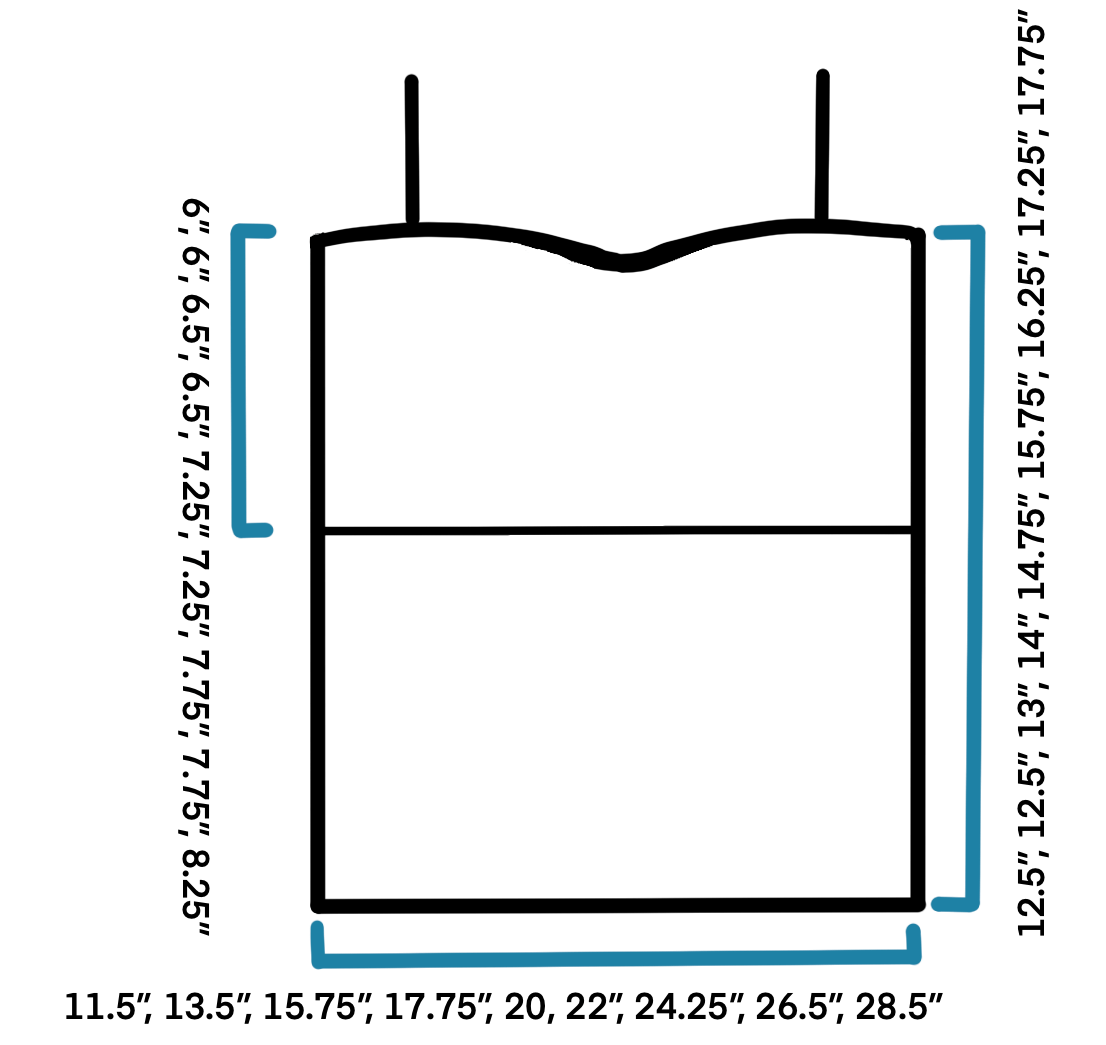
Finished Measurements:


Notes:
This pattern is made in 2 panels from the top down.
The Ch 2 does not count as a St.
You can make the upper portion of your tank top longer by adding as many rows as you want in multiples of 2 before moving onto the lacy section. You can make your overall tank top length longer or shorter by adding or removing rows in multiples of 2 before completing the final row of the panel. Add or remove the same amount to the other panel.
I recommend trying on your top before adding your straps. Use stitch markers and mark off where your bra strap is so you can customize the placement of the straps to cover them. Estimated placement is provided in the pattern but I highly recommend placing in your preferred spot. Then, follow the strap instructions as normal. Strap length is also adjustable.
The Botanic yarn tends to stretch slightly with washing. Be aware of that when checking gauge. Always hand wash and lay flat to dry.
Stitches and Abbreviations (US Terms):
- Ch(s)- Chain
- Esc- Extended Single Crochet
- Sc- Single Crochet
- St(s)- Stitches
- Sl St- Slip Stitch
- Dc- Double Crochet
- Sk- Skip
- Sp- Space
- RS- Right Side
- SM- Stitch Marker
- Sc2tog- Single Crochet 2 Together
Pattern (Front Panel):
Ch 44(52, 60, 68, 76, 84, 92, 100, 108)
Row 1(RS): 1 Esc in the second Ch from the hook and in the next 19(23, 27, 31, 35, 39, 43, 47, 51) Chs, 1 Sl St into the following 3 Chs, 1 Esc into each remaining Ch across, turn. (40(48, 56, 64, 72, 80, 88, 96, 104) Esc, 3 Sl St)
Rows 2-5: Ch 2(does not count here and throughout), 20(24, 28, 32, 36, 40, 44, 48, 52) Esc, 3 Sl St, 20(24, 28, 32, 36, 40, 44, 48, 52) Esc, turn.
Rows 6-10: Ch 2, 20(24, 28, 32, 36, 40, 44, 48, 52) Esc, 3 Sc, 20(24, 28, 32, 36, 40, 44, 48, 52) Esc, turn. (40(48, 56, 64, 72, 80, 88, 96, 104) Esc, 3 Sc)
Rows 11-21(21, 23, 23, 25, 25, 27, 27, 29): Ch 2, 1 Esc in each St across, turn. (43(51, 59, 67, 75, 83, 91, 99, 107) Esc)
Add or remove rows here in multiples of 2 to adjust the length of this section if desired.
Row 22(22, 24, 24, 26, 26, 28, 28, 30): Ch 2(does not count here and throughout), 1 Dc in first 3 Sts, *Sk 2, 1 Dc in next, Ch 3, 3 Dc around the post of the last Dc made, Sk 2, 1 Dc in next 3 Sts* repeat from * to * across row, turn. (43(51, 59, 67, 75, 83, 91, 99, 107) Sts) Note- the Ch 3 counts as 1 St towards the St count here and throughout.
Row 23(23, 25, 25, 27, 27, 29, 29, 31): Ch 2, 1 Dc in first 3 Sts, *Ch 2, 1 Sc into the Ch 3 Sp, Ch 2, 1 Dc in next 3 Dc (the group of 3 in previous row)*, repeat from * to * across row, turn. (43(51, 59, 67, 75, 83, 91, 99, 107) Sts) Note- the ch’s count as Sts in the St count here and throughout.
Row 24(24, 26, 26, 28, 28, 30, 30, 32): Ch 2, 1 Dc in first 3 Sts, *1 Dc in next Sc, Ch 3, 3 Dc around the post of the last Dc made, 1 Dc in next 3 Dc, (the group of 3 in previous row)*, repeat from * to * across row, turn. (43(51, 59, 67, 75, 83, 91, 99, 107) Sts)
Rows 25(25, 27, 27, 29, 29, 31, 31, 33)-33(33, 35, 37, 39, 41, 43, 45, 47): Repeat previous 2 rows, ending on a Row 23(23, 25, 25, 27, 27, 29, 29, 31) repeat. You can adjust the length of your top by adding or removing rows here in multiples of 2.
Row 34(34, 36, 38, 40, 42, 44, 46, 48): Ch 2, 1 Dc in first 3 Sts, *1 Dc in next Sc, Ch 6, Sl St into the 3rd Ch, 3 Dc around the post of the last Dc made, 1 Dc in next 3 Sts*, repeat from * to * across row, turn. (43(51, 59, 67, 75, 83, 91, 99, 107) Sts) Note- the picots on the edge are not reflected in the St count.
Fasten off, leave a long tail for seaming side.
Back Panel-
Ch 44(52, 60, 68, 76, 84, 92, 100, 108)
Row 1(RS): 1 Esc in the second Ch from the hook and each Ch across, turn. (43(51, 59, 67, 75, 83, 91, 99, 107) Esc)
Rows 2-21(21, 23, 23, 25, 25, 27, 27, 29): Ch 2, 1 Esc in each St across, turn.
Add or remove rows here in multiples of 2 to adjust the length of this section if desired.
Row 22(22, 24, 24, 26, 26, 28, 28, 30): Ch 2(does not count here and throughout), 1 Dc in first 3 Sts, *Sk 2, 1 Dc in next, Ch 3, 3 Dc around the post of the last Dc made, Sk 2, 1 Dc in next 3 Sts* repeat from * to * across row, turn. (43(51, 59, 67, 75, 83, 91, 99, 107) Sts)
Row 23(23, 25, 25, 27, 27, 29, 29, 31): Ch 2, 1 Dc in first 3 Sts, *Ch 2, 1 Sc into the Ch 3 Sp, Ch 2, 1 Dc in next 3 Dc (the group of 3 in previous row)*, repeat from * to * across row, turn. (43(51, 59, 67, 75, 83, 91, 99, 107) Sts)
Row 24(24, 26, 26, 28, 28, 30, 30, 32): Ch 2, 1 Dc in first 3 Sts, *1 Dc in next Sc, Ch 3, 3 Dc around the post of the last Dc made, 1 Dc in next 3 Sts*, repeat from * to * across row, turn. (43(51, 59, 67, 75, 83, 91, 99, 107) Sts)
Rows 25(25, 27, 27, 29, 29, 31, 31, 33)-33(33, 35, 37, 39, 41, 43, 45, 47): Repeat previous 2 rows, ending on a Row 23(23, 25, 25, 27, 27, 29, 29, 31) repeat. You can adjust the length of your top by adding or removing rows here in multiples of 2.
Row 34(34, 36, 38, 40, 42, 44, 46, 48): Ch 2, 1 Dc in first 3 Sts, *1 Dc in next Sc, Ch 6, Sl St into the 3rd Ch, 3 Dc around the post of the last Dc made, 1 Dc in next 3 Sts*, repeat from * to * across row, turn. (43(51, 59, 67, 75, 83, 91, 99, 107) Sts)
Fasten off, leave a long tail for seaming side.
Join Panels-
Lightly steam block your panels to the measurements listed above.
Place panels together RS facing. Using your tail of yarn, seam from the bottom hem, up the side of the panels. I used a needle and mattress stitch but you can seam using your preferred method. Repeat the same process on the other side.
Add Straps-
You can place your straps anywhere you want on your tank top. I recommend trying on your top and marking with a stitch marker where your bra is. That way your straps will be in the right place to cover them.
I provided an estimated placement below but suggest customizing.
With your tank top RS out and front panel facing RS up, count 6(8, 12, 14, 18, 22, 24, 28, 30) Sts in from the side seam towards the center of the shirt, place SM in that 6th(8th, 12th, 14th, 18th, 22nd, 24th, 28th, 30th) St. Count over 3 more Sts and place your second SM in that 9th(11th, 15th, 17th, 21st, 25th, 27th, 31st, 33rd) St. Repeat on second strap of the front panel.
Turn your tank top so that your back panel is now facing you. Count 6(8, 12, 14, 18, 22, 24, 28, 30) Sts in from the side seam towards the center of the shirt, place SM in the 6th(8th, 12th, 14th, 18th, 22nd, 24th, 28th, 30th) St. Count over 2 more Sts and place your second SM in that 8th(10th, 14th, 16th, 20th, 24th, 26th, 30th, 32nd) St. Repeat on second strap of the back panel.
One strap starts from the back panel and the second strap starts from the front panel. That way the picot detailing faces the right/same way on both sides.
Left Strap-
Still facing the RS of the back panel, join your yarn with a Sl St where the second SM is placed (8th(10th, 14th, 16th, 20th, 24th, 26th, 30th, 32nd) St) on the left side strap.
Row 1(RS): Ch 1, 1 Sc in same St and next 2 Sts, turn. (3 Sc)
Row 2:Ch 1, 1 Sc in each St across, turn.
Row 3: Repeat Row 2.
Row 4: Ch 4, Sl St into first Ch made, 1 Sc in each St across, turn. (1 picot, 3 Sc)
Rows 5-7: Ch 1, 1 Sc in each St across, turn. (3 Sc)
Row 8: Ch 4, Sl St into first Ch made, 1 Sc in each St across, turn. (1 picot, 3 Sc)
Rows 9-48(52, 52, 56, 56, 60, 60, 60, 64): Repeat Rows 5-8
Adjust the length of your strap by adding or removing rows in repeats of 5-8 here.
Row 49(53, 53, 57, 57, 61, 61, 61, 65): Ch 1, 1 Sc in each St across, turn.
Row 50(54, 54, 58, 58, 62, 62, 62, 66): Ch 1, 1 Sc in first 2 Sts, 2 Sc in last, turn. (4 Sc)
Row 51(55, 55, 59, 59, 63, 63, 63, 67): Ch 1, 1 Sc in each St across.
Sl St the last row of the strap to the 4 Sts marked off on the front panel. Make sure your strap is not twisted, place the RS of the strap and front panel together and Sl St across. Or, fasten off and use the tail of yarn to sew across.
Right Strap-
With your front panel facing RS up, join yarn with a Sl St to the second SM placed (9th(11th, 15th, 17th, 21st, 25th, 27th, 31st, 33rd) St) for the right strap.
Row 1(RS): Ch 1, 1 Sc in same St and next 3 Sts, turn. (4 Sc)
Row 2: Ch 1, 1 Sc in each St across, turn.
Row 3: Ch 1, Sc2tog, 1 Sc in last 2 Sts, turn. (3 Sc)
Row 4: Ch 4, Sl St into first Ch made, 1 Sc in each St across, turn. (1 picot, 3 Sc)
Rows 5-7: Ch 1, 1 Sc in each St across, turn. (3 Sc)
Row 8: Ch 4, 1 Sl St into first Ch made, 1 Sc in each St across, turn. (1 picot, 3 Sc)
Rows 9-48(52, 52, 56, 56, 60, 60, 60, 64): Repeat Rows 5-8.
Adjust the length of your strap by adding or removing rows in repeats of 5-8 here.
Rows 49(53, 53, 57, 57, 61, 61, 61, 65)-51(55, 55, 59, 59, 63, 63, 63, 67): Ch 1, 1 Sc in each St across, turn.
Sl St the last row of the strap to the 3 Sts marked off on the back panel. Make sure your strap is not twisted, place the RS of the strap and back panel together and Sl St across. Or, fasten off and use the tail of yarn to sew across.
Weave in any remaining ends.