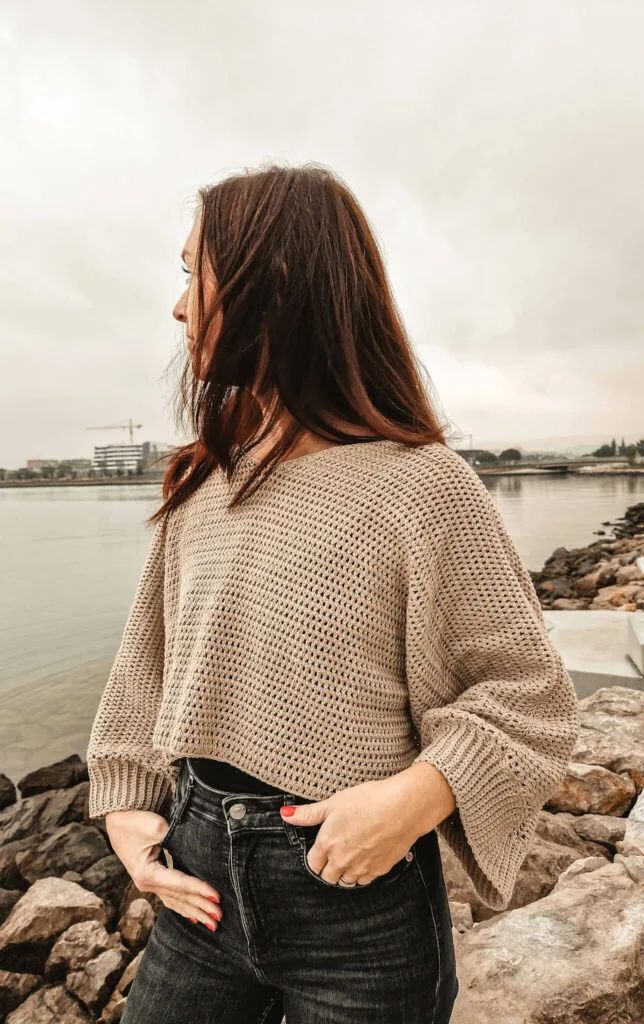
Crochet V-Neck Sweater
The Crochet V-Neck Sweater is a cozy and stylish addition to any wardrobe. The delicate crochet details give it a charming and feminine look, perfect for both casual outings and more dressed-up occasions. The V-neck design is flattering and creates a lovely silhouette, making you feel confident and chic. Pair it with your favorite jeans for a laid-back vibe, or dress it up with a skirt and heels for a classy ensemble. With its versatility and timeless appeal, this sweater is sure to become a favorite go-to piece in your closet.
Project Level: Easy
Size: Small
Materials
- YARN: DROPS Safran, color 64, yarn group A.
- Hook: 5 mm/ US H-8, 4 mm/G-6
- Yarn Needle, Scissors, Measuring Tape
Of course you are more than welcome to use any yarn fiber that you wish. I think a nice wool blend or even an acrylic yarn would work wonders for the colder months ahead as long as it’s a sport weight yarn.
Stitch Key (US terminology)
- ch = chain
- dc = Double Crochet
- dc2tog = Double Crochet 2 together
- sc blo = Single Crochet in back loop only
- sc2tog = Single Crochet 2 together
- sk = skip
- st = Stitch
- sts = stitches
- slst = Slip Stitch
- slsts = Slip Stitches
Specialty Stitch & Technique Key
Invisible seam for sewing together the sleeve and body ribbing. Start with the right side facing you and hold the beginning and the end of the ribbing together so that the V`s of both sides are facing you. With a tail that you left from finishing the ribbing go ( with a yarn needle) from behind the outside V loop of the end of the ribbing and under the outside V loop of the beginning of the ribbing. Continue going from the outside of the V loop on the other side (end) and under the outside V loop of the beginning.
Notes
- The sweater is made of two panels (front and back).
- After sewing the panels together, crochet the ribbing on the sleeves.
- Dc stitches are worked in the space between stitches not under the V as usually.
- Crochet with a 5 mm / H-8 hook unless the instructions are for a different hook size.
- Ch2 never counts as a stitch.
- I recommend you attach new yarn on the edges because that way the ends won’t peak through the holes of the body and sleeves.
Instructions (size S)
Ch 90
Row 1: dc (in back bumps) in 3rd ch from the hook and across.
Row 2 – 15: ch2, turn. Dc across.
Row 16: ch42, turn. Dc in 3rd ch from the hook and across until you come to the last st, drop yarn and attach a second yarn to the ch2 from row 15 at the top, ch40 and cut yarn. Pick up the remaining yarn and continue to dc.
Row 17 – 35: ch2, turn. Dc across.
Left sleeve and neckline
Row 36: ch2, turn. Dc in next 82 sts, dc2tog.
Row 37: ch2, turn. Dc2tog, dc across.
Row 38: ch2, turn. Dc in next 80 sts, dc2tog.
Row 39: ch2, turn. Dc2tog, dc across.
Row 40: ch2, turn. Dc in next 78 sts, dc2tog.
Row 41: ch2, turn. Dc2tog, dc across.
Row 42: ch2, turn. Dc in next 76 sts, dc2tog.
Row 43: ch2, turn. Dc2tog, dc across.
Row 44: ch2, turn. Dc in next 74 sts, dc2tog.
Row 45: ch2, turn. Dc2tog, dc across.
Row 46: ch2, turn. Dc in next 72 sts, dc2tog.
Row 47: ch2, turn. Dc2tog, dc across.
Row 48: ch2, turn. Dc in next 70 sts, dc2tog.
Row 49: ch2, turn. Dc2tog, dc across.
Row 50: ch2, turn. Dc in next 68 sts, dc2tog.
Fasten off, leaving a long tail for sewing the shoulders together (only on the first panel).
Right sleeve and neckline
Start in the middle in the 84th st from the left:
Row 36: ch2, turn. Dc2tog, dc in next 82 sts.
Row 37: ch2, turn. Dc in next 81 sts, dc2tog.
Row 38: ch2, turn. Dc2tog, dc in next 80 sts.
Row 39: ch2, turn. Dc in next 79 sts, dc2tog.
Row 40: ch2, turn. Dc2tog, dc in next 78 sts.
Row 41: ch2, turn. Dc in next 77 sts, dc2tog.
Row 42: ch2, turn. Dc2tog, dc in next 76 sts.
Row 43: ch2, turn. Dc in next 75 sts, dc2tog.
Row 44: ch2, turn. Dc2tog, dc in next 74 sts.
Row 45: ch2, turn. Dc in next 73 sts, dc2tog.
Row 46: ch2, turn. Dc2tog, dc in next 72 sts.
Row 47: ch2, turn. Dc in next 71 sts, dc2tog.
Row 48: ch2, turn. Dc2tog, dc in next 70 sts.
Row 49: ch2, turn. Dc in next 69 sts, dc2tog.
Row 50: ch2, turn. Dc2tog, dc in next 68 sts.
Fasten off, leaving a long tail for sewing the shoulders together (only on the first panel).
Assembling
Sew the shoulders (and sleeve) together with a sl st.
With a blanket stitch sew together the sleeve and sides of the body.
Ribbing
Sc around the sleeve hole – 2 sc in each dc row. >140 sc<
Slst to join. Do not cut off yarn!
Ch16 with a 4 mm hook.
Row 1: sc in 2nd ch from the hook and across. >15 sc<
Row 2: slst in next 3 sts from the sc row (starting in the st where you chained 16), turn, sk the 3 slsts and sc blo in next 14 sts, sc in the last st. >15 sc<
Row 3: ch1, turn. Sc in 1st st, sc blo in next 14 sts. Slst in next 3 sts of sc row. >15 sc<
Repeat row 2 and 3 until row 91 when you have only 2 sts left to get around – slst in next 2 sts, sc blo in next 14 sts, sc in the last st. That is together 92 rows (the number of rows must be even!). Finish off leaving a long tail for sewing. Sew the beginning and the end of the ribbing together so that the right side is facing you (see the video attached).
Neckline
Start where you started the decreases for the neck hole – sc2tog (in 2 sts where you started the decreases for the v neck), 2 sc in each dc row. When you get to the other side (the front), sc2tog and continue with 2 sc in each dc row. Join with a slst at the end and finish off.
Weave in all the ends and you are finished with your crochet v neck sweater.