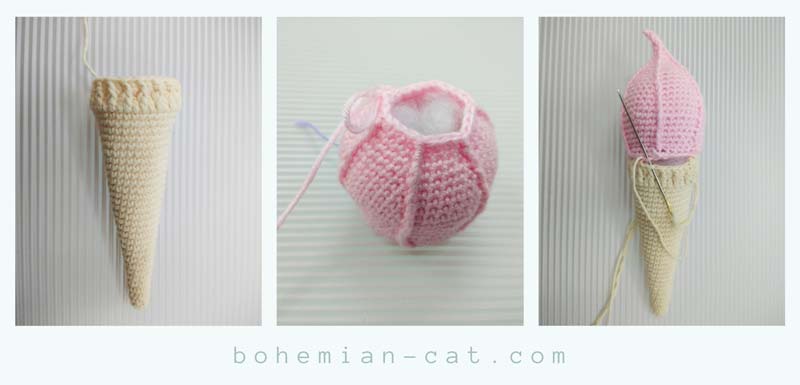
Crochet Amigurumi Ice Cream
Create your very own adorable amigurumi ice cream cone using crochet techniques. This fun and creative project allows you to customize the colors and details of your ice cream cone, making it a unique and personalized piece of art. With just a few basic crochet stitches, you can bring this sweet treat to life and add a touch of whimsy to your home decor or gift it to a friend who has a sweet tooth. The possibilities are endless when it comes to creating your own crochet amigurumi ice cream cone. Whether you're a beginner or an experienced crocheter, this project is sure to bring a smile to your face as you work on each tiny detail of the ice cream cone. From choosing the perfect yarn colors to stitching on sprinkles or a cherry on top, every step of the process is a chance to let your creativity shine. So grab your crochet hook and yarn, and get ready to make your very own sweet and whimsical amigurumi ice cream cone today!

Materials: I used cotton yarn Golden Sun 50 gr / 180 m, light yellow and pink colors. Crochet hook 2 mm. As a filler stuff, I used sintepon as in pillows. Scissors, needle with a big eye.
Measurement: total height of ice cream is 6.7 inches (17 cm).
Abbreviations Used in This Patterns:
sts= stitches
sc = single crochet
dc = double crochet
FPsc = Front post single crochet
FPdc = Front post double crochet
sl st = slip stitch
Inc = increase
Dec = decrease
The pattern is worked in continuous rounds from bottom to top. Use a stitch marker to mark the first stitch of each row; move it up as you go along.
How to crochet cone:
Start with light yellow coloured yarn. Make Magic Ring.
Round 1: Sc 4 into magic ring (4 sts)
Round 2: Inc around (8 sts)
Round 3: Sc around (8 sts)
Round 4: [Sc 3, inc], x 2 times (10 sts)
Round 5: Sc around (10 sts)
Round 6: [Sc 4, inc] x 2 times (12 sts)
Round 7: Sc around (12 sts)
Round 8: [Sc 5, inc] x 2 times (14 sts)
Round 9: Sc around (14 sts)
Round 10: [Sc 6, inc] x 2 times (16 sts)
Round 11: Sc around (16 sts)
Round 12: [Sc 7, inc] x 2 times (18 sts)
Round 13: Sc around (18 sts)
Round 14: [Sc 8, inc] x 2 times (20 sts)
Round 15: Sc around (20 sts)
Round 16: [Sc 9, inc] x 2 times (22 sts)
Round 17: Sc around (22 sts)
Round 18: [Sc 10, inc] x 2 times (24 sts)
Round 19: Sc around (24 sts)
Round 20: [Sc 11, inc] x 2 times (26 sts)
Round 21: Sc around (26 sts)
Round 22: [Sc 12, inc] x 2 times (28 sts)
Round 23: Sc around (28 sts)
Round 24: [Sc 13, inc] x 2 times (30 sts)
Round 25: Sc around (30 sts)
Round 26: [Sc 14, inc] x 2 times (32 sts)
Round 27: Sc around (32 sts)
Round 28: [Sc 15, inc] x 2 times (34 sts)
Round 29: Sc around (34 sts)
Round 30: [Sc 16, inc] x 2 times, join to ring (36 sts)
Round 31: Dc around, sl st to join (36 sts)
Round 31: [Dc, FPdc] repeat [] around, sl st to join (36 sts).
Leave a thread about 15-20 inches long. This is required to connect the cone and cream. Stuffing cone firmly.

How to crochet cream:
Make Magic Ring
Round 1: Sc 6 into magic ring (6 sts)
Round 2: Inc around (12 sts)
Round 3: [Sc, Inc] x repeat [] around (18 sts)
Round 4: [Sc 2, Inc] x repeat [] around (24 sts)
Round 5: [Sc 3, Inc] x repeat [] around (30 sts)
Round 6: [Sc 4, Inc] x repeat [] around (36 sts)
Round 7: Sc back loop only around (36 sts)
Round 8-9: [Sc 5, FPsc] x 6 times (36 sts)
Round 10: [Inc, Sc 4, FPsc] x 6 times (42 sts)
Round 11: [Sc 6, FPsc] x 6 times (42 sts)
Round 10: [Inc, Sc 5, FPsc] x 6 times (48 sts)
Round 11: [Sc 7, FPsc] x 6 times (48 sts)
Round 12: [Inc, Sc 6, FPsc] x 6 times (54 sts)
Round 13: [Sc 8, FPsc] x 6 times (54 sts)
Round 14: [Dec, Sc 6, FPsc] x 6 times (48 sts)
Round 15: [Sc 7, FPsc] x 6 times (48 sts)
Round 16: [Dec, Sc 5, FPsc] x 6 times (42 sts)
Round 17: [Sc 6, FPsc] x 6 times (42 sts)
Round 18: [Dec, Sc 4, FPsc] x 6 times (36 sts)
Round 19: [Sc 5, FPsc] x 6 times (36 sts)
Round 20: [Dec, Sc 3, FPsc] x 6 times (30 sts)
Round 21: [Sc 4, FPsc] x 6 times (30 sts)
Begin stuffing firmly. Continue to stuff after every few rounds.
Round 22: [Dec, Sc 2, FPsc] x 6 times (24 sts)
Round 23: [Sc 3, FPsc] x 6 times (24 sts)
Round 24: [Dec, Sc, FPsc] x 6 times (18 sts)
Round 25: [Sc 2, FPsc] x 6 times (18 sts)
Round 24: [Dec, FPsc] x 6 times (12 sts)
Round 25: [Sc, FPsc] x 6 times (12 sts)
Round 26-27: [ FPsc] x 6 times (6 sts)
Round 28-29: [ FPsc] x 3 times (3 sts)
Fasten off.
Sew a cone and cream passing into each loop. Sew it again to get a more embossed seam pattern.