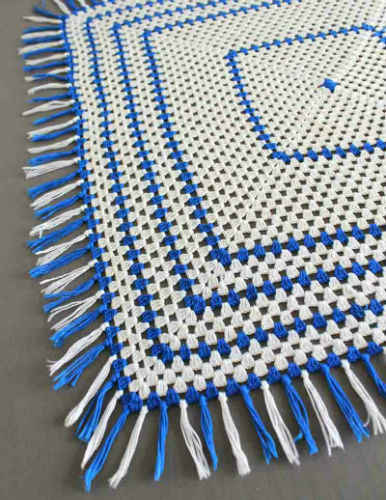
Crochet Vintage Granny Square Doily
The Crochet Vintage Granny Square Doily is a stunning and elegant DIY project that brings a touch of nostalgia to any room! By combining classic granny square motifs with intricate doily patterns, you can create a beautiful and delicate piece of home decor that adds a vintage charm to any setting. This intricate and time-consuming project requires some experience with crochet, but the end result is well worth the effort.
Skill: Easy
Size: About 17½” square (without fringe)
Materials: Size 10 Crochet Cotton Thread: Natural – 400 yds Blue – 150 yds
Crochet Hook:Steel No. 7 (1.65 mm) or size needed to obtain gauge.
Gauge: Rnds 1-4 = 2″
Special Stitches
Shell: (3 dc, ch 2, 3 dc) in same st or sp indicated.
DOILY
Rnd 1: (Right Side) Starting at center, with Blue, ch 5, join with sl st to first ch to form ring; ch 3 (counts as first dc now and throughout), 2 dc in ring, ch 2, [3 dc in ring, ch 2] 3 times; join with sl st to first dc. (12 dc and 3 ch-2 sps) Finish off and weave in ends.
Rnd 2: With right side facing, join Natural with sl st to any ch-2 sp, ch 3, (2 dc, ch 2, 3 dc) in same sp, ch 1, [shell in next ch-2 sp, ch 1] around; join as before. (24 dc, 4 ch-1 sps and 4 corner ch-2 sps)
Rnds 3-12: Sl st to next corner ch-2 sp, ch 3, (2 dc, ch 2, 3 dc) in same sp, ch 1, [3 dc in next ch-1 sp, ch 1] across to next corner, * shell in next corner ch-2 sp, ch 1, [3 dc in next ch-1 sp, ch 1] across to next corner; rep from * around; join as before. At the end of Rnd 12, there are twelve 3-dc groups across each side. (144 dc) Finish off and weave in ends.
Rnd 13: With right side facing, join Blue with sl st to any ch-2 sp, ch 3, (2 dc, ch 2, 3 dc) in same sp, ch 1, [3 dc in next ch-1 sp, ch 1] across to next corner, * shell in next corner ch-2 sp, ch 1, [3 dc in next ch-1 sp, ch 1] across to next corner; rep from * around; join as before. Finish off and weave in ends.
Rnd 14: With right side facing, join Natural with sl st to any ch-2 sp, ch 3, (2 dc, ch 2, 3 dc) in same sp, ch 1, [3 dc in next ch-1 sp, ch 1] across to next corner, * shell in next corner ch-2 sp, ch 1, [3 dc in next ch-1 sp, ch 1] across to next corner; rep from * around; join as before.
Rnds 15-23: Sl st to next corner ch-2 sp, ch 3, (2 dc, ch 2, 3 dc) in same sp, ch 1, [3 dc in next ch-1 sp, ch 1] across to next corner, * shell in next corner ch-2 sp, ch 1, [3 dc in next ch-1 sp, ch 1] across to next corner; rep from * around; join as before.
Rnd 24: Rep Rnd 13.
Rnd 25: Rep Rnd 14.
Rnds 26-27: Sl st to next corner ch-2 sp, ch 3, (2 dc, ch 2, 3 dc) in same sp, ch 1, [3 dc in next ch-1 sp, ch 1] across to next corner, * shell in next corner ch-2 sp, ch 1, [3 dc in next ch-1 sp, ch 1] across to next corner; rep from * around; join as before.
Rnds 28-35: Rep Rnds 24-27 twice.
Rnd 36: Rep Rnd 13. (36 dc-groups across each side) Finish off and weave in ends.
FRINGE
Cut a piece of cardboard 2″ wide (length of fringe). Wind thread loosely around the cardboard until full. Cut across one end; repeat with Natural and Blue thread until you have 216 strands of each color.

Fig. 1 Fig. 2
Hold together 3 stands of Blue together; fold in half. Working around last round in ch-sps, with wrong side of doily facing and using a crochet hook, draw the folded end up through corner space (Fig. 1) and pull the loose ends through the folded end (Fig. 2); draw the knot up tightly.
In the next ch-1 sp, hold 3 strands Natural together and make a tassel (as above).
Repeat tassels around, alternating colors. (Blue tassels are in each corner.)
Lay doily flat on hard surface and trim ends of fringe.