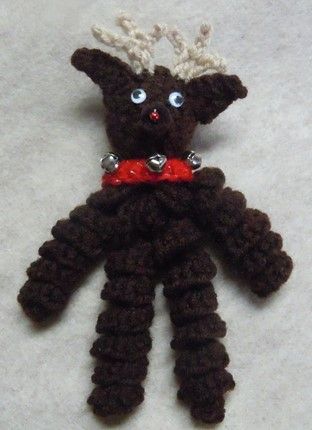
Crochet Curly Reindeer Ornament
The Crochet Curly Reindeer Ornament is a delightful addition to any holiday decor! This charming decoration brings a touch of whimsy to your Christmas tree with its curly antlers and adorable design. Handcrafted with care and attention to detail, this reindeer ornament is sure to bring a smile to your face and spark joy during the festive season. Whether you hang it on your tree or use it as a gift to spread holiday cheer, the Crochet Curly Reindeer Ornament is a festive must-have that will make your home feel warm and welcoming. So why not add a touch of handmade charm to your holidays with this cute and cuddly reindeer ornament?
Craft Supplies:
- Size G crochet hook
- Three 1/4" bells
- Two 7mm wiggle eyes
- 1.5" Styrofoam ball
- Worsted weight yarn, brown and buff
- 1/2" Brown pompom
- One red bead* from a string of pearls (approx 3mm)
- Bernat Happy Holidays Christmas silver red yarn
- Monofilament
- Tacky glue
* You can substitute a tiny red pompom for the pearl bead.
Abbreviations:
- sc = single crochet
- slst = slip stitch
- ch = chain
- st = stitch
- sk = skip
Instructions:
Legs — make 2:
- With brown, ch 30
- 2 sc in 2nd ch from hook; 3 sc in remaining ch.
- Cut yarn. Fasten off and weave loose ends back into your work.
Arms — make 2:
- With brown, ch 25
- 2 sc in 2nd ch from hook; 3 sc in remaining ch.
- Cut yarn. Fasten off and weave loose ends back into your work.
Antlers — make 2:
- With buff colored yarn, ch 6, sc in 2nd ch form hook and in next ch, ch 2. Fasten off. You should now have something that looks like a v with the bottom center of the v filled in.
- Attach the yarn to the center of the v, ch 3 and fasten off.
- Weave loose ends back into the antler.
Head:
- With brown colored yarn, ch 3, join with slst to form a ring
- 8 sc in ring
- *sc in 1st sc, 2 sc in next sc. Repeat form * around (12)
- *1 Sc in each of the next 2 sc, 2 sc in next sc. Repeat form * around (16)
- Work even for 2 rounds
- Insert a 1.5" Styrofoam ball into the head and continue to crochet with the ball inside.
- Sc in 1st st, *sk 1, sc in next 2 sts. Repeat from * around (11)
- Sc in 1st st, * sk 1, sc in next sc. Repeat from * around (6)
- *Sk 1 st, slst in next. Repeat from * around (3)
- Fasten off and weave loose ends back into your work.
- Sew the two antlers to the center top of the head.
Ears — make 2:
- With brown yarn Ch 7
- Slst in 2nd ch form hook and in next 2 ch. turn.
- Slst in each of the 3 slsts, turn
- Slst in each of the 3 slsts and in the 2 ch stitches (from the original ch6).
- Fasten off and weave ending string back into your work. Stitch the bottom edge of the ear to the top of the head; one ear on either side of the antlers. Refer to photo for approximate position.
Collar:
- With red, ch 18
- Sc in 2nd ch from hook and in each ch across
- Fasten off and weave loose ends back into your work.
- Attach three bells to the collar. One bell should be in the center of the collar. Then attach one 3/4" to the left of the center bell and one 3/4" to the right of the center bell.
Assemble your Reindeer:
- The easiest way to join the arms and legs together is to line up the top of the arms and legs altogether and whip stitch the top 3/4" or so with a yarn needle and matching yarn. Then stitch the whole arm leg assembly to the bottom of the head assembly. Be sure to put the two legs between the arms.
- Wrap the collar around the reindeer's neck and stitch the two ends together in the back.
- On the face, glue on two 7mm eyes and a pompom nose. Glue a red pearl bead on top of the pompom.
- Thread a piece of monofilament through the top of the reindeer's head and tie the ends in an overhand knot. This will be the ornament hanger.