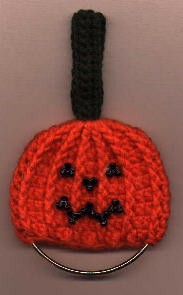
Crochet Pumpkin Towel Ring
Looking to add some autumn charm to your kitchen or bathroom? The Crochet Pumpkin Towel Ring is a delightful and functional accessory that will bring cozy fall vibes to your home décor. This handmade towel ring features a cute crochet pumpkin design that is both cute and practical. Whether you hang your kitchen towel on it or use it in the bathroom, this charming accessory is sure to add a touch of warmth and whimsy to any room. Handcrafted with love, this Crochet Pumpkin Towel Ring is the perfect way to embrace the spirit of the season while keeping your towels tidy and within reach.
Materials:
- Worsted weight yarn, orange and green
- Crochet hook size F, or size needed for gauge
- Yarn needle
- 4” metal ring
- Green button
- 8 black tri beads
- hot glue gun & glue or black sewing thread & needle
Halloween or Thanksgiving kitchen towel (or both!)
Gauge: Rounds 1-3 = 2 1/2”
Stitch guide:
fpdc — (front post dc) Yo, insert hook from the front to back to front around the post of the indicated dc, complete as a dc.
dc decrease — Yo, draw up a loop in the first dc, yo, draw up a loop in the next dc, yo, complete as a dc.
Pumpkin
With orange, ch 6; join with a sl st to form ring
Round 1: Ch 3 to count as the first dc, work 11 more dc in the ring; join with a sl st to the top of the beginning ch 3. (12 dc)
Round 2: Ch 3 to count as the first dc, fpdc around the same dc, (dc in the next dc, fpdc around the same dc) 11 times; join with a sl st to the top of the beginning ch 3. (24 sts)
Round 3: Ch 3 to count as the first dc, dc in the same st, fpdc around the next fpdc (2 dc in the next dc, fpdc around the next fpdc) 11 times; join with a sl st to the top of the beginning ch 3. (36 sts)
Round 4: Ch 3 to count as the first dc, dc in the next dc, fpdc around the next fpdc, (dc in each of the next 2 dc, fpdc around the next fpdc) 11 times; join with a sl st to the top of the beginning ch 3. (36 sts)
Rounds 5-8: Repeat round 4.
Round 9: Ch 2, dc in the next dc, fpdc around the next fpdc (dc decrease over the next 2 dc, fpdc around the next fpdc) 11 times; join with a sl st to the top of the beginning ch 3. Fasten off, leaving a long tail for sewing.
Stem
With green work 1 sc around the metal ring, ch 25
Row 1: Sc in the 2nd ch from hook and in each of the next 23 ch, sc around the netal ring; turn.
Row 2: Skip the sc formed around the ring, sc in each of the next 20 sc, ch 3, skip next 3 sc, sc in the last sc; ch 1, turn.
Row 3: Sc in the first sc, sc in each of the next 3 ch, sc in each of the next 20 sc, sc around the metal ring. Fasten off.
Finishing: Insert bare hook through the beginning ch 6 ring of pumpkin piece, and then through the buttonhole of the stem piece. Pull the stem piece through the pumpkin piece, inserting the metal ring into the pumpkin piece. Sew the button to the base of the stem piece, just above the pumpkin piece. Thread the yarn needle with the tail of the pumpkin piece.
Sew the back and front of the last row of the pumpkin piece together with a running stitch, leaving part of the metal ring bare. Pull slightly to gather.
Knot the yarn tail; weave in ends. Glue or sew the tri beads as shown in the photo to form a jack-o-lantern face.
Insert towel into the space between the pumpkin and the bare section of the metal ring.