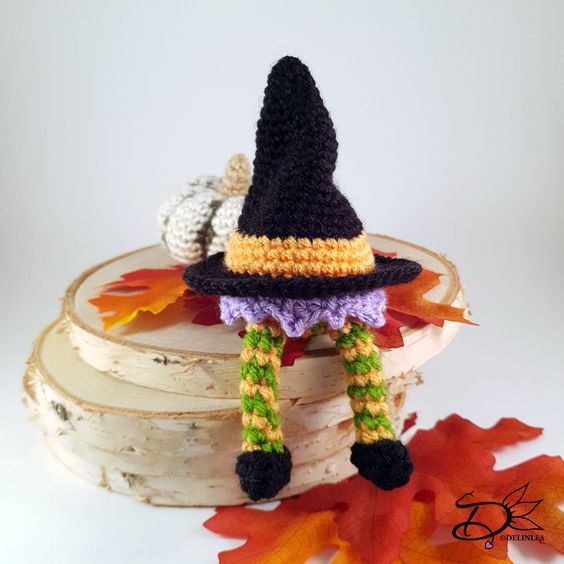
Crochet Hiding Witches Amigurumi
Crochet hiding witches amigurumi are adorable little decorations that add a touch of whimsy to any Halloween display or cozy corner of your home. These tiny witches are carefully crafted with soft yarn and detailed with intricate crochet stitches to bring a smile to your face. The hidden element in these amigurumi, such as playful peek-a-boo hands or mischievous expressions peeking out from behind a broomstick, adds an element of surprise and charm. Whether you place them on your shelves, mantelpiece, or incorporate them into a spooky centerpiece for a party, these crochet hiding witches amigurumi are sure to enchant anyone who lays eyes on them.

For this DIY you’ll need:
♥ Yarn in the colors; Black, Orange, Purple and Green. ( I used Stylecraft and some other yarn I don’t remember it’s name).
♥ Crochet Hook (I used a 2,5mm hook).
♥ Stuffing.
♥ Scissors.
♥ Sewing Pins.
♥ Yarn Needle.
Stitches used (US Terms):
Magic Ring.
CH = Chain.
SLST = Slip Stitch.
SC = Single Crochet.
HDC = Half Double Crochet.
DC = Double Crochet.
ST = Stitch.
Inc = Increase.
Dec = Decrease.
FL = Front Loop.
BL = Back Loop.
(…) = Repeat the space in brackets the given number of times.
[…] = Total number of stitches.
Pattern
Work in continues rounds, use a stitch marker to mark your first stitch of every row. This is for every part, unless stated otherwise.
Witch Hat
Start with the color Black.
1: 6SC in Magic Ring. [6]
2: (2SC, inc) 2 times. [8]
3: (3SC, inc) 2 times. [10]
4: 10SC. [10]
5: (4SC, inc) 2 times. [12]
6: (3SC, inc) 3 times. [15]
7: 15SC. [15]
8: (4SC, inc) 3 times. [18]
9: 18SC. [18]
10: (5SC, inc) 3 times. [21]
11: 21SC. [21]
12: (6SC, inc) 3 times. [24]
13: 24SC. [24]
14: (7SC, inc) 3 times. [27]
15: 27SC. [27]
16: (8SC, inc) 3 times. [30]
17: 30SC. [30]
Change to the color Orange.
18: (9SC, inc) 3 times. [33]
19: 33SC. [33]
20: (10SC, inc) 3 times. [36]
Change back to the color Black.
21: FL, (5SC, inc) 6 times. [42]
22: (6SC, inc) 6 times. [48]
23: 3SC, inc, (7SC, inc) 5 times, 4SC. [54]
24: (8SC, inc) 6 times. [60]
Fasten off and weave in tail. I didn’t stuff the hat at all, so I could get it all creasy.
Body
Start with the color Purple.
1: 6SC in Magic Ring. [6]
2: 2SC in each st around. [12]
3: (1SC, inc) 6 times. [18]
4: (2SC, inc) 6 times. [24]
5: (3SC, inc) 6 times. [30]
6: 30SC. [30]
|
8: 30SC. [30]
Change to the color Orange.
9: BL, 30SC. [30]
10: 30SC. [30]
Change to the color Green
11: (3SC, dec) 6 times. [24]
Change to the color Orange.
12: (2SC, dec) 6 times. [18]
Change to the color Green.
13: (1SC, dec) 6 times. [12] Stuff the body around here.
Change to the color Orange.
14: dec all around. [6]
Fasten off and weave in tail.
Skirt
Use the color Purple.
At row 9 of the body you worked in Back Loops only, now you are gonna rejoin in the Front Loops.
1: 30SC. [30]
2: (1SC, DC + Picot +DC in the next st, 1HDC, 1SC, Picot, 1SC) 6 times. [40]
Fasten off and weave in tail.
Leg (Make 2)
Start with the color Green.
1: 6SC in Magic RIng. [6]
2: 6SC. [6]
Change to the color Orange.
3: 6SC. [6]
Change to the color Green.
4: 6SC. [6]
Repeat row 3 and 4 until you have 11 rows total.
Fasten off and leave a long tail for sewing.
Shoes (Make 2)
Use the color Black.
1: Ch6, insert in the second Ch from hook, 4SC, 3SC in the next st, 3SC, inc. [12]
2: 12SC. [12]
3: 12SC. [12]
Fasten off and sew a small part together, until you are left with a gap for the leg to fit in.
Assembling.
By the use of sewing pins, you can position all of your parts first to see if you like it. When you are happy, you can sew it on. I recomment you doing so.
Sew the body to the head using a bit a extra thread. Mine is sewn where the dress starts, into the BL of the hat. Then sew the legs to the body and add her shoes as well. And you are already done!