Crochet Basketweave Bracelet
Crochet Basketweave Bracelet is a charming and versatile accessory that brings a touch of handmade beauty to your wrist. The intricate basketweave pattern creates a unique texture that sets it apart from ordinary bracelets. It's a fun and creative project to crochet, perfect for both beginner and experienced crafters looking to add a touch of flair to their style. The bracelet can be customized with different colors and sizes of yarn to match your outfit or mood. Whether you're making one for yourself or as a thoughtful gift for a loved one, the Crochet Basketweave Bracelet is sure to bring joy and a sense of accomplishment with every stitch. So grab your crochet hook and let's get crafting!
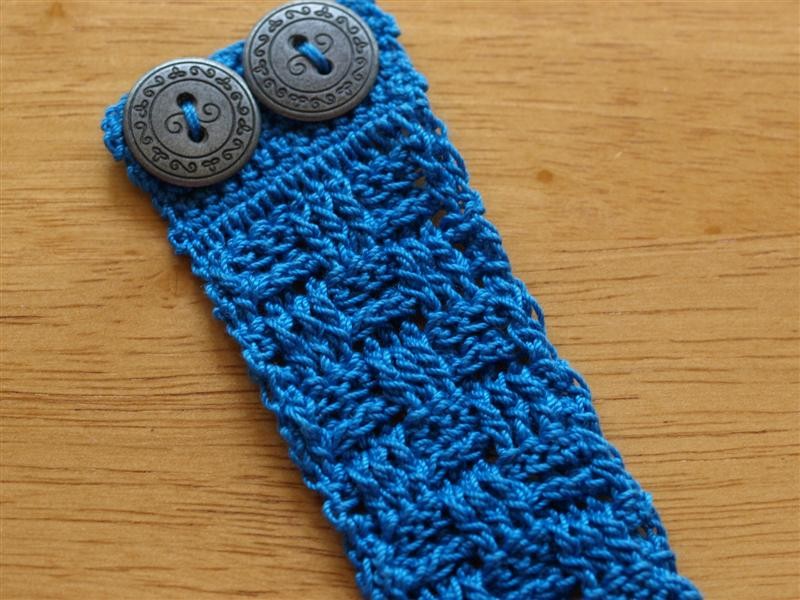
Buttons sewn onto the first 8 rows of single crochets.

Triple Crochets at the other end of the bracelet.

Crochet Basketweave Bracelet
Pattern:
Size: Approximately 1-1/2 inches wide, make it as long as you need it.
Materials:
- Size 10 crochet thread. I used Aunt Lydia’s Classic Crochet Thread in the color Blue Hawaii
- Crochet Hook – Size US 7/1.5 mm
- Buttons that will fit through your double or triple crochet.
- Stitch markers. I use small pieces of contrasting color crochet thread to use as markers.
Gauge: Not important
Abbreviations: ch = chain, sc = single crochet, sl st = slip stitch, st = stitch, dc = double crochet, fpdc = front post double crochet, bpdc = back post double crochet, tr = triple crochet
Notes: I find it helpful to use my stitch markers to mark the top of my turning chains as I make them and move the marker up as I go.
Pattern:
To begin: This portion of the bracelet is where you will eventually sew on the buttons. You can make more or less rows of single crochets, depending on the size of your buttons.
- chain 14.
- Turn. sc in 2nd ch from hook and in each ch across – 13 each row. Repeat this row until there are enough rows to accommodate the size of your buttons. I crocheted eight rows of sc’s to accommodate the size of my buttons.
Now, you are moving on to the basketweave portion of the bracelet.
- Turn. ch 2 (mark the top of your turning chain!), dc across: 12 dcs + turning ch = 13
- Turn. ch 2 (mark the top of your turning chain!), 1 fpdc, 3 bpdc’s, 3 fpdc’s, 3 bpdc’s, 1 fpdc, 1 dc in top of turning ch.
- Turn. ch2, (mark the top of your turning chain!), 1 bpdc, 3 fpdc’s, 3 bpdc’s, 3 fpdc’s, 1 bpdc, 1 dc in top of turning ch.
- Repeat basketweave row #3.
- Repeat basketweave row #2.
- Continue on in the pattern of row 2 – 3 – 3 – 2 until your bracelet is the correct length. I continued in this pattern until the working end of the bracelet just met the beginning of the bracelet when placed around my daughter’s wrist.
Now you will make the portion of the bracelet that serves as the button holes.
- Turn. ch1, sc across – 13 (last sc is in the top of the turning ch of the previous row)
- Turn. Now either ch 2 and dc across, or ch3 and tr across. Whether you dc or tr will depend on your button size and which it fits through better.
- Turn. Slip stitch across. Finish off and weave in the ends.
Show off your new bracelet! I hope you enjoy this pattern!