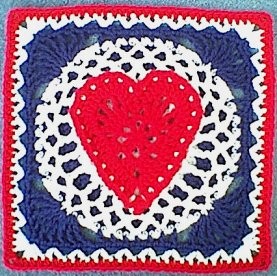
Crochet Heart of the USA Square
The Crochet Heart of the USA Square pattern is a delightful and charming design that captures the essence of American pride and love in every stitch. This square is not just a simple crochet piece; it's a heartfelt creation that embodies the spirit of unity and community. With its intricate details and vibrant colors, this pattern is a beautiful way to showcase your love for the USA through the art of crochet. Whether you're a seasoned crocheter or a beginner looking for a fun project, the Crochet Heart of the USA Square is sure to bring a smile to your face as you work on each lovingly crafted row. What a wonderful way to show your patriotic spirit and creativity all in one crochet square!
Materials:
Worsted weight acrylic yarn (I used Red Heart Super Saver), approx. 1 oz each White (MC) and Royal (CA), approx. ½ oz Cherry Red (CB); size I (5.5 mm) aluminum crochet hook (I used a Boye hook) OR Size Needed for Gauge
.
Gauge:
Rnd 1 = about 2" across, Heart (excluding White) = about 6" wide & 6½" tall
.
Finished Size:
12" square
.
Special Stitches:
V-Stitch (V-st) — (dc, ch 1, dc) in st or sp indicated
Single Crochet Decrease (sc dec) — (insert hook in next dc, draw loop through) 2 times (skipping hdc dec between dc's), yo, draw through all 3 loops on hook
Half-Double Crochet Decrease (hdc dec) — (yo, insert hook in next ch-1 sp, draw loop through) 2 times, yo, draw through all 5 loops on hook
Double Crochet Decrease (dc dec) — holding last loops of sts on hook, dc in each of the next 2 ch-3 sps, yo, draw through all 3 loops on hook
Picot (p) — ch 4, sl st in front lp and front vertical bar of sc just made
Double Treble Crochet (dtr) — yo hook 3 times, insert hook in st indicated, draw up a lp, (yo, draw through 2 loops on hook) 4 times
.
Note:
Square may need blocking when finished. To do this, I usually mist the square (front and back) with water from a spray bottle and lay out on a flat surface, pinning to shape if needed. Allow enough time for square to air dry completely.
.
.
Heart Overlay
.
With CB, ch 4, join with sl st in first ch to form ring.
.
Rnd 1: ch 4, dc in ring (counts as beginning V-st), ch 2, (V-st in ring, ch 2) 3 times, join with sl st in 3rd ch of beg ch-4. (4 V-sts, 4 ch-2 sps)
.
Rnd 2: ch 3, (counts as first hdc and 1 ch), (3 dc, ch 2, 3 dc) in next ch-2 sp, ch 1, sk next ch-1 sp, hdc in next dc, (hdc, sc) in next ch-2 sp, *ch 1, [tr, ch 1, (dtr, ch 1) 3 times, tr, ch 1] in next ch-1 sp, sc in next ch-2 sp*, rep from * to * once more, hdc in same sp as last sc, join with sl st in 2nd ch of beg ch-3. (6 dc, 6 dtr, 4 hdc, 4 tr, 3 sc, 1 ch-2 sp)
.
Rnd 3: ch 3 (counts as first dc), dc in next ch-1 sp and in each of next 3 dc, (2 dc, ch 2, 2 dc) in next ch-2 sp, (dc in each of next 3 sts, dc in next ch-1 sp) 2 times, *dc in next tr and in next ch-1 sp, (3 dc in next dtr, dc in next ch-1 sp) 3 times, dc in next tr*, hdc dec, rep from * to * once more, dc in next ch-1 sp and in each of last 2 sts, join with sl st in top of beg ch-3. (50 dc, 1 hdc dec, 1 ch-2 sp)
.
Rnd 4: ch 1, sc in same st as joining, (ch 3, sk next dc, sc in next dc) 3 times, ch 3, (sc, p, sc) in ch-2 sp, ch 3, sc in next dc, (ch 3, sk next dc, sc in next dc) 11 times, ch 3, sc dec, (ch 3, sk next dc, sc in next dc) 8 times, ch 3, join with sl st in top of first sc. Fasten Off. (26 sc, 26 ch-3 lps, 1 sc dec, 1 p)
.
Note: On Rnd 5 you will be working in skipped sts of Rnd 3 and Behind the ch-3 lps of Rnd 4. For left-handed crocheters, where Rnd 5 indicates «to the right of» or «to the left of», simply reverse these directions.
.
Rnd 5: Turn heart so that the bottom point is facing up. Join MC with sc in same ch-2 sp as, and to the right of, the (sc, p, sc) group, ch 3, sc in same sp and to the left of second sc, (ch 3, sc in next skipped st of Rnd 3) 12 times, ch 1, sk sc dec, sc in next skipped st, (ch 3, sc in next skipped st of Rnd 3) 11 times, ch 3, join with sl st in top of first sc. (26 sc, 25 ch-3 lps, 1 ch-1 sp)
.
Rnd 6: sl st into ch-3 lp, (ch 1, sc) in same lp, ch 3, sc in next lp, ch 3, dc in next lp, (ch 3, tr in next lp) 3 times, (ch 3, dc in next lp) 2 times, ch 3, hdc in next lp, (ch 3, sc in next lp) 3 times, ch 3, dc dec, (ch 3, sc in next lp) 3 times, ch 3, hdc in next lp, (ch 3, dc in next lp) 2 times, (ch 3, tr in next lp) 3 times, ch 3, dc in next lp, ch 3, sc in next lp, ch 3, join with sl st in top of first sc. (24 ch-3 lps, 9 sc, 6 dc, 6 tr, 2 hdc, 1 dc dec)
.
Rnd 7: sl st into ch-3 lp, (ch 1, sc) in same lp, ch 4, (sc in next lp, ch 4) 23 times, join with sl st in top of first sc. Fasten Off. (24 sc, 24 ch-4 lps)
.
Note: Weave in and secure ends now as it will be difficult to do so after the Overlay is attached to the Background Square.
.
.
Background Square
.
With MC, ch 4, join with sl st in first ch to form ring.
.
Rnd 1: ch 4 (counts as first dc and 1 ch), (dc in ring, ch 1) 7 times, join with sl st in 3rd ch of beg ch-4. (8 dc, 8 ch-1 sps)
.
Rnd 2: ch 4 (counts as first dc and 1 ch), dc in next ch-1 sp, ch 1, (dc in next dc, ch 1, dc in next ch-1 sp, ch 1) around, join with sl st in 3rd ch of beg ch-4. (16 dc, 16 ch-1 sps)
.
Rnd 3: ch 5 (counts as first dc and 2 ch), (dc in next dc, ch 2) around, join with sl st in 3rd ch of beg ch-5. (16 dc, 16 ch-2 sps)
.
Rnd 4: ch 3, *3 dc in next ch-2 sp**, dc in next dc*, rep from * to * around ending last rep at **, join with sl st in top of beg ch-3. Fasten Off. (64 dc)
.
Rnd 5: join CA with sl st in any dc, ch 3, dc in same st as joining, *sk next dc, 3 dc in next dc, sk next dc**, 2 dc in next dc*, rep from * to * around ending last rep at **, join with sl st in top of beg ch-3. (80 dc)
.
Rnd 6: ch 3 (counts as first dc), dc in same st as joining *dc in each of next 9 dc**, 2 dc in next dc*, rep from * to * around ending last rep at **, join with sl st in top of beg ch-3. (88 dc)
.
Rnd 7: ch 1, sc in same st as joining, sc in each st around, join with sl st in top of first sc. Fasten Off. (88 sc)
.
Note: You will be attaching the Overlay on Rnd 8. To do this, hold the Overlay in Front of the Background Square with the Wrong Side of Overlay facing the square — in other words, both pieces will have the Right Sides facing you and the Overlay will be on top of the square. Attaching is done as follows: insert hook through ch-4 lp on Rnd 7 of Overlay and into sc indicated on Rnd 7 of Square, work a sc through both pieces.
.
Rnd 8: join MC with sc in any sc, sc in next sc, *join Overlay in same st as last sc, (sc in next 3 sc, join Overlay in next sc) 2 times**, sc in next 3 sc*, rep from * to * around ending last rep at **, sc in last sc, join with sl st in top of first sc. Fasten Off. (96 sc)
.
Rnd 9: join CA with sc in joining sc directly above center of Heart, ch 1, sk next sc, sc in next sc, ch 1, sk next sc, *hdc in next sc, ch 1, sk next sc, dc in next sc, ch 2, sk next 4 sc, [(dtr, ch 1) 3 times in next sc] 2 times, [(dtr, ch 1) 2 times, dtr] in next sc, ch 2, sk next 4 sc, dc in next sc, ch 1, sk next sc, hdc in next sc, ch 1, sk next sc**, (sc in next sc, ch 1, sk next sc) 3 times*, rep from * to * around ending last rep at **, sc in next sc, ch 1, sk last sc, join with sl st in top of first sc. (36 dtr, 12 sc, 8 hdc, 8 dc, 8 ch-2 sps)
.
Rnd 10: ch 1, sc in same st as joining, sc in each st and ch-1 sp around with 2 sc in each ch-2 sp and (sc, ch 2, sc) in center dtr of each corner, join with sl st in top of first sc. Fasten Off. (140 sc, 4 ch-2 corner sps)
.
Rnd 11: join MC with sl st in any corner ch-2 sp, ch 3 (counts as first dc), (2 dc, ch 2, 3 dc) in same sp, *sk next 3 sc, (V-st in next sc, sk next 3 sc) 8 times**, (3 dc, ch 2, 3 dc) in next corner ch-2 sp*, rep from * to * around ending last rep at **, join with sl st in top of beg ch-3. Fasten Off. (32 V-sts, 24 dc, 4 ch-2 sps)
.
Rnd 12: join CB with sl st in any ch-2 corner sp, ch 2 (counts as first hdc), (hdc, ch 2, 2 hdc) in same sp, hdc in each dc and each ch-1 sp around with (2 hdc, ch 2, 2 hdc) in each corner ch-2 sp, join with sl st in top of beg ch-2. Fasten Off. Weave in ends. (136 hdc, 4 ch-2 sps)
.
Note: If you prefer, you can use the Hidden Ends technique instead of ending Rnd 12 with a sl st.