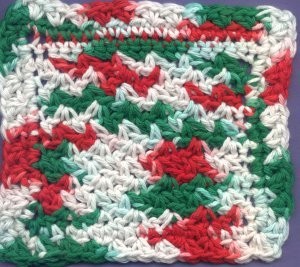
Crochet Lacy Slant V Stitch Hot Pad
Crochet Lacy Slant V Stitch Hot Pad is a lovely and functional piece that adds a touch of charm to any kitchen! This crochet pattern combines the elegance of lacy stitches with the modern twist of the V stitch, resulting in a unique and eye-catching design. Whether you are a beginner or an experienced crocheter, creating this hot pad will be an enjoyable and rewarding project. The delicate texture of the lacy slant v stitches not only provides a beautiful aesthetic but also ensures excellent heat protection for your hands and surfaces. With a wide range of yarn colors available, you can customize your hot pad to match your kitchen decor or create a thoughtful handmade gift for a loved one. Crocheting this hot pad is a fun and creative way to add a personal touch to your home while enjoying the relaxing and fulfilling art of crochet.

Materials Needed:
WW Cotton Yarn
Size «G» Hook
Approx. size: 10 x 10
Special Stitches:
Slant V Stitch: (sc, ch1, dc) in same stitch
Difficulty: Easy
Make 2
Side 1
Row 1: Ch 41, sc in second ch from hook and each stitch across. (40sc)
Row 2: Ch 1 turn, sc in same sp as ch 1, (sc, ch 1, dc) in next st to form slant V, * sk next 2 st, (sc, ch 1, dc) in next st. Repeat * across to last 3 sts, sk next 2 st, sc in last st. Ch 1 and turn.
Row 3-24:SC in same sp as ch 1, Work (sc, ch 1, dc) in each ch 1 sp across, sc in last st. Ch 1 and turn
Row 25: Sc in same sp as ch 1, sc evenly around using 2 sc in corners. Finish off and weave in ends.
Side 2:
Make same as side 1. At the end of Row 25 DO NOT finish off. Put both sides together with wrong sides facing each other. Join both sides together with a slip st, ch 1, sc in same sp. Sc around using 2 sc in corners. Join with sl st to first sc. Ch 1
Edging:
Work (sc,dc,ch 1, sc, dc) in same sp as ch 1. *sk next st, (sc,dc) in next st. Repeat * around, but use the (sc, dc, ch 1, sc, dc) in corners. Finish off and weave in ends.