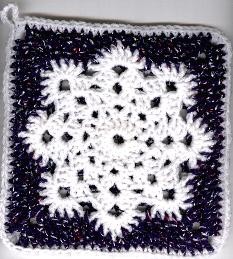
Crochet Snowflake Potholder
Crochet snowflake potholders are not just handy in the kitchen but also add a touch of whimsy and charm to your home decor. These delightful creations are perfect for protecting your hands from hot pots and pans while spreading a cozy, festive vibe in your kitchen. With their intricate snowflake patterns, they make for wonderful handmade gifts that show thoughtfulness and care. Imagine hanging them up in your kitchen to evoke a cozy winter wonderland feel or gifting them to friends and family for a heartfelt touch during the holiday season. Crocheting snowflake potholders can be a fun and easy project, allowing you to get creative with colors and designs to match your unique style. So next time you're whipping up a batch of your favorite comfort food, reach for your radiant crochet snowflake potholder and let it bring joy to your culinary adventures!
Materials:
G Hook
Color A — White
Color B — Fiesta Navy
Instructions:
With color A, ch 6; join to form a ring.
Rnd 1(right side): Ch 3 (counts as a dc on this and following rnds), 15 dc in ring; join in 3rd ch of beg ch-3 — 16 dc.
Rnd 2: Ch 5 (counts as a dc and a ch-2 sp), dc in same ch; sk next dc; *in next dc work (dc, ch 2, dc); sk next dc; rep from * 6 times more; join in 3rd ch of beg ch-5 — 8 ch- sps.
Rnd 3: Sl st in next ch-2 sp, ch 3, in same sp work (dc, ch 3, 2 dc); in rem ch-2 sp work (2 dc, ch 3, 2 dc); join in 3rd ch of beg ch-3 — 8 ch-3 sps.
Rnd 4: Sl st in next dc and in next ch-3 sp, ch 3, in same sp work (2 dc, ch 3, 3 dc); in each rem ch-3 sp work (3 dc, ch 3, 3 dc); join in 3rd ch of beg ch-3.
Rnd 5: Sl st in next 2 dc and in next ch-3 sp, ch 3, in same sp work(3 dc, ch 2, 4 dc); in each rem ch-3 sp work (4 dc, ch 2, 4 dc); join in 3rd ch of beg ch-3 — 8 ch-2 sps. Finish off Color A.
Rnd 6: Join Color B in any ch-2 sp; ch 3, in same sp work (dc, ch 3, 2 dc) — beg corner made; working in sps between dc, dc in next 5 sps, hdc in next sp, sc in next sp, sl st in next ch-2 sp; sc in next sp, hdc in next sp, dc in next 5 sps; * in next ch-2 sp work (2 dc, ch 3, 2 dc) — corner made; dc in next 5 sps, hdc in next sp, sc in next sp, sl st in next ch-2 sp; sc in next sp, hdc in next sp, dc in next 5 sps; repeat from * twice more; join in 3rd ch of beg ch-3.
Rnd 7: Ch 3, dc in next dc, in next corner ch-3 sp work corner; * dc in next 6 dc, sc in next 7 sts, dc in next 6 dc, in next corner ch-3 sp work corner; rep from * twice more; dc in next 6 dc, sc in next 7 sts, dc in next 4 dc; join in 3rd ch of beg ch-3. Fasten off and weave in ends.
Now make one more but reversing the order of colors(center will be Color B and outside will be Color A).
Outside border: I then placed them, wrong sides together, and single crocheted through both thicknesses with Color A sc along edge and doing 3 sc in each corner and adding a ch 10 loop in one corner in between the 2nd and 3rd sc of that corner.