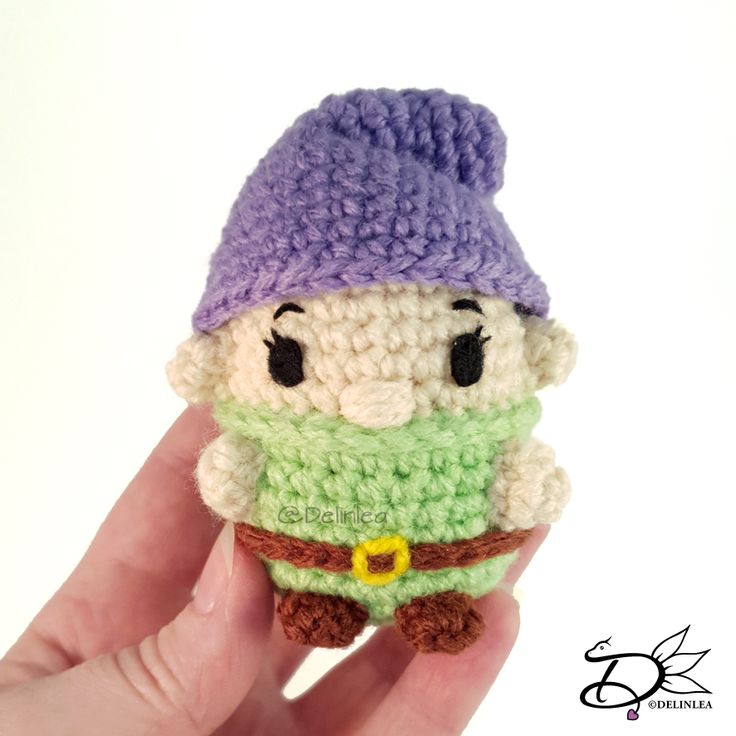
Crochet Dopey Ufufy Amigurumi Toy
Crocheting a Dopey Ufufy Amigurumi toy is not only a delightful craft project but also a fun way to bring a touch of whimsy into your life. These adorable little characters, inspired by the lovable Dopey from Snow White, are perfect for adding a sprinkle of cuteness to any space. With their fluffy texture and charming features, they make for wonderful gifts or even a cute addition to your own collection. Whether you're a seasoned crocheter or just starting out, creating your very own Dopey Ufufy is sure to bring a smile to your face and warm your heart with its undeniable charm. So grab your yarn and hook, and get ready to crochet up a little piece of magic!

For this DIY you’ll need:
Yarn in the colors; Beige, Light Green, Brown, Light Purple and a tiny bit of Yellow. (I used Budgetyarn.com)
Crochet Hook (I used a 2,5mm hook).
Stuffing.
Scissors.
Sewing Pins.
Yarn Needle.
Felt in Black.
(Fabric) Glue.
Stitches used (US Terms):
Magic Ring.
BL = Back Loops.
FL = Front Loops.
CH = Chain.
SLST = Slip Stitch.
SC = Single Crochet.
ST = Stitch.
Inc = Increase.
Dec = Decrease.
(…) = Repeat the space in brackets the given number of times.
[…] = Total number of stitches.
Pattern
Work in continues rounds, use a stitch marker to mark your first stitch of every row. This is for every part, unless stated otherwise.
Body
Start with the color Beige.
1: 6SC in magic ring. [6]
2: 2SC in each ST around. [12]
3: (1SC, inc) 6 times. [18]
4: (2SC, inc) 6 times. [24]
5: 24SC. [24]
6: 24SC. [24]
7: (3SC, inc) 6 times. [30]
8: 30SC. [30]
|
10: 30SC. [30]
Change to the color Light Green.
11: 30SC. [30]
12: Work in BL, 30SC. [30]
13: 30SC. [30]
|
17: 30SC. [30]
18: (3SC, dec) 6 times. [24]
19: (2SC, dec) 6 times. [18] Stuff the body here.
20: (1SC, dec) 6 times. [12]
21: Dec all around. [6]
Fasten off and weave in tail.
Arms/Legs and Ears (Make 6)
Use the color Beige for 2 Arms & 2 Ears. Use the color Brown for the Legs.
1: 4SC in Magic Ring.
2: (1SC, inc) 2 times. [6]
Fasten off and leave a long tail for sewing.
At row 12 you worked in back loops, work now in the front loops, SLST around the body to make an extra dimension in his clothes. This is optional.
Belt
Use the color Brown.
Make a chain of 32CH. You can adjust the size by crocheting more or less CH. Make round and sew together.
Hat
Use the color Light Purple. (I used a darker shade of this color as should been, since I didn’t had a lighter version. It still does look cute I guess, maybe I’ll change it in the future.
1: 6SC in Magic Ring. [6]
2: 2SC in each St around. [12]
3: 12SC. [12]
|
5: 12SC. [12]
6: (1SC, inc) 6 times. [18]
7: 18SC. [18]
|
9: 18SC. [18]
10: (2SC, inc) 6 times. [24]
11: 24SC. [24]
12: (3SC, inc) 6 times. [30]
13: 30SC. [30]
14: (4SC, inc) 6 times. [36]
15: 36SC. [36]
|
17: 36SC. [36]
Fasten off and leave a long tail for sewing. You can stuff the hat lightly to hold shape a bit. To keep the tip of the hat folded over, I have sewn it to the base of the hat. Just with one stitch to hold it in place.
Assembling
For amigurumi, I always use sewing pins to position all of my parts. This way you can easily move everything around until you are happy with the result. I recommend you do so as well.
Start with sewing on his legs, this way you know where the arms have to be placed, just under the rim of his green clothes. Above the green rim, you will position his ears, on both sides of his head.
Put on his belt, I recommend to secure it with a few stitches in the back so it won’t slide down. And in front, you will secure the piece of yellow yarn, make a small rectangle with the yarn so it looks like a belt.
Make a nose with some beige yarn, going back and forth on the same spot. And put his hat on, you can sew this on, it really depends on how it sit on itself.
From some black felt, cut out eyes and eyebrows, and glue those on.