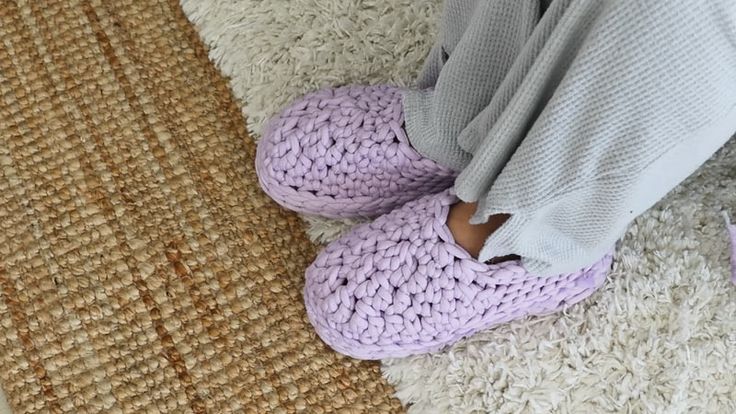
Crochet Chunky Slippers
Crochet Chunky Slippers are the coziest addition to your loungewear collection! Imagine slipping your feet into these soft and warm slippers after a long day – pure comfort! Perfect for keeping your toes toasty during chilly evenings or just adding a touch of cuteness to your outfit while lounging around the house. Their chunky design not only makes them super comfy but also gives them a trendy and stylish look. Treat yourself to a pair of these adorable slippers and get ready to elevate your relaxation game in the most delightful way!

Materials Needed & Measurements:
- Suggested Yarn:
- Super Bulky Chenille Yarn:
- Bernat Blanket (Pale Gray, Merlot)
- Bernat Baby Blanket (Overcast)
- Edging: Red Heart Hygge Fur (Cotton Tail)
- Super Bulky Chenille Yarn:
- Crochet hooks:
- N/P (10mm) for the slipper body
- K (6.5mm) for the fur trim
- Big-eye tapestry needle
- Stitch marker or safety pin
- Gauge: 7 sc stitches x 7 rows = 4 inches
Abbreviations:
- ch: chain
- sc: single crochet
- sl st: slip stitch
- st(s): stitch(es)
- inc: increase (2 sc in the same st)
- dec: decrease (sc2tog, single crochet two stitches together)
- RS: right side
Stitching Instructions for Making the Chunky Crochet Slippers Pattern:
Slipper Body (Make 2)
- Toe Section:
- Start with a Magic Ring: Wrap the yarn around your fingers to create a loop and secure it with a slip knot. This creates an adjustable starting point.
- Round 1: Foundation Circle
- Ch 1 (this does not count as a stitch). Work 6 sc into the magic ring. Pull the ring tight to close the circle.
- Sl st to the first sc to join the round. (6 sts)
- Round 2: Increase Round
- Ch 1. Work 2 sc into each st around. This creates an even circle.
- Sl st to the first sc to join. (12 sts)
- Round 3: Increase Round
- Ch 1. (Sc in the next st, 2 sc in the next st). Repeat this sequence around.
- Sl st to the first sc to join. (18 sts)
- Round 4: Final Increase Round
- Ch 1. (Sc in the next 2 sts, 2 sc in the next st). Repeat this sequence around.
- Sl st to the first sc to join. (24 sts)
- Note: If you need a wider slipper, you can add another round of increases: (Sc in the next 3 sts, 2 sc in the next st) for a total of 30 sts.
- Foot Section:
- Rounds 5-9: Build Length
- Ch 1. Sc in each st around. Continue working in a spiral (or join each round with a sl st if preferred).
- At the end of each round, sl st to the first sc to keep the seam straight. (24 sts)
- Repeat for 5 rounds or adjust based on foot length. The section should cover the mid-foot.
- Tip: Use a stitch marker to keep track of the beginning of each round if working in a continuous spiral.
- Rounds 5-9: Build Length
- Heel Section:
- Mark the Heel Area: Flatten the slipper with the seam at the back. Count 12 sts from the center back to each side and mark these stitches with stitch markers. These 12 sts will form the heel.
- Row 1 (Right Side): Ch 1. Starting at one side marker, sc across the next 12 sts. Turn. (12 sts)
- Rows 2-6: Build Heel Height: Ch 1. Sc across the 12 sts. Turn after each row. Repeat this for 5 more rows. (12 sts)
- Row 7: Begin Shaping the Heel: Ch 1. Sc2tog (single crochet two stitches together to decrease), sc in the next 8 sts, sc2tog. Turn. (10 sts)
- Row 8: Final Heel Shaping: Ch 1. Sc2tog, sc in the next 6 sts, sc2tog. Turn. (8 sts)
- Close the Heel: Fold the heel section so the edges align. Sl st across the edges to close the heel opening. Fasten off securely and weave in all loose ends.
Edging (Fur Trim)
- Attach Hygge Fur Yarn: Join the yarn at any point around the slipper opening with a K (6.5mm) hook. Secure with a slip knot.
- Round 1: Base Edging Round: Ch 1. Sc evenly around the slipper opening, working 1 sc into each stitch or row edge. Ensure even spacing for a neat edge. Sl st to the first sc to join.
- Round 2: Fur Trim
- Ch 1. Sc in each st around. Sl st to the first sc to join.
- Fasten off and weave in all loose ends.
Finishing Touches
- Optional: Add Non-Slip Soles: Use fabric glue or sew on leather patches to the bottom of the slippers for extra grip.
- Repeat for Second Slipper: Follow the same steps to create the second slipper.
With these instructions, you’ll have a pair of snug, stylish chunky crochet slippers ready to wear or gift!
No comments
Write a comment