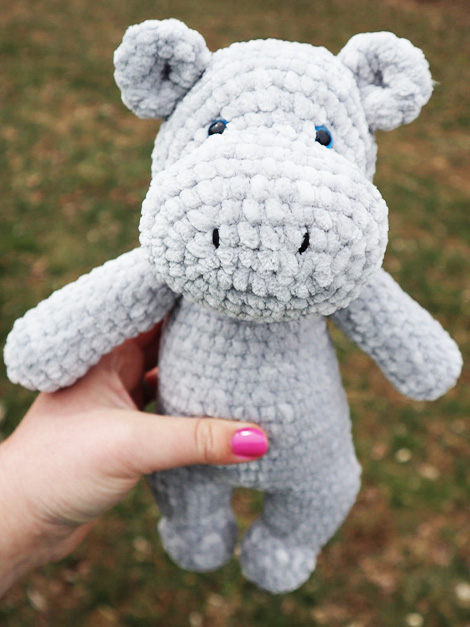
Crochet Hippo Amigurumi
Crochet hippo amigurumi is a wonderful craft project that combines cuteness with creativity! These adorable little hippos can be crocheted in various colors and sizes, making them a perfect addition to your amigurumi collection or a heartfelt handmade gift for a friend. With their big, friendly eyes and chubby bodies, crochet hippo amigurumis are sure to bring a smile to anyone's face. Whether you're a seasoned crocheter or just starting out, creating these whimsical creatures is a fun and rewarding experience that you'll enjoy from start to finish. Get your crochet hook ready and let's make some charming hippo friends!

Materials Needed:
- 2 skeins of gray velvet baby yarn
- Size 7 or 4.50 mm hook
- Stitch marker (optional)
- Tapestry needle or Yarn needle for sewing
- Scissors
- 2 safety eyes
- Colored floss for sewing face details
Finished Hippo Size: approximately 11 inches tall
Skill Level: Intermediate
Abbreviations:
- mr – magic ring (magic circle)
- sc – single crochet
- dc – double crochet
- sl st – slip stitch
- dec (inv dec) – invisible decrease
- inc (sc inc) – single crochet increase
- BLO – back loops only
Cute Amigurumi Hippo: Free Pattern
Huge Nose and Head
Round 1: ch 7, in 2nd ch from the hook, make 2 sc st, sc in next 4 sts, 3 sc in last st, turn. Make sc in the next 5 sts, then join with a sl st to the first st. (14 sts)
Round 2: ch 1, inc in the first 2 sts. Sc in the next 4 sts, inc in the next 3 sts, sc in next 4 sts, inc in the last st. Join with sl st. (20 sts)
Round 3: ch 1, inc in the first st, sc, inc, sc in the next 5 sts. Inc, sc, inc, sc, inc, sc, in the next 5 sts, inc, join with sl st. (26 sts)
Round 4: ch 1, inc, 2 sc, inc, sc in the next 6 sts, inc, 2 sc, inc, 2 sc, inc, sc in next 6 sts, inc, 2 sc, join with sl st. (32 sts)
Round 5: ch 1, inc, 3 sc, inc, sc in the next 7 sts, inc, 3 sc, inc, 3 sc, inc, sc in the next 7 sts, inc, 3 sc, join with sl st. (38 sts)
Round 6 – 7: ch 1, sc in each stitch around. Join with a sl st to the first st. (38 sts)
Round 8: ch 1, sc, dec, sc, dec, sc in the next 5 sts, inc in next 4 sts, sc in the next 5 sts, dec, sc, dec, sc in the next 12 sts. Join with sl st. (37 sts)
Round 9: ch 1, sc in each st around. Join with sl st. (37 sts)
Round 10: ch 1, sc, dec, sc in the next 3 sts, inc, (sc, inc) 7 times more [8 inc sts total]. Sc in the next 3 spaces, dec, sc in the next 13 sts, join with sl st. (45 sts)
Round 11: ch 1, sc in each st around. Join with sl st. (45 sts)
Round 12: ch 1, sc, inc x 2, sc in the next 27 sts, inc x 2, sc in the next 13 sts. Join with sl st. (49 sts)
Round 13 – 18: ch 1, sc in each st around. Join with sl st. (49 sts)
Round 19: ch 1, (dec, sc in next 4 sts), repeat around. Join with sl st. (41 sts)
Round 20: ch 1, sc in each st around. Join with sl st. (41 sts)
Round 21: ch 1, (dec, sc in next 3 sts), repeat around. Join with sl st. (33 sts)
Round 22: ch 1, (dec, sc in next 2 sts), repeat around. Join with sl st. (25 sts)
*At this point, you will want to insert safety eyes if desired and stuff the head.
Round 23: ch 1, (dec, sc), repeat around. Join with sl st. (17 sts)
Round 24: ch 1, (dec), repeat around. Join with sl st. (9 sts)
Finish off by cutting the yarn, threading a needle, and weaving it through each of the remaining stitches. Then pull tight, and weave in the ends of the yarn.
Cute Ears (make 2)
Round 1: ch 2, in 2nd ch from the hook, make 6 sc, join with sl st to form a circle. (6st)
Round 2: Ch 1, (inc) in each st around, join with sl st. (12st)
Round 3: Ch 1, (inc, 2 sc) repeat around. Join with sl st. (16st)
Round 4: Ch 1, sc in each st around. Join with sl st. (16st)
Round 5: Ch 1, (dec, sc) repeat around. Join with sl st.
Finish off and leave a long tail for sewing the ears to the head.
First Leg
Round 1: ch 2, 8 sc in the 1st ch space. Join with sl st to form a circle. (8st)
Round 2: ch 1, (inc) x8, around. Join with sl st. (16st)
Round 3: ch 1, in BLO sc in each st around. Join with sl st. (16st)
Round 4: ch 1, sc in each st around. Join with sl st. (16st)
Round 5: ch 1, sc in next 4 sts, dec, sc, dec, sc, dec, sc in the remaining 4 spaces. Join with sl st.
Round 6: ch 1, sc in next 5 sp, dec, sc in remaining 6 sts. Join with sl st.
Round 7: ch 1, sc in each st around. Join with sl st. (12st)
Round 8: ch 1, (inc, sc) around. Join with sl st. (18st)
Round 9 – 10: ch 1, sc in each st around. Join with sl st. (18st)
Finish off the first leg.
Second Leg
Round 1: ch 2, 8 sc in the 1st ch space. Join with sl st for form a circle. (8st)
Round 2: ch 1, (inc) x8, around. Join with sl st. (16st)
Round 3: ch 1, in BLO sc in each st around. Join with sl st. (16st)
Round 4: ch 1, sc in each st around. Join with sl st. (16st)
Round 5: ch 1, sc in next 4 sts, dec, sc, dec, sc, dec, sc in the remaining 4 spaces. Join with sl st.
Round 6: ch 1, sc in next 5 sp, dec, sc in remaining 6 sts. Join with sl st.
Round 7: ch 1, sc in each st around. Join with sl st. (12st)
Round 8: ch 1, (inc, sc) around. Join with sl st. (18st)
Round 9 – 10: ch 1, sc in each st around. Join with sl st. (18st)
Do not finish off.
Body
Round 11: with the second leg, ch 1, 16 sc, ch 4, sc in each stitch around the first leg, 4 sc in the next ch 4 space, sc 2 more times to finish going around the second leg. Join with sl st.
This is the base of the body. From here, you will work in rounds working up from the legs into the body.
Round 12 – 14: ch 1, sc in each st around, join with sl st. (44st)
Belly
Please note: at this point, we are going to start giving the hippo a belly, if you want the hippo to not have a large belly, you can work a single crochet in each st, from rounds 14 through rounds 22 when we begin to decrease to form its neck.
Round 15: ch 1, sc in next 3 st, dec x 3, sc in next 18 st, dec x 3, sc in next 11 st. Join with sl st.
Round 16: ch 1, sc in next 9 st, dec x 2, inc in next 6 sts, dec x 2, sc in next 10 st, inc, sc, inc, sc, inc, join with sl st.
Round 17: ch 1, sc in each st around. Join with sl st. (43st)
Round 18: ch 1, sc in next 4 sts, dec x2, sc in next 6 sts, inc x5, sc in next 6, dec x2, sc in next 8 sts, dec x2, sc in next 2 sts. join with sl st.
Round 19 – 21: ch 1, sc in each st around. Join with sl st.
Round 22: ch 1, sc in next 14 st, dec, sc, dec, sc, dec, sc, dec, sc in next 17 sts. Join with sl st.
Round 23: ch 1, 5 sc, dec around to the last 10 spaces, 10 sc. Join with sl st.
Round 24 – 28: ch 1, sc in each st around. Join with sl st.
Round 29: ch 1, (dec, sc in next 5) around. Join with sl st.
Round 30: ch 1, (dec, sc in next 4) around. Join with sl st.
Round 31: ch 1, (dec, sc in next 3) around. Join with sl st.
Round 32: ch 1, sc in each st around. Join with sl st.
Round 33: ch 1, (dec, sc in next 2) around. Join with sl st.
Finish off. Leave a long tail for sewing.
Arms (make 2)
Round 1: ch 2, 6 sc in the 1st ch sp. Join with sl st to form a circle. (6st)
Round 2: ch 1, inc in each st around. Join with sl st. (12st)
Round 3 – 13: Ch 1, sc in each st around. Join with sl st. (12st) [make 10 rounds]
*fill arms with stuffing
Round 14: ch 1, (dec, sc) around. Join with sl st. (8st)
Round 15 – 16: ch 1, sc in each st around. Join with sl st.
Finish off, and leave a long tail for sewing.
Tail (optional)
Row 1: chain 10, sl st in the 3rd ch from the hook, ch 3, sl st in 3rd ch from hook, ch 3, sl st in 3rd ch from the hook. Sl st in each of the remaining ch, until you get to the last. Finish off and leave a long tail for sewing the tail to the butt of the hippo.
Free Crochet Hippo Pattern – Assembly
Now that the body parts have been created, it’s time to sew them all together into your finished hippo. I like to start with the head.
To do this, pinch each ear, and then sew it in place on the hippo’s head. Make sure to place them where you prefer, before sewing them securely.
Next, I would recommend sewing the arms onto the top of your crochet hippo’s body. After the arms are sewn securely in place, weave in the ends of the yarn.
Finally, sew the hippo’s head onto its body. You may want to sew around the base of its head and neck a few times to make sure it is held securely. After you are done sewing the head and body together, tie a knot, and weave in the ends of the yarn to finish.
Finishing Touches
I believe that it’s the small details that go a long way toward making this hippo pattern into an adorable little guy, so feel free to add as many finishing touches as you want to make this stuffy super cute! One of my favorite things to do is to use colored floss to stitch on a face and eyelashes.