Crochet Picture Frame Square
The crochet picture frame square is a wonderful and creative way to add a personal touch to your decor. Not only does it offer a fun and engaging project for crochet enthusiasts, but it also allows you to showcase your favorite pictures in a unique and stylish manner. By incorporating different colors and stitches, you can customize each frame square to match your individual taste and the aesthetics of your space. Whether you're a beginner or an experienced crocheter, this project provides an opportunity to unleash your creativity and express yourself through a delightful and functional piece of artwork. So go ahead, pick up your yarn and hook, and let your imagination run wild as you create these charming picture frame squares to display your cherished memories with a touch of handmade charm.
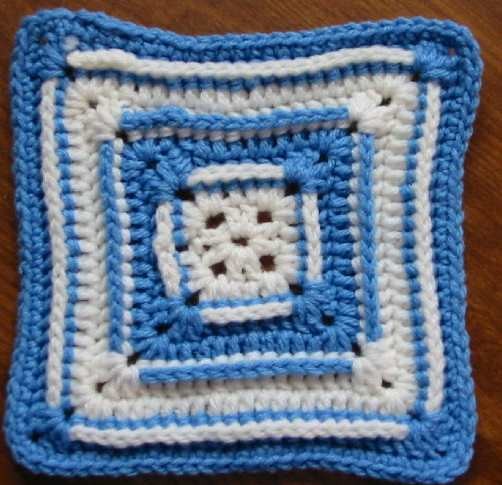
Finished size: 7 inches
Materials needed: Small amounts of worsted weight yarn in 2 colors, size H crochet hook
To work BP dc, YO once, insert hok from back to front around post of st immediately below, yo and draw up a loop, (yo and draw through 2 loops) twice.
With Color A, ch 5, join with a sl st to form a ring.
Rnd 1: Ch 3, dc in ring, ch 2, * 2 dc in ring, ch 2; rep from * twice more, join with a sl st in top of beg ch 3.
Rnd 2: Ch 3, dc in next st, in next ch-2 corner sp work (2 dc, ch 2, 2 dc) (corner made), * dc in each st across to next ch-2 corner sp, work corner in next sp, rep from * twice more, join in top of beg ch 2. Finish off Color A.
Rnd 3: Join Color B. with sl st in any ch-2 corner sp, ch 3, in same sp work (dc, ch 2, 2 dc), work BP dc around post of next 6 dc, * work corner in next ch-2 sp, work BP dc around post of next 6 dc; rep from * twice more, join w/sl st in top of beg ch 3.
Rnd 4: Ch 3, dc in next st, work corner in next ch-2 sp. * dc in each st across to next ch-2 corner sp, work corner in next sp, rep from * twice more, work dc in each remaining dc, join in top of beg ch 2. Finish off Color B
Rnd 5: Join Color A. with sl st in any ch-2 corner sp, ch 3, in same sp work (dc, ch 2, 2 dc), work BP dc around post of next 14 dc, * work corner in next ch-2 sp, work BP dc around post of next 14 dc; rep from * twice more, join w/sl st in top of beg ch 3.
Rnd 6: Ch 3, dc in next st, work corner in next ch-2 sp. * dc in each st across to next ch-2 corner sp, work corner in next sp, rep from * twice more, work dc in each remaining dc, join in top of beg ch 2. Finish off Color A.
Rnd 7: Join Color B. with sl st in any ch-2 corner sp, ch 3, in same sp work (dc, ch 2, 2 dc), work BP dc around post of next 22 dc, * work corner in next ch-2 sp, work BP dc around post of next 22 dc; rep from * twice more, join w/sl st in top of beg ch 3.
Rnd 8: Ch 1, work sc in each st around square, working 3 sc in each ch-2 corner sp. Finish off and weave in all ends.