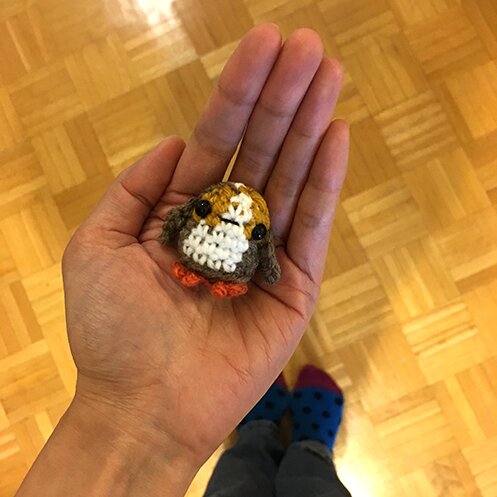
Crochet Tiny Porg
Crocheting a tiny Porg can be a delightful and heartwarming experience! These adorable creatures from the Star Wars universe come to life in the palm of your hand as you carefully loop and weave each stitch. Whether you're a seasoned crocheter or just starting out, creating a miniature Porg can bring a smile to your face and add a touch of whimsy to your day. With their fluffy bodies and curious eyes, these little crochet companions are perfect for gifting to a fellow Star Wars fan or simply keeping you company while you indulge in your favorite crafting hobby. So grab your yarn, hook, and imagination, and let's bring these lovable creatures to life, one stitch at a time!

To make your own tiny porg, you’ll need:
- Small amount of mustard, white, brown and orange yarn in worsted weight
- 3.5 mm hook
- 2.5 mm hook (for feet and weaving in ends)
- 2 black safety eyes (3mm), or round black beads
- Black thread and sewing needle
- Yarn needle
- Yarn ends (for stuffing), or polyester stuffing
Pattern:
Body:
Note: beginning ch 1 does not count as a stitch throughout.
Round 1: With brown, ch 4, 2 sc in 2nd ch from hook, sc in next ch, 3 sc in last ch, sc in the remaining loop of the next ch (the ch that has only 1 sc in it), sc in the next ch (the ch with the beginning 2 sc in it), sl st in first sc of round.
Round 2: ch 1, 2 sc in first sc, sc in next 3 sc, 3 sc in next sc, sc in next 3 sc, sc in next sc (the sc with the beginning 2 sc in it), sl st in first sc of round.
In the next round we begin to incorporate other colours.
Round 3: ch 1, in back loop only, sc in next 7 sc. When completing the 7th sc, attach and change to white. Carrying the brown yarn (i.e. wrap it in your stitch) as you crochet with white, sc in the next 4 sc. When completing the 4th sc, change back to brown, sc in last sc, sl st in first sc.
Round 4: With brown, ch 1, sc in next 7 sc, change to white, carrying the brown as you go, sc in next 4 sc, change to brown, sc in last sc, sl st in first sc.
Round 5: Repeat round 4.
Round 6: With brown, ch 1, sc in next 6 sc. Change to yellow and carrying brown as you go, sc in next 2 sc, change to white and carry the brown and yellow as you go, sc in next 2 sc, change to yellow and carry the brown as you go, sc in next 2 sc, change to brown, sl st in first sc.
Round 7: Repeat around 6.
After round 7, install safety eyes (or sew on beads for eyes) in between the 2 yellow stitches between rounds 6 and 7. Sew on mouth. Stuff with yarn ends or stuffing.
Round 8: With brown, ch 1, 2 sc tog three times, change to yellow and fasten off brown, 2 sc tog with yellow, change to white and carry the yellow as you go, 2 sc tog with white, change to yellow and fasten off white, 2 sc tog with yellow, sl st in first sc of round, fasten off, leave a long tail. Weave the tail in the remaining stitches around and cinch the opening close, secure and fasten off, weave in ends.
Wings (make 2): With brown, ch 2, 5 sc in 2nd ch from hook, ch 2, sl st in 2nd ch from hook (forming a point), sc in ch with the 5 sc in it, sl st in first sc of round, leave a tail for sewing, fasten off. (I only leave a tail for sewing on one wing, not both.
Sew on wings: Position the wing with the yarn tail for sewing on the side of the body, thread the yarn needle in the yarn tail, insert needle where you want the first wing, pull the needle through the body so the needle comes out on the other side where you want the other wing to be. Thread the other wing through the needle, and sew back and forth through the body to secure both wings at the same time. Fasten off, weave in ends.
Feet:
Feet are made linked together with a few ch in between.
With orange, *ch 3, sl st in 2nd ch from hook, sl st in next ch, ch 2, sl st in 2nd ch from hook, sl st in very first ch made, ch 3, sl st in 2nd ch from hook, sl st in next ch, sl st in very first ch made*, ch 2 (link between feet), then repeat from * to * once more. Fasten off and leave a long tail for sewing.
Position feet under body and sew on with yarn tail, fasten off and weave in ends.