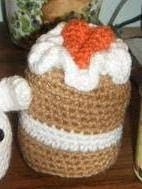
Crochet Carrot Cake
Introducing the Crochet Carrot Cake, a delightful and unique creation that combines the art of crochet with the mouthwatering appeal of a carrot cake. This whimsical masterpiece is a feast for the eyes and a treat for the senses. Imagine a cake that is not only delicious to taste but also visually stunning, with intricate crochet patterns adorning its surface. Each stitch is carefully crafted to mimic the texture and appearance of a real carrot cake, complete with fluffy layers, creamy frosting, and even tiny fondant carrots on top. This unique creation is not only a visual delight but also a testament to the creativity and skill of crochet artists. It showcases the endless possibilities of crochet as an art form, pushing the boundaries of what can be achieved with a simple hook and yarn. Whether displayed as a centerpiece at a special occasion or gifted to a loved one, the Crochet Carrot Cake is sure to leave a lasting impression and spark conversations about the incredible talent and imagination behind its creation.

Materials: (US) size F hook, worsted weight yarn: less than 1 ounce each of Warm Brown, and Soft White; scrap amounts of Carrot, and (optional)Paddy Green (Red Heart Super Saver was used for example), large handful of fiberfil stuffing, 2 small pieces of cardboard or plastic (I used circles cut from a plastic milk jug), tapestry needle.
NOTE: Entire piece is worked in the round without joining unless otherwise noted.
TOP
With Warm Brown and using adjustable loop
Round 1: 6 sc into loop. (6 sc)
Round 2: 2 sc in each st around. (12 sc)
Round 3: (2 sc in next st, sc in next st) 6 times. (18 sc)
Round 4: (2 sc in next st, sc in each of next 2 sts) 6 times. (24 sc)
Round 5: (2 sc in next st, sc in each of next 3 sts) 6 times. (30 sc)
Round 6: (2 sc in next st, sc in each of next 4 sts) 6 times. (36 sc)
Round 7: sc in each st around, sl st in next st to join, fasten off leaving long tail for sewing.
CAKE
With Warm Brown and using adjustable loop
Round 1: 6 sc into loop. (6 sc)
Round 2: 2 sc in each st around. (12 sc)
Round 3: (2 sc in next st, sc in next st) 6 times. (18 sc)
Round 4: (2 sc in next st, sc in each of next 2 sts) 6 times. (24 sc)
Round 5: (2 sc in next st, sc in each of next 3 sts) 6 times. (30 sc)
Round 6: (2 sc in next st, sc in each of next 4 sts) 6 times. (36 sc)
Round 7: sc in each st around.
Round 8: working in BLO, sc in each st around.
Rounds 9-11: sc in each st around.
Round 12: change to Soft White, sc in each st around.
Rounds 13 and 14: sc in each st around.
Round 15: Change to Warm Brown, sc in each st around.
Rounds 16 — 18: sc in each st around, at end of round 18 sl st in next st to join, fasten off, weave in ends.
ICING
With Soft White and using adjustable loop
Round 1: 6 sc into loop. (6 sc)
Round 2: 2 sc in each st around. (12 sc)
Round 3: (2 sc in next st, sc in next st) 6 times. (18 sc)
Round 4: (2 sc in next st, sc in each of next 2 sts) 6 times. (24 sc)
Round 5: (2 sc in next st, sc in each of next 3 sts) 6 times. (30 sc)
Round 6: 3 sc in each st around, sl st in next st to join, fasten off, weave in ends.
CARROTS (make 2)
With Carrot and using adjustable loop
Round 1: 8 sc into adjustable loop. (8 sc)
Round 2: sc in each st around.
Round 3: sc in each of next 6 sts, sc2tog. (7 sc)
Round 4: sc in each of next 5 sts, sc2tog. (6 sc)
Round 5: sc in each of next 4 sts, sc2tog. (5 sc)
Round 6: sc in each of next 3 sts, sc2tog. (4 sc)
Round 7: sc2tog, sc in next st, leave last st unworked, do not join, ch 1 and pull tight, fasten off leaving long tail for sewing. (2 sc)
ASSEMBLY
1) Optional: For tops of CARROTS, cut two 4 inch pieces of Paddy Green. Fold each piece in half and using a lark's head knot (fringe knot), attach 1 strand to each CARROT. Trim to desired length. Using tip of tapestry needle, split the plies of yarn to fray.
2) Arrange CARROTS as desired on top of ICING and using long tail, sew into place.
3) With Soft White, sew ICING piece to TOP piece between rounds 5 and 6.
4) Using the TOP piece as a template, cut 2 circles from the cardboard (or plastic) to fit just inside the CAKE piece. Place one of the circles in the bottom of the CAKE piece. Stuff with fiberfill. Place other circle on top of fiberfil.
5) Using the long tail left at the end of round 7, sew the outer edge of the TOP piece to the top edge of the CAKE piece.
Enjoy!