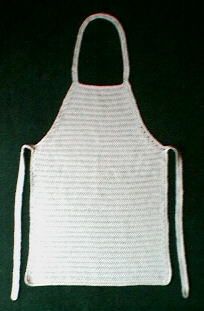
Crochet Basic Apron
Crocheting a basic apron can be a fun and rewarding project that allows you to showcase your creativity while also creating a practical item for your kitchen. With just a few simple stitches and some yarn, you can customize your apron to match your style and color preferences. Whether you choose a classic pattern or decide to experiment with unique designs, the process of crocheting an apron is a fantastic way to unwind and express yourself through crafting. Plus, once your apron is complete, you'll have a charming and personalized accessory to wear while cooking or baking. Overall, crocheting a basic apron is not only enjoyable but also results in a functional and delightful addition to your culinary adventures!
Materials
About 1/2 cone of worsted weight cotton yarn or 2 balls of Aunt Lydia’s
Denim
Crochet hook size H
Gauge: Rows 1-5 = 20” x 1 3/4”
To work a sc dc: Insert hook in first indicated st and pull up a loop, insert
hook in next st and pull up a loop, yo and pull through all 3 remaining loops
on hook.
To work a dc dec: Yo, insert hook in first indicated st and pull up a loop, yo
and pull through 2 loops on hook, yo, insert hook in next st and pull up a
loop, yo and pull through 2 loops on hook, yo and pull through all 3
remaining loops on hook.
Ch 66
Row 1: Sc in the 2nd ch from hook and in each remaining ch across; ch 2,
turn. (65 sc) Note: the “ch 2” at the end of rows does NOT count as the first
dc of the next row.
Row 2: Dc in ea sc across; ch 1, turn. (65 dc) (Mark this as right side.)
Row 3: Sc in ea dc across; ch 2, turn. (65 sc)
Row 4: Dc in ea sc across; ch 1, turn. (65 dc)
Rows 5-48: (Repeat rows 3 and 4) 22 times.
Row 49: Sc dec over first 2 sts, sc across to within the last 2 sts, sc dec over
the last 2 sts, ch 2, turn. (63 sc)
Row 50: Dc dec over the first 2 sts, dc across to within the last 2 sts, dc dec
over the last 2 sts; ch 1, turn. (61 dc)
Rows 51-60: (Repeat rows 49 and 50) 10 times. You should have 41 dc at
the end of row 60.
Row 61: Sc in each sc across; ch 2, turn. (41 sc)
Row 62: Dc dec over the first 2 sts, dc across to within the last 2 sts, dc dec
over the last 2 sts; ch 1, turn. (39 dc)
Row 63: Sc in each sc across; ch 2, turn. (39 sc)
Rows 64-75: (Repeat rows 62 and 63) 6 times. You should have 27 sc at the
end of row 75.
Row 76: Sl st in each st across. (27 sl st’s)
Edging, Neck Strap and Ties
Round 1: Ch 100 (or length needed for neck strap — 100 works well for a
man’s size), join with a sl st to the last sl st on row 76 being careful not to
twist ch; turn; ch 3 to count as the first dc, skip first ch, dc in the next 99
ch’s; continuing around apron, dc in the side of rows 76-49, working 1 dc in
the side of sc’s and 2 dc in the sides of dc’s; ch 102 for the first tie, dc in the
3rd ch from hook and in each of the next 98 ch’s; continuing around apron,
dc in the side of rows 48-2, working 1 dc in the side of sc’s and 2 dc in the
sides of dc’s; 3 dc in the side of row 1; dc in the base of each foundation ch
across; 3 dc in the side of row 1; dc in the side of rows 2-48, working 1 dc
in the side of sc’s and 2 dc in the sides of dc’s; ch 102 for the second tie, dc
in the 3rd ch from hook and in each of the next 98 ch’s; dc in the side of
rows 49-78, working 1 dc in the side of sc’s and 2 dc in the sides of dc’s;
join with a sl st to the top of the beginning ch 3.
Round 2: (See illustration) Starting at the red X in the illustration, sl st in
each st around, working around the ties by first working sl st’s in the base of
the foundation ch’s, then working 2 sl st’s in the last dc, then working sl st’s
in the tops of the tie dc’s; join with a sl st to the first sl st. Fasten off. Weave
in ends.
